

This is one of the first blog posts that I wrote in 2016 but never published. Maybe it's time 😀
This Christmas I've decided to decorate my cozy New York apartment in rustic chic style - pretty raw and rough but with occasional sparkles and smooth silky fabric. It is pretty simple to make these burlap rustic no-sew Christmas stockings. Let me show you how I did it.
It would be easier with a sewing machine, but since I don't own one I had to come up with some other solution, which is a glue gun, but you are welcome to use any other tools to simplify the process.
Disclaimer: Please note, that some of the links below are affiliate links and I will earn a commission if you purchase through those links (at no additional cost to you). Thanks for your support this way.
Materials:
- Burlap
- Glue gun
- Jute twine
- Beige velvet (I got a piece in Fashion District where they even gave me a discount because the seller adored Aspen, my beloved American Eskimo :))
- Wood buttons
- Burlap flower, tutorial here.
- White letters (Michael's has great variety and awesome discounts)

Instructions:
- Make a template of a stocking. With chalk draw a contour, leaving 1 in extra on all the sides.
- Burlap is a very tricky material and can leave little fibers. It's important to cut it in a certain way so it won't unravel unevenly. Great tutorial for it is here.
- You should get something like this. I prefer to cut it leaving plenty of space on the sides for easier trimming later.
- Our next step is to cut out velvet. In my case, it's 7 inches, but it could be customized.
- Glue velvet parts to burlap
- Don't forget to add a velvet hook to it.
- Glue two parts of stockings together by the drawing lines.
PIN FOR LATER>>>>>>>>
- Glue together parts of velvet
- Using jute twine we do simple edging stitch all over our stocking. I was cutting edges to the shape right before stitching in order to avoid the unraveling of burlap.
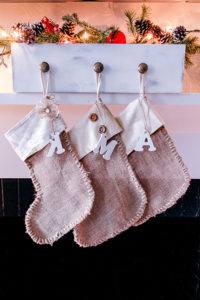
- We are almost done! Just need to decorate our stockings by theme or with any scraps that you have by your side. For my stocking, I used some lace, burlap flower, wooden buttons, and white letters with our initials. Of course, Aspen got a stocking as well. We will fill it up with his favorite bones and snacks on Christmas Eve (I hope he won't take it down while trying to get it haha)


That's it! Our no-sew burlap Christmas stockings are ready to use. You can fill it up with candies, small presents, and other goodies. Can't wait to open mine 😉
Your burlap rustic no-sew Christmas stockings are ready. Do you have a place to hang them? If not, check out this Rustic Stocking Holder that I made that year. I had so much fun building it, hope you will enjoy it as well!
I hope you enjoyed this tutorial! If you like it, follow me on Instagram @ifonlyapril. I try to post in stories my progress with all the projects.
Here is the link to my YouTube Channel where I post videos about simple DIY decor, mom hacks, and activities for kids.
Also, don't forget to follow me on Pinterest, where I create inspiration boards for my next projects.
YOU MIGHT ALSO LIKE
In this post where I share 15 HANDMADE ORNAMENTS IDEAS

If you have kids and would like to know how to toddler-proof your Christmas tree, you should check this out.
A rustic Advent calendar is a great way to start the holiday season on a great note!
What’s your handmade Christmas looks like this year?
I hope you like these handmade burlap rustic stockings and will make it yourself! If you do, share it with me, I’d love to see what you create! And don’t hesitate to ask me any questions. Follow me on Instagram @ifonlyapril. I try to post stories behind the scenes for my projects.
xoxo,
April


Leave a Reply