• Skip to primary navigation
  • Skip to main content
  • Skip to primary sidebar
If Only April
  • MEET APRIL
  • DIY PROJECTS
    • Kids projects
    • DIY furniture
    • Design plans
    • DIY holiday projects
    • Macrame
    • Transformations
    • Woodworking
  • VIDEOS
  • CONTACT
  • SHOP
    • Facebook
    • Instagram
    • Pinterest
    • YouTube
menu icon
go to homepage
search icon
Homepage link
  • MEET APRIL
  • DIY PROJECTS
    • Kids projects
    • DIY furniture
    • Design plans
    • DIY holiday projects
    • Macrame
    • Transformations
    • Woodworking
  • VIDEOS
  • CONTACT
  • SHOP
×

How to make an epoxy Christmas tree with wooden circles

Please note, that some of the links below are affiliate links and I will earn a commission if you purchase through those links (at no additional cost to you). Thanks for your support this way.

FacebookPinPrintEmail

I saw this cool concept of a wooden Christmas tree on Etsy and thought it would be cool to try to make it with epoxy. That's how the idea of this Christmas tree with wood and epoxy was born.

This one that is sold on Etsy is made differently and I would love to try it too once. It doesn't have epoxy in between the wooden circles. And I thought that it did!

I guess we can call my project a happy accident. It turned out fabulous!

Ok. Will tell you below what I've learned from the process, my mistakes, and what I'd do differently to make a Christmas tree from wood and epoxy.

Related:

DIY pinboard with epoxy butterflies

Tips on how to use epoxy for small projects

Materials

  • Epoxy resin
  • Melamine board
  • Silicone
  • wooden circles (small and large)
  • Screws
  • Tuck tape

Instructions

Step 1 - make a mold

Making a mold isn't as hard as it sounds. And it doesn't have to look perfect, it just needs to be functional and don't let epoxy escape.

Wrap melamine board with the tape

How to make a mold for epoxy projects

Since I made custom sizes, I had to create a mold for them. I already had an experience with a mold for the outdoor console with cement tabletop. To make a mold for epoxy is similar but it needs some tweaks.

For the base, I also used a melamine board, great that I already had it left from another project. (I guess my hoarding skills paid off for once haha)

The problem with melamine board and epoxy is that epoxy sticks to them. It seems that epoxy sticks to a lot of surfaces.

Here is a list of what epoxy doesn't stick to:

  • Parchment or wax paper
  • Sheathing or tuck tape
  • Silicone
  • vinyl
  • Plastic

I thought that tuck tape would be my best option. I got it at Home Depot and taped the melamine board. Now thinking about it, I could easily use any plywood board. 🤔 Good ideas seem to be always late haha

I also made sure to cover the sides with tape as well. I cut 1" strips for the sides to shape the triangle with.

Arranged the stripes so they shape 3 triangles (I figured if I started this whole process I should make at least a couple of the trees. Eventually I realized that I don't have enough resin for all of them and made only two).

Arrange it to make 3 triangles

The next step is to attach sides to the board. I started using screws but ran out of them and thought that brad nails would do just fine. Well, it works in the end but wasn't easy to separate sides from the mold. If you use screws, it would make your life easier later on.

Note: don't forget to drill pilot holes for the screws or you run into a risk of splitting the melamine board

Add silicone at the edges

We also need silicone to cover the edges of the mold so the epoxy wouldn't escape through the gaps. For that, you can find the cheapest silicone and run it over the edges. Don't forget to add silicone on the sides of the mold as well, they are often overlooked.

Then let it dry overnight and the mold is ready to use!

Don't forget to add silicone to the edges

PIN IT TO MAKE FOR CHRISTMAS

Step 2 - prepare your materials

For the easier release of the mold, everyone recommended using something. I didn't want to buy a whole can of epoxy releaser since I wasn't sure when I'd be using it again.

So I used vaseline. Just rub it all over your mold and you are good to go!

Mix epoxy as per instructions on the bottle. Don't forget to wear gloves since epoxy isn't very safe to work with.

Related: Tips on how to work with epoxy

Step 3 - arrange wood pieces inside the mold

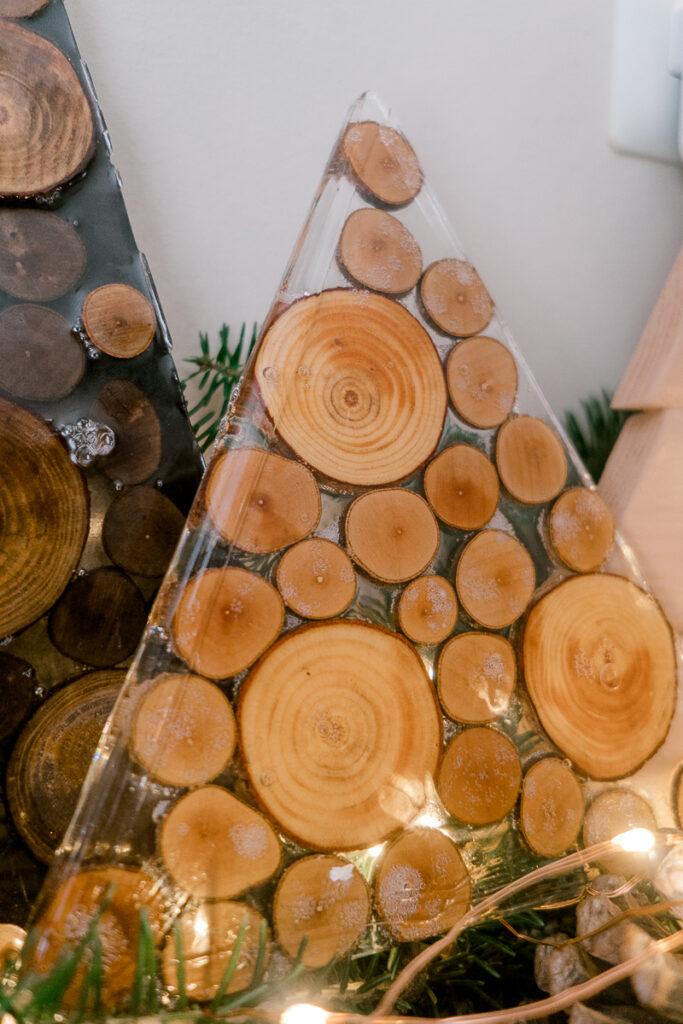
Lay down round circles inside the mold. I like to put a larger circle down and then surround it with smaller ones.

When you like the way wood circles are arranged, pour epoxy over it.

Step 4 - adding epoxy to the mold

For one tree I used clear epoxy, for another one I decided to get creative and add black acrylic paint.

That didn't work as well as I imagined it in my head - black color covered wooden circles almost completely and they became barely visible. That was not the look I was going for!

And then I realized that the tree that I got inspired by was simply arranged on the black backboard. And the space between logs was hollow! That was not epoxy at all!

Anyway, I let it dry overnight.

When it was time to de-mold it, I ran into a little problem. It was not that easy to take off brad nails - so make sure to use screws next time.

I used Vaseline on only one mold but both of them came off the tape relatively easily.

They do have little bubbles inside and to avoid them you need to have a bit of patience and tap the sides of the mold so the epoxy can settle. It doesn't bother me though! I love the imperfections.

That's it!!! Aren't they gorgeous? They came out so much better than I imagined. I would love to try to make it again.

You could also make a little stand for them, like here. But I felt that they were fine just standing on the mantle.

What do you think about these handmade Christmas trees from epoxy with wooden circles?

I know they have a lot of imperfections and bubbles but I love them the way they are!

I hope you'll give it a try and let me know how it went. You can tag me on Instagram @ifonlyapril to be featured.

If you'd like to watch me make this Christmas tree from wood and epoxy along with other fun DIY Christmas decorations, you can on my YouTube channel.

xoxo,

April

Share this:

  • Tweet
  • Print
« DIY affordable Christmas decorations ideas for your home
Entryway closet makeover plans and ideas »
FacebookPinPrintEmail

Reader Interactions

Leave a Reply Cancel reply

Your email address will not be published. Required fields are marked *

Primary Sidebar

Hi, I'm April! I love woodworking and making things! I hope you will stay for a while and get inspired to make something!

More about me →

Popular

  • Little girl bedroom makeover inspired by spring
  • The progress of Sia's bedroom and my favorite finds for her room
  • 10 LEGO table ideas that kids would be excited about
  • Sia's room makeover moodboard

ifonlyapril

DIY single mom | 📍CT
Drogo has been such a good boy lately. I can't bel Drogo has been such a good boy lately. I can't believe he is only 7 months and will continue growing🤯 but I wouldn't change him for anyone else❤️ 
#dogsofinstagram #singlemoms #singlemomlife #germanshepherd #loveislove #germanshepherds #germanshepherdpuppy #longcoatgsd #doggydrogo #puppiesofinstagram #puppiesofig
It felt good 😁 #singlemoms #singlemomlife #ever It felt good 😁
#singlemoms #singlemomlife #everydaylife #singlemomlife💪 #productivity #funny #chooseyourself
How could I dare to start another room before fini How could I dare to start another room before finishing kids bedrooms first?😂 well, we'll keep you posted😄
#diyroommakeover #gracopaintsprayers #diypanelling #ifonlyapril_house #diyprojects #sherwinwilliams #singlemoms #singlemomlife #roomtransformation
A regular Saturday here🤷🏻‍♀️ Authorit A regular Saturday here🤷🏻‍♀️ 
Authorities are still at loss. 
Channeling my @kaylamariesully but no one could say it better than her😅 
#momcomedy #singlemoms #singlemomlife #momlife #momproblems
Since we moved to this house last summer, I had a Since we moved to this house last summer, I had a vision for a piano in this corner of my drawing room. I've been passively checking FBMP for awhile now, since it's definitely wasn't a priority (haha we didn't even have a couch till few days ago). 

So when I saw this beauty 5 mins away from us, I said to myself it had to be mine! 

I finished 7 years of musical school (I was 15 at the time, and barely played ever since). But I really want to pick it up again and teach my kids how to play (well, who am I kidding? I don't have patience for teaching my kids, so I'll find someone who is more qualified than me). 

Wouldn't it be wonderful to hear my kids play? ☺️ I'd start with Chopin, he's always been my favorite☺️ I hope kids are ready for it😅🤣

#fbmpfinds #singlemomlife #pianoplayer #diylife
One step closer to finish this bedroom😁 This One step closer to finish this bedroom😁 

This is your calling to finish that one project that takes little time but you can never get to it 😁

Forgot to mention that I primed it 3 weeks ago🤣 and left it till the energy came back to me today☺️
#paintingdoors #girlbedroommakeover #bedroommakeover #moodypinkbedroom #bunniesbedroom
Definitely my favorite room in the house so far😍❤️ what do you think?
#roommakeover #transformation #ifonlyapril_diy #ifonlyapril_makeover #librarytransformation #librarylife  #librarymakeover
Will it ever get easy? Or let's say easier? The pa Will it ever get easy? Or let's say easier? The pain, the betrayal, that feeling of being powerless? Some people are simply not good people. And I've done my share. I was in a survival mode for more years I can count. How about switching the narrative and fucking focus my energy on me? To thrive! For me and my kids! That's the only thing I want now. 
It's hard to do, but thriving is the only way to go!
#ifonlyapril_diy #mindfulness #narcissisticabuse #wegogirls #wecandohardthings #womenforchange #narcawareness
Load More... Follow on Instagram

Footer

↑ back to top

About

  • Disclaimer

Newsletter

  • Sign Up! for emails and updates

Contact

  • Contact
  • Media Kit

As an Amazon Associate, I earn from qualifying purchases.

Copyright © IfOnlyApril 2023

Share this ArticleLike this article? Email it to a friend!

Email sent!