• Skip to primary navigation
  • Skip to main content
  • Skip to primary sidebar
If Only April
  • MEET APRIL
  • DIY PROJECTS
    • Kids projects
    • DIY furniture
    • Design plans
    • DIY holiday projects
    • Macrame
    • Transformations
    • Woodworking
  • VIDEOS
  • CONTACT
  • SHOP
    • Facebook
    • Instagram
    • Pinterest
    • YouTube
menu icon
go to homepage
search icon
Homepage link
  • MEET APRIL
  • DIY PROJECTS
    • Kids projects
    • DIY furniture
    • Design plans
    • DIY holiday projects
    • Macrame
    • Transformations
    • Woodworking
  • VIDEOS
  • CONTACT
  • SHOP
ร—

Demo and installing side paneling in the screened-in porch | One Room Challenge. Week 2

Please note, that some of the links below are affiliate links and I will earn a commission if you purchase through those links (at no additional cost to you). Thanks for your support this way.

FacebookPinPrintEmail

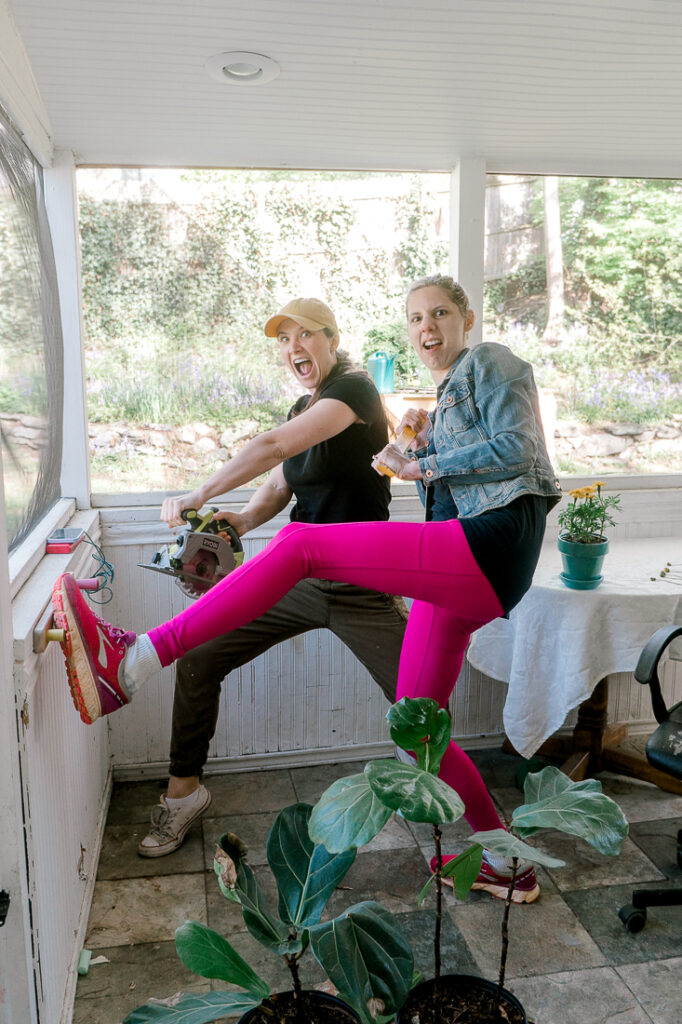
We had such an eventful week here. Erin from Top Shelf DIY came from Atlanta to help me kick start the One Room Challenge. And oh my, she's been so helpful! We had so much fun doing a demo and installing side paneling for my screened-in porch makeover. But let's start from the beginning.

As you can see, we had a lot of fun!

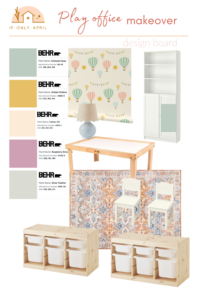
If you are new here, hi! My name is April and I'm doing a makeover of my screened-in porch in 8 weeks as a part of the One Room Challenge. Last week I shared with you my design plans, the before photos, and a mood board so you can get an idea of what direction I want to go.

Here is the list of things that need to be done and what's already completed.

Clear the space

Demo the walls

Put side paneling

Add trim 

Power wash the floors

Paint screened-in porch

Change screens

Add a new door

Install new fan light

Source credenza from Facebook marketplace

Build outdoor chairs

Make tile coffee table

Get accessories 

Decorate the space

Add lights

Ugh, when I write it all down, it looks like I have so much work to do!

screened-in porch makeover
The porch when cleared looks so much bigger
screened-in porch makeover
The punching bag stayed through demo process

Progress update for screened-in porch makeover

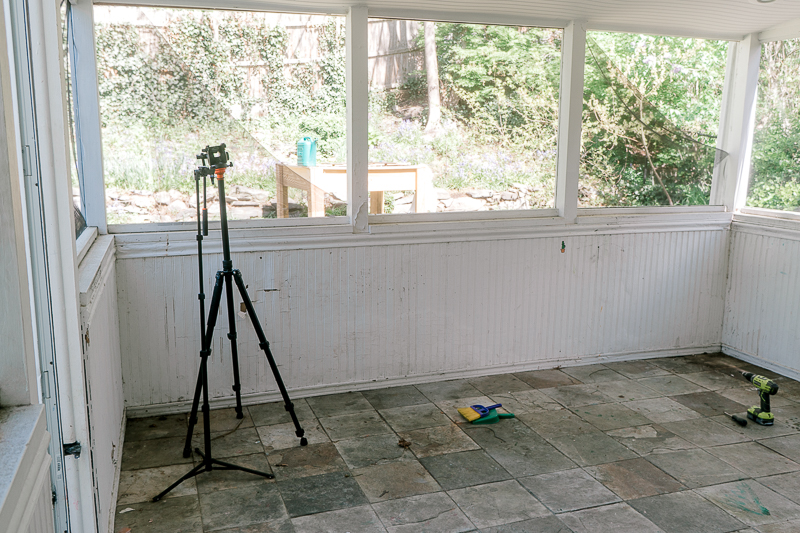
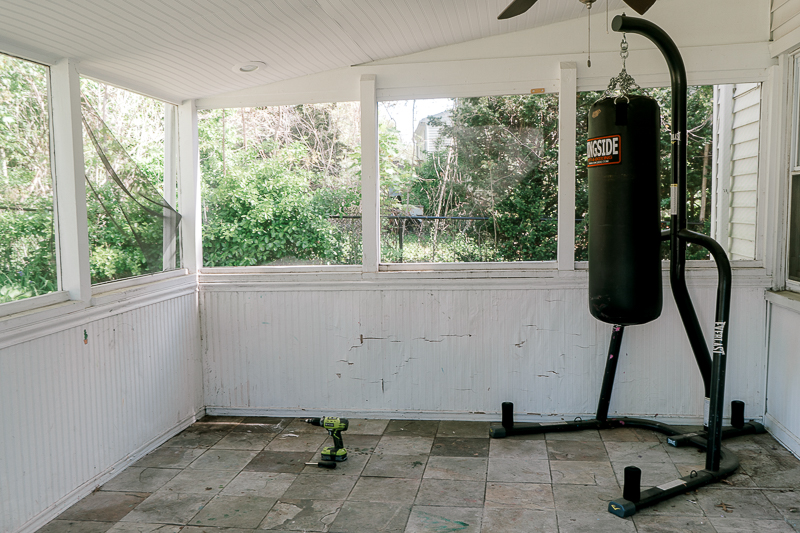
We started by clearing out the whole space. It was amazing to have a friend to do it with. It didn't take us more than an hour to do it.

Turns out, we've accumulated quite a lot of things in the last years. I still need to think of appropriate storage for this room, where we could keep all the towels and outdoor-related items.

Maybe a dresser?

The only thing we couldn't move outside was a punching bag since it is so tall and heavy. As I previously mentioned, I'll keep it as it is and make it into a small workout area.

When the room was cleared, it turned out it's so much bigger than it seemed haha I guess that's always the case - you need to completely clear out the space to see how much potential it has.

screened-in porch makeover
It's so satisfying to see blank walls after the demo

Demo

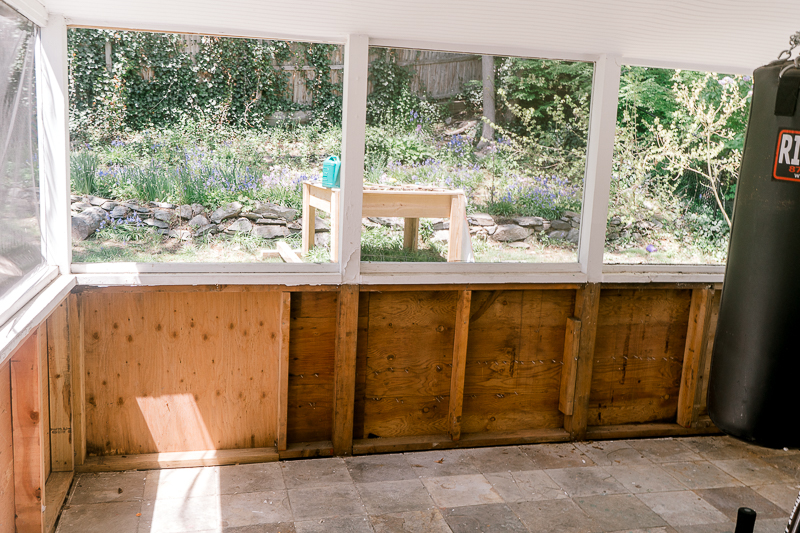
The next step was to demo walls! It was probably the most exciting part of the process since it was my first demo and I had no idea what to expect ๐Ÿ˜ We armed with a crowbar and started demolishing the walls. This process is so oddly satisfying. You can see all the behind-the-scenes on my Instagram. I have it saved in "ORC" highlights. I'll try to edit a video for YouTube in a few weeks.

The demo didn't take too long and soon we had exposed wooden beams that had to be covered with new walls.

The crowbar is officially my favorite tool now ๐Ÿ˜ If only I could use it every day.

When you are doing the demo, don't forget to wear protective gear!!! We started doing ours without masks but quickly realized that masks and eyeglasses are a must and should be worn at all times!

screened-in porch makeover
Old bead board is removed and it's time to put up new walls

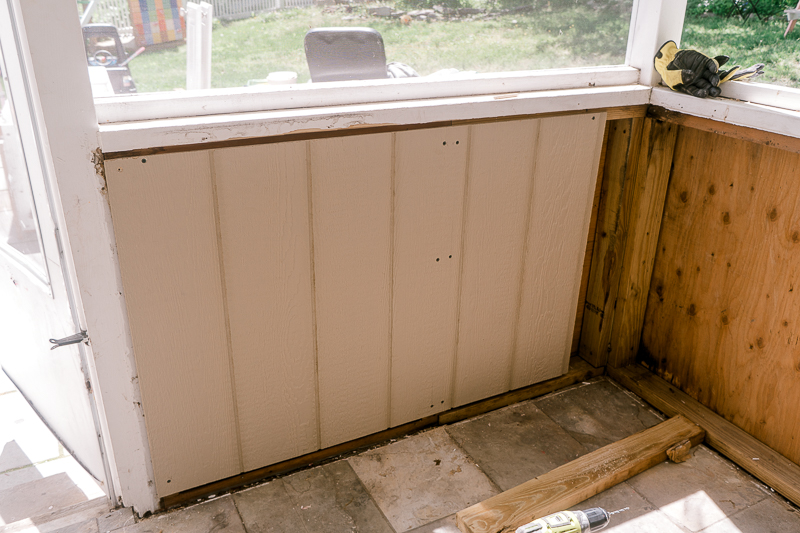
Installing panel siding

We got these siding panels from Home Depot. They made from special materials and are meant to be outside and to be exposed to all natural elements, unlike the bead board that previous owners had.

We measured the height of the walls and asked the Home depot guys to cut it for us. Siding panels usually come in 4x8' and it wouldn't' fit into my car anyway. It saved us a lot of time. In the end we only had to make a few cuts to get a perfect fit.

To attach these siding panels we used 2 ยฝ" galvanized (meant for outside) screws that we drove into the studs. Easy peasy!

The first panel is up! So exciting!

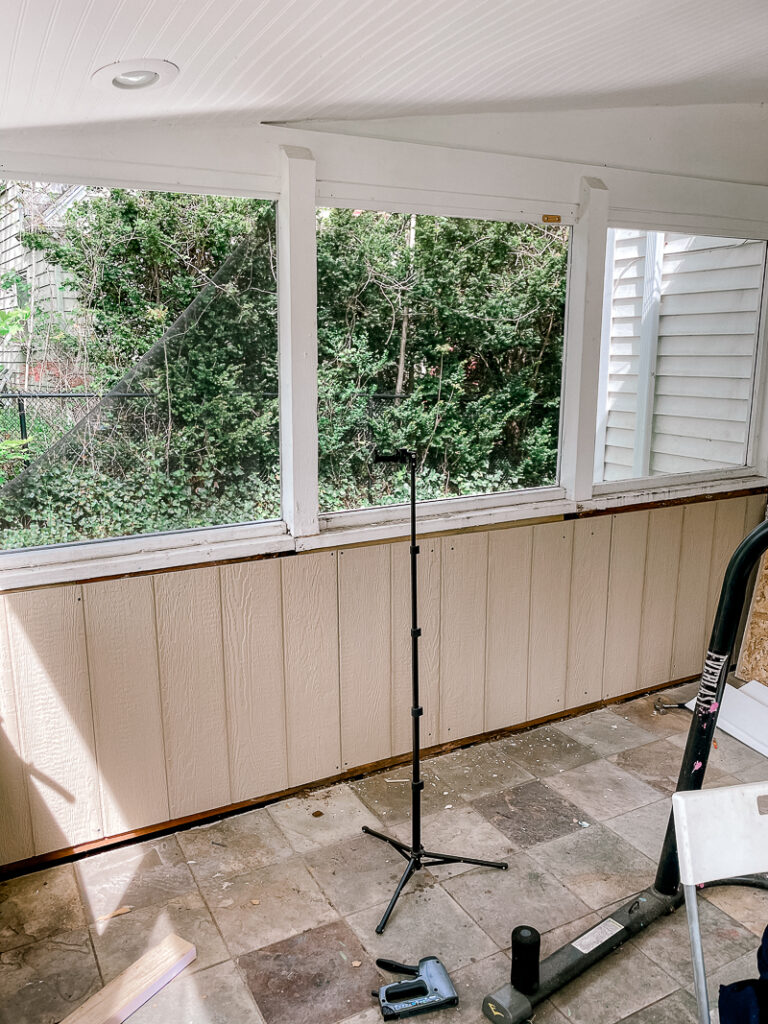
We finished all the siding panels and started adding a trim. Erin had to go back home, and I was suppose to finish the trim but I caught a cold ๐Ÿ™ So I have to take a break from the screened-in porch makeover till I feel better.

screened-in porch makeover
The whole wall is covered with siding panels

Stay tuned for the next week! I hope to finally finish the trim and power wash the floors. My wonderful neighbor said he would lend me a power washer. So I'm waiting on that!

I also started looking for a right size credenza to go to the room, but no luck so far. I'll keep you updated!

I'll be posting sneak peaks to Instagram as the weeks progress, so make sure you're following along.  You can also sign up for email updates below so that you don't miss any of the action!

xoxo,

April

Want more swift renovations to follow? Here are the other 20 insanely talented designers in the One Room Challenge to follow! Canโ€™t wait to see where we all end up. 

« The before + design plans for screened-in porch | One room challenge. Week 1.
Adding trim and challenges | One Room Challenge. Week 3 »
FacebookPinPrintEmail

Primary Sidebar

Hi, I'm April! I love woodworking and making things! I hope you will stay for a while and get inspired to make something!

More about me โ†’

Popular

  • I Want To Paint Our Library Moody Dark Blue
  • How to build a brick hearth for a wood stove
  • Home Improvement Projects I'd Like To Finish In 2022
  • Looking for a house as a first time home buyer

ifonlyapril

DIY Lifestyle Mom | ๐Ÿ“CT
It's not perfect but I wouldn't love it any other It's not perfect but I wouldn't love it any other way ๐Ÿค—

Phase 1 of an unexpected renovation that I had to complete in 2 weeks is under my belt ๐Ÿ’๐Ÿปโ€โ™€๏ธ

This brick hearth was such a challenge and oh boy, how much I've learnt from it! Will I look at bricks any time soon? Probably not ๐Ÿ˜… 
now I need to decide if I want to white wash this hearth (probably yess since I messed up with mortar cracks) and what to do with the back wall. Any ideas?๐Ÿค”

Full blog with all details is available at www.ifonlyapril.com (type in search brick hearth) and a video will be on YouTube tomorrow! 

#diyhomedecor #diylife #diybrickhearth #ifonlyapril_diy #oldhouse #oldhousenewhome #
New week, new build๐Ÿ˜Š I was so excited to replic New week, new build๐Ÿ˜Š I was so excited to replicate my first build ever that I made 3 years ago for one wonderful girl this week.

Plans are available on my blog ๐Ÿ˜Š
#ifonlyapril_diy #diyfloorbed
A friend of mine today told me that as a "not a DI A friend of mine today told me that as a "not a DIYer" she can't fully appreciate what I did to this closet. To her it doesn't feel like this transformation is so magical. 

So my DIYer friends, let's take a moment and appreciate what I did with this closet!! 
Swipe to see the "before"๐Ÿ™ˆ
#diymakeover #diyclosetmakeover #ifonlyapril_diy #diyyoutuber
Christmas decor video is live on YouTube ๐ŸŽ„ Swi Christmas decor video is live on YouTube ๐ŸŽ„

Swipe to see my almost successful experiment with epoxy and wooden rounds๐Ÿ˜„ watch the video to see what went wrong and how I think you could fix it. 
Details are on the blog and YouTube.
#diychristmas #diychristmaswreath #diychristmasdecor #christmaswithapril
This year I decided to update our stocking holder This year I decided to update our stocking holder and create this beautiful village.

The problem occurred when I couldn't decide how to finish it - to leave the wood as is or paint cute details in traditional Christmas colors.

So I made both ๐Ÿ˜
Which one would you choose?

Find full tutorial on the blog and YouTube.

#diychristmasdecor #diychristmas #diyyoutuber #christmaswithapril
Guess what?๐Ÿ˜๐Ÿ”ฅ It only took me about 6 month Guess what?๐Ÿ˜๐Ÿ”ฅ

It only took me about 6 months but I finished the playroom! ๐ŸŽ‰๐ŸŽ‰๐ŸŽ‰

EVERY piece of furniture is made by me over the course of last 6 months๐Ÿ˜ and decor tooโ˜บ๏ธ are you excited to see it?

I'm so excited! There are no words to describe it! 
The reveal will be on YouTube tomorrow at 10am est. Subscribe and turn on notifications to not miss it!!! It's epic!๐Ÿ˜๐Ÿ”ฅ 
#diymakeover #playroommakeover #ifonlyapril_makeover
NEW video is live on YouTube ๐ŸŽ‰ Last week I mad NEW video is live on YouTube ๐ŸŽ‰

Last week I made this Pottery Barn inspired bulletin board and I'm in love๐Ÿ˜ it turned out so much better than I imagined๐Ÿ˜
Read about all the details and material list on the blog.

And now to the real question - should I put it in the kids playroom (as intended) or keep it to myself?๐Ÿ˜๐Ÿค”

#ifonlyapril_diy #makersgonnamake #makersofinstagram #diyhomedecor
Witch wears Louboutin ๐Ÿ˜‚๐Ÿ‘ป @louboutinworld #d Witch wears Louboutin ๐Ÿ˜‚๐Ÿ‘ป

@louboutinworld #diyhalloweendecor #diyhomedecor #diyhalloween
Load More... Follow on Instagram

Footer

โ†‘ back to top

About

  • Disclaimer

Newsletter

  • Sign Up! for emails and updates

Contact

  • Contact
  • Media Kit

As an Amazon Associate, I earn from qualifying purchases.

Copyright ยฉ IfOnlyApril 2022

Share this ArticleLike this article? Email it to a friend!

Email sent!