• Skip to primary navigation
  • Skip to main content
  • Skip to primary sidebar
If Only April
  • MEET APRIL
  • DIY PROJECTS
    • Kids projects
    • DIY furniture
    • Design plans
    • DIY holiday projects
    • Macrame
    • Transformations
    • Woodworking
  • VIDEOS
  • CONTACT
  • SHOP
    • Facebook
    • Instagram
    • Pinterest
    • YouTube
menu icon
go to homepage
search icon
Homepage link
  • MEET APRIL
  • DIY PROJECTS
    • Kids projects
    • DIY furniture
    • Design plans
    • DIY holiday projects
    • Macrame
    • Transformations
    • Woodworking
  • VIDEOS
  • CONTACT
  • SHOP
Γ—

DIY wooden baby gym and toys for little hands to play

Please note, that some of the links below are affiliate links and I will earn a commission if you purchase through those links (at no additional cost to you). Thanks for your support this way.

FacebookPinPrintEmail

I'm hosting my friend a baby shower this month. It's her second baby and she has most of the stuff already.  The DIY wooden baby gym comes as a perfect gift for the occasion.

In terms of gifts, as you know, I'm a big fan of handmade things since they are so unique and the fact that you spend x-amount of hours making them, makes it so much more special.

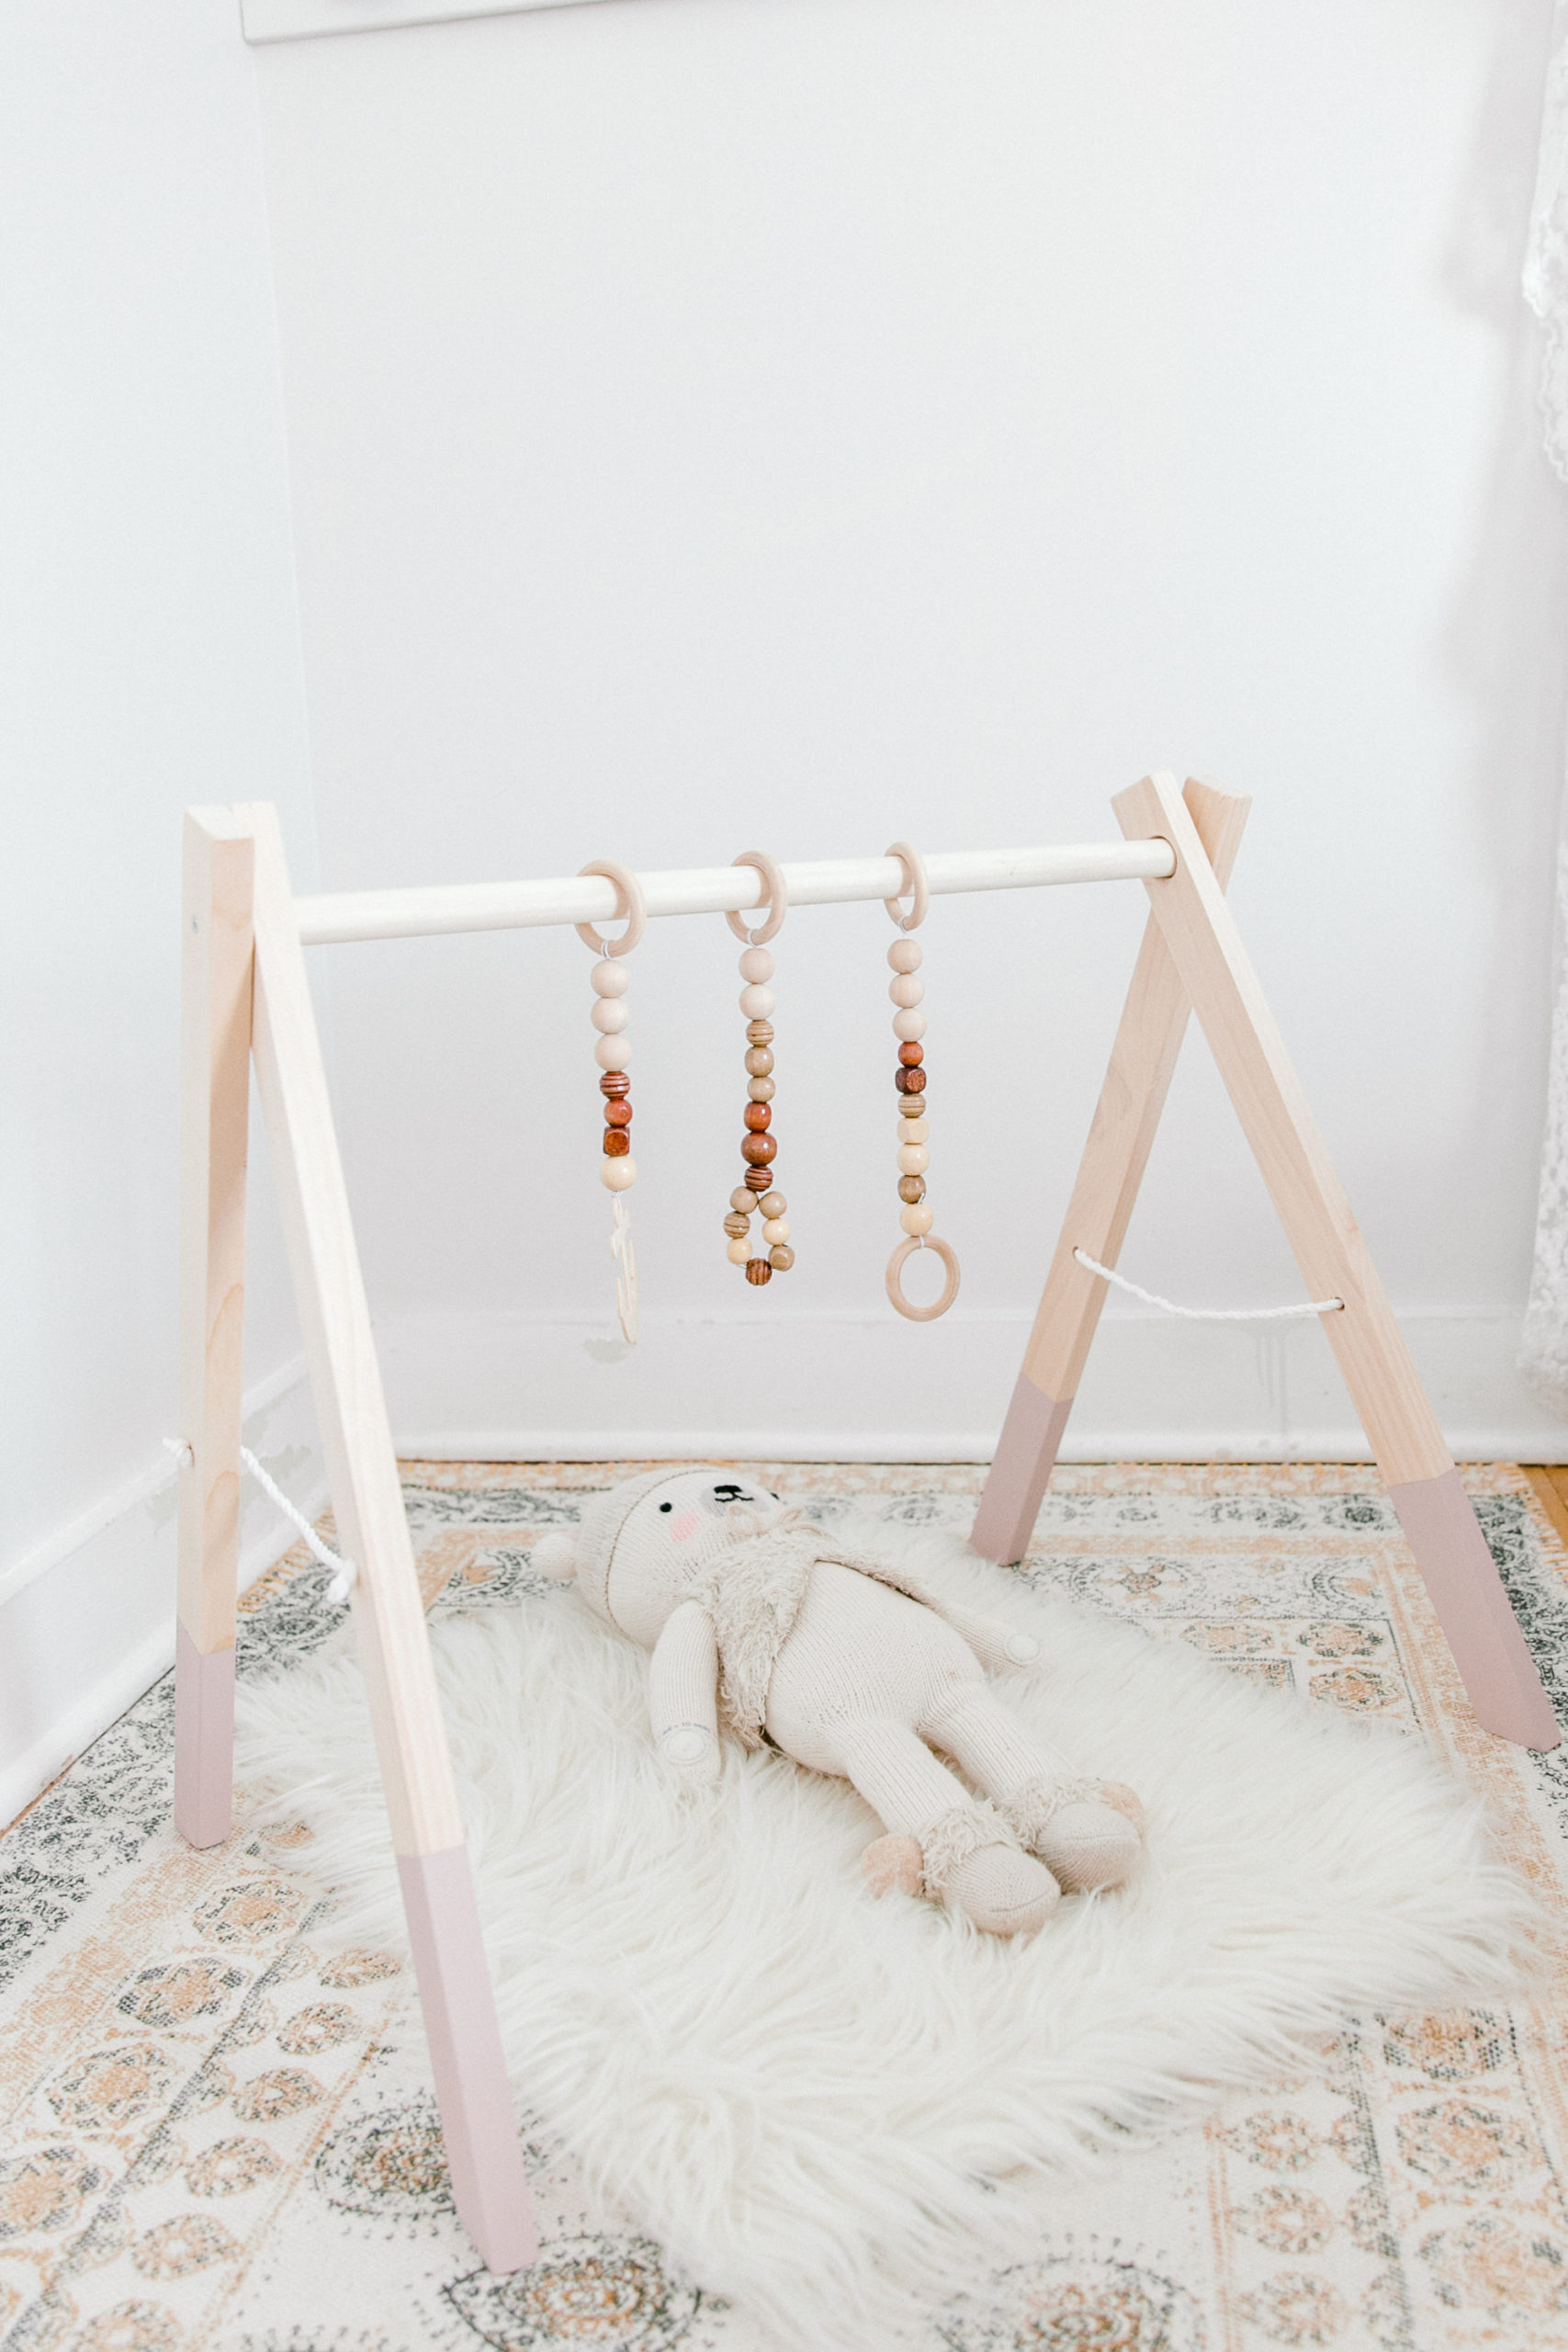
The idea to make a baby gym for my friend came from her admiring Sasha's and Sia's baby play gym that I made when Sasha was little. It's been through 2 moves, 2 kids, and already lost its freshness but it saw better times!

I feel any wooden toys or baby gym is so much more eye-pleasing than the store-bought plastic ones.

It's a simple project that could be done in an hour without the serious tools required.

WOODEN BABY GYM

DIFFICULTY: beginner

TIME SPENT: 1 hour

COST: less than $10

You can go an easy route if you want and ask Home Depot workers to cut wood for you and make the required holes.

I did this last time but since I have tools, I decided to make everything from scratch this time, and let me show you how I did it.

FIND A VIDEO VERSION OF THIS POST

ON MY YOUTUBE CHANNEL HERE.

I also recently made a baby gym for twins!!! So exciting! You can watch it here

Materials

  • 1x2x8 (1)
  • dowel (mine is β…ž)
  • screws (x2)
  •  wooden rings (this set from Amazon has a variety of sizes)
  • wooden beads (I got my from Michaels years ago, but there are better options on Amazon)
  • elastic cord (optional)
  • rope for the sides
  • paint (optional)

DON'T FORGET TO PIN FOR LATER>>>>>>>

DIY WOODEN BABY GYM

Tools

  • any type of saw
  • hole saw or drill press
  • sander
  • drill

Instructions

1. Measure 4 legs (2' each)

2. Using a hole saw, drill a hole on 2 legs (2" from the top). If you don't have that one, you can always ask Home Depot workers to do it for you.

After I was done with an easy part - to cut all the legs 24" each, I attempted to make holes. I don't have a drill press where you can easily make a hole and decided to go with a hole saw. I purchased one the right size (1" for my β…ž" dowel) and got to work.

It clearly seems so much easier on tutorial videos. It was a complete fiasco. Wood from the backside of the leg chipped terribly.

After some practice, I realized that the only way it would work with me is if you start to drill from one side and then finish from the opposite side. This way the hole comes out even and doesn't chip.

I decided to flip it around and drill from the sides meeting in the center. Luckily, it worked! But I decided never to use the hole saw again.

WOODEN BABY GYM

3. Cut a 23 angle cut on the bottom of the legs. I used my miter saw but you can also use a hand saw. This cut will ensure your wooden baby play gym to be stable on its legs.

4. Attach dowel with screws.

5. Drill holes on the sides and put a rope through it. You can adjust the angle of the baby gym.

6. Using an elastic cord put the wooden beads on it.

diy WOODEN BABY GYM

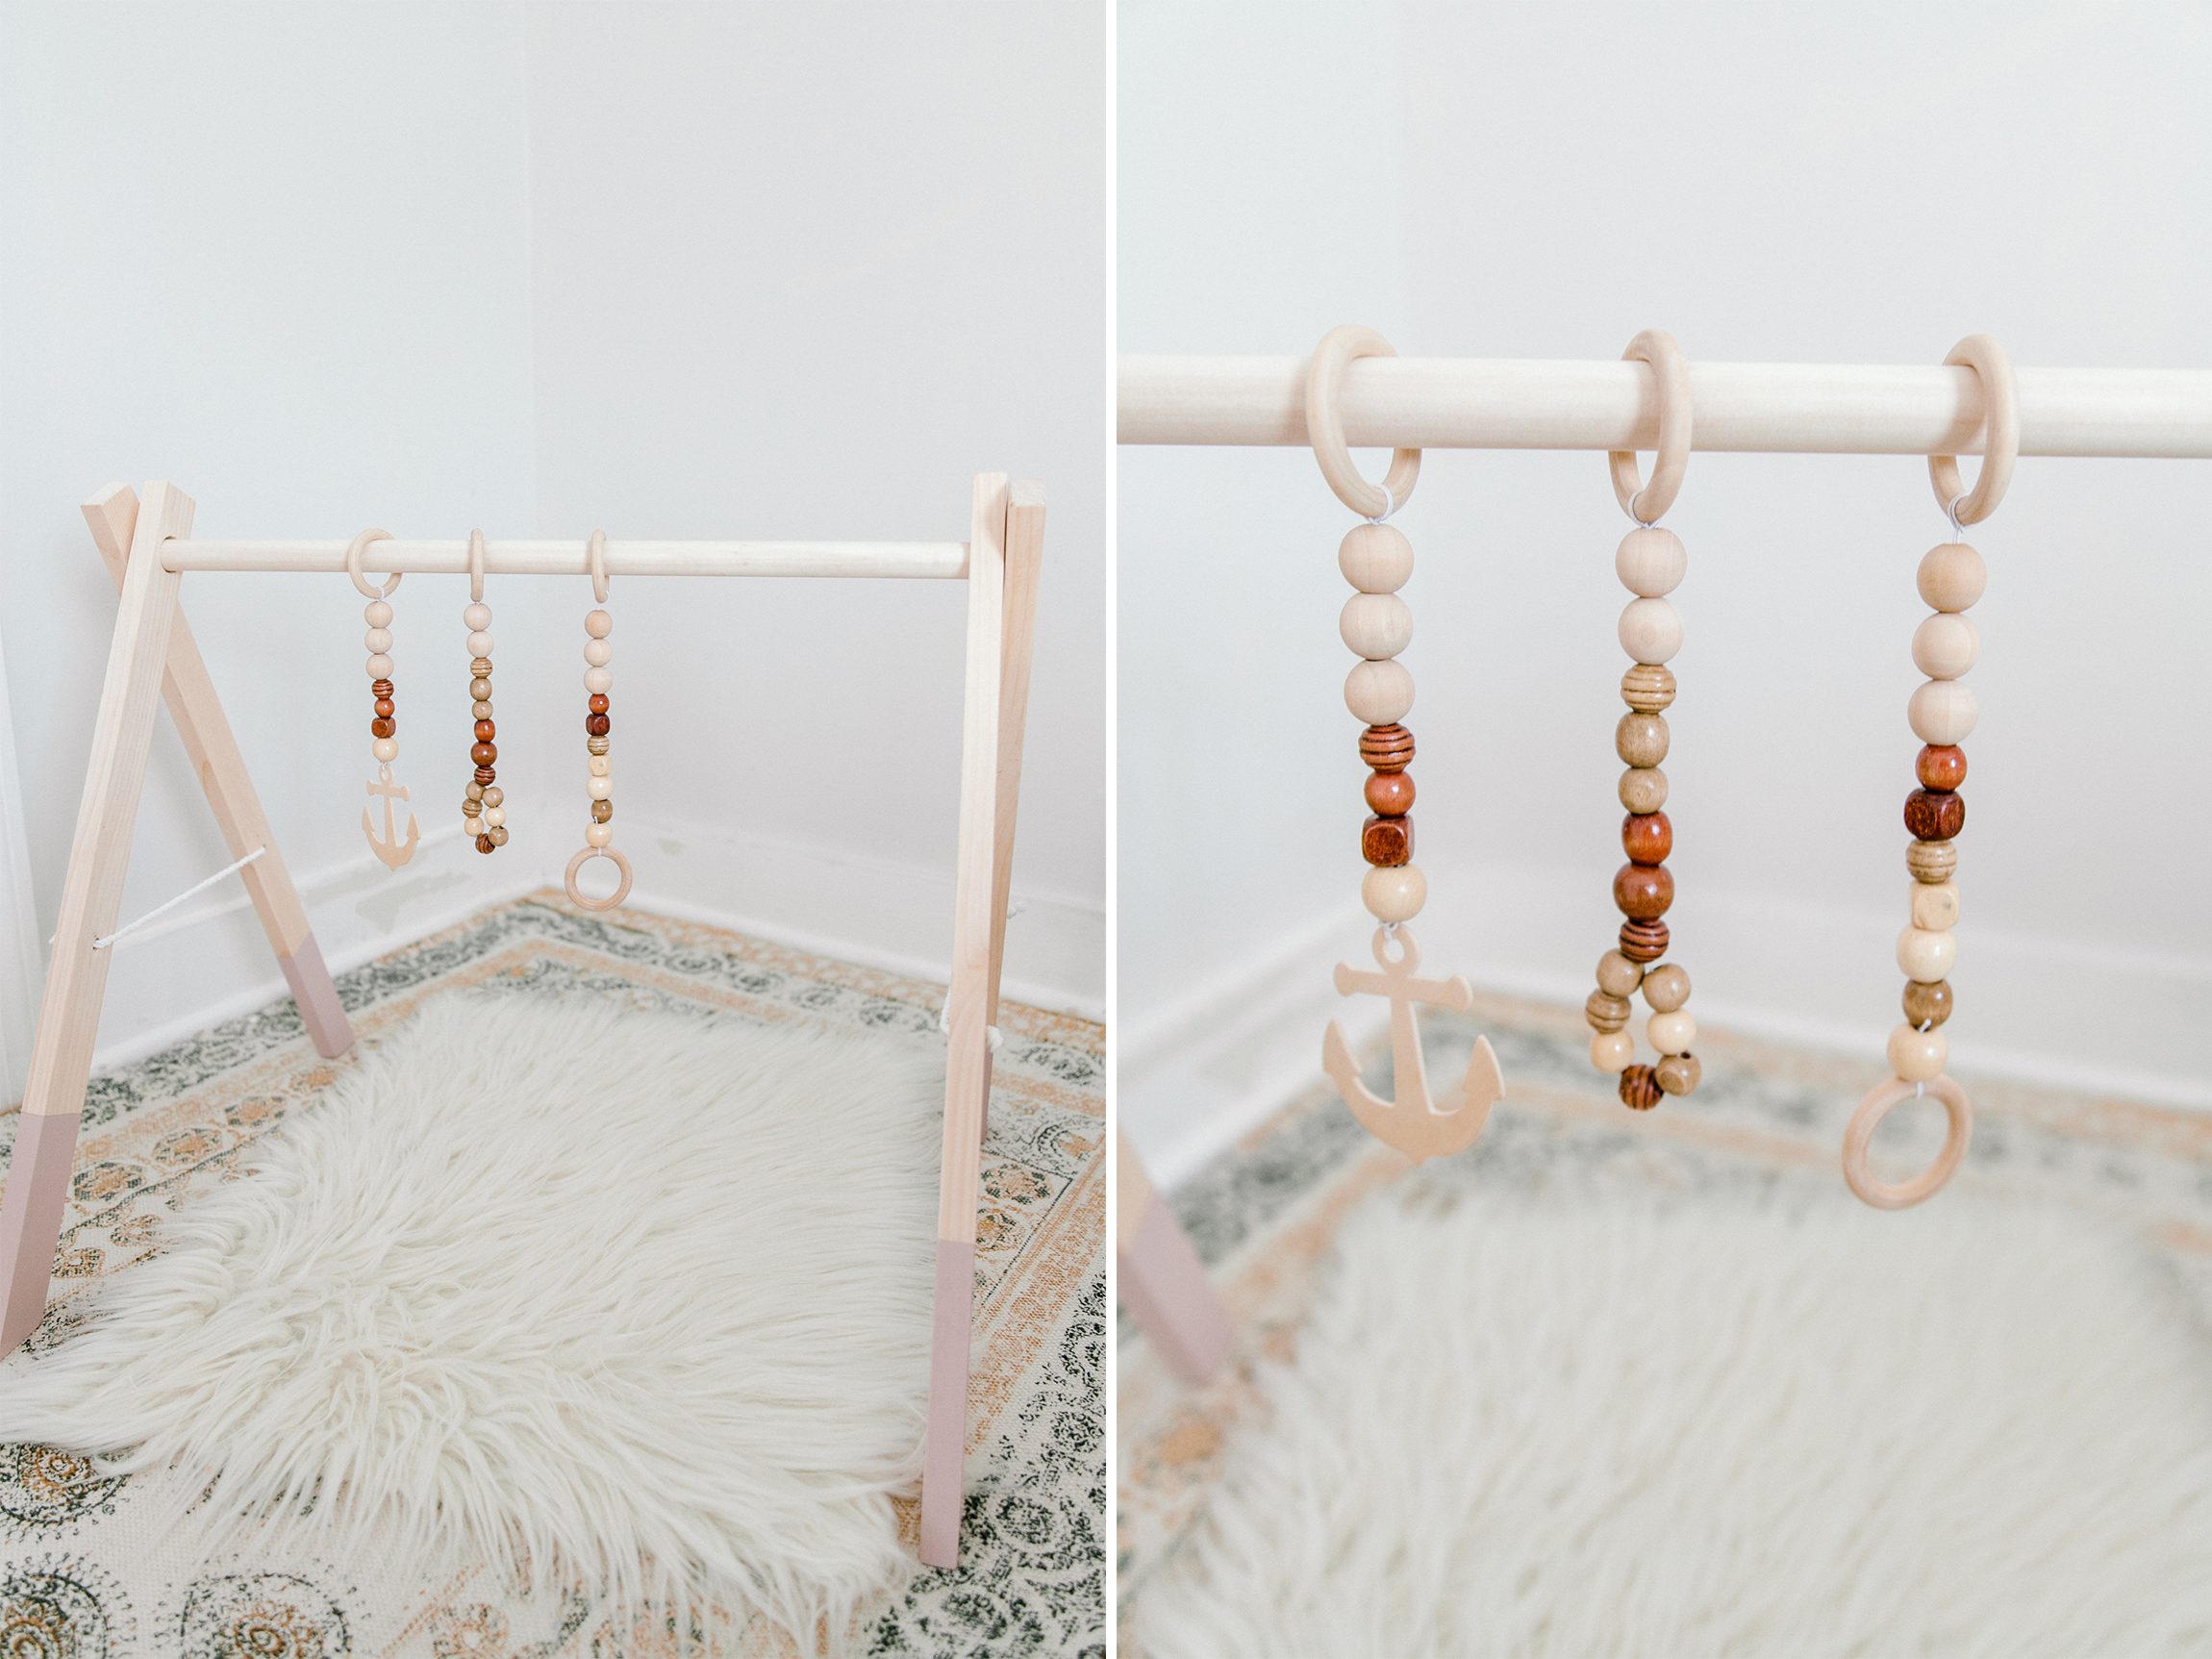
Adding wooden toys to the baby gym

I used the elastic cord to make it more exciting for the baby to be under. He can reach for the toy, pull it down and up. That encourages your baby to move, reach out for objects, and improves hand-eye coordination.

You can add different mobiles for it. As options, you could use wooden teethers (these non-toxic wooden teethers are so cute), felt toys (cool clouds here), or colorful ribbon(you could also use these ones later when kids grow up a little). The point is for the baby to get curious about those things and try to reach it, working out those tiny baby muscles.

It encourages your baby to reach the milestone and improves hand-eye coordination.

If you prefer to buy

If you are not a handy type, you can always buy it. Amazon and Etsy have a variety of options for different budgets. Here are a few options from Amazon:

All of them have a great rating.

If you prefer to support small businesses, Etsy alternative is a great option.

This grey and the white baby gym are very adorable!

I hope you enjoyed this DIY baby gym tutorial! If you like it, follow me on Instagram @ifonlyapril. I try to post in stories my progress with all the projects.

Here is the link to my YouTube Channel where I post videos about simple DIY decor and planning to make a video version of a DIY wooden baby gym.


WE THOUGHT YOU MIGHT ALSO LIKE:

How to organize a 3-year old party at home on the budget

How to make play silks for open-ended play

xoxo,

April

Share this:

  • Tweet
  • Print
« SPRING MANTEL DECOR + {HOW TO SPRAY PAINT VASES}
DIY growth chart for kids »
FacebookPinPrintEmail

Reader Interactions

Comments

  1. Chrisha

    December 30, 2020 at 5:01 am

    Once you’ve finished your beaded strands, it’s time to fit the baby gym together. Slide two of the legs onto the dowel so they’re snug against the button end. This is where I ran into a problem I pushed the outside leg so hard against the button end that it wouldn’t rotate, and it wound up popping off the button. You don’t need to make it snug it just needs to sit there with enough room to swivel.

    Reply
  2. Alina

    October 11, 2021 at 3:33 pm

    Wonderful project and very pretty end result!

    How far from the top do you drill the hole for the wooden dowel?

    Reply
    • April

      October 15, 2021 at 8:15 pm

      Thank you πŸ™‚ I think it was about 1" or something like that. But you can go up to 2" and it would still look good!

      Reply
  3. Nikki

    August 23, 2022 at 10:24 am

    I have already started this project , and really looking forward to the end result, thank you!

    Where do you drill the holes for the rope? In the middle of the legs?

    Reply
    • April

      August 31, 2022 at 12:25 pm

      Hi Nikki! It’s more or less in the middle but it doesn’t really matter. You can adjust the rope to change the distance between legs

      Reply

Leave a Reply Cancel reply

Your email address will not be published. Required fields are marked *

Primary Sidebar

Hi, I'm April! I love woodworking and making things! I hope you will stay for a while and get inspired to make something!

More about me β†’

Popular

  • Speakeasy library room reveal + budget breakdown
  • Little girl bedroom makeover inspired by spring
  • The progress of Sia's bedroom and my favorite finds for her room
  • 10 LEGO table ideas that kids would be excited about

ifonlyapril

DIY single mom | πŸ“CT
I made this sound diffuser almost a year ago. I fi I made this sound diffuser almost a year ago. I finally hung it up and added picture light to it. 

I call it "There will be light" as a reflection of a dark times I was going through at the moment.

What do you think guys? 

Watch full video on YouTube and find all the details at 
https://ifonlyapril.com/there-will-be-light-unique-diy-wood-sound-diffuser-wall-art/

#makersgonnamake #diyproject #diysounddiffuser
I hosted my first party for @newcanaannewcomers In I hosted my first party for @newcanaannewcomers International club last night and it was such a success🀩✨ 
Thank you all for coming! 

If you want to recreate the magic, all you need is PVC pipes, some cement, few buckets and string lights. 
Easy peasy πŸ˜„

Would you try it at home?

#easydiy #diyoutdoors #diystringlightpoles #ifonlyapril_diy #newcanaannewcomers
Nothing can beat a $1 find that looks so good 🀩 Nothing can beat a $1 find that looks so good 🀩 what do you think?

#rubnbuff #diy #diyonthebudget #simplediy #letsmakeitfabulous
I think this little bunny bedroom makeover deserve I think this little bunny bedroom makeover deserves a permanent place on my feed☺️ scroll to the end to see "the before"πŸ₯Ί 

#littlegirlmakeover #bunnyroom #littlebunnyroom #moodypinkroom #crateandbarrel #potterybarnkids #smallable #diyroommakeover #spoonflower
Do you see a resemblance?πŸ˜… #dogsofinstagram #dr Do you see a resemblance?πŸ˜…
#dogsofinstagram #drogodog #germansheppard #germansheppardpuppy #germanshepherdsofinstagram #longcoatgermanshepherd
I made this reel last week and intended to post it I made this reel last week and intended to post it for the last day of school. I feel before 9.20am I did already so much lol
What was I complaining about? πŸ€¦πŸ»β€β™€οΈπŸ˜†

Now, on day 6 of summer break, I reminiscent on good all chaotic mornings when I had to drive kids around and get them ready for school. At least I had time for cold green tea in peace! πŸ˜†
We miss you, school! 

I can't wait for September when both of my kids will be on the same bus. 

Till then, we need to survive the summer and get the best out of it! 
Send me chocolate and wineπŸ€—πŸ˜…

#morningroutine #singlemom #singlemomlife #summerbreak #singlemomproblems #morningroutines #diysinglemom
I always called my youngest daughter a little bunn I always called my youngest daughter a little bunny. Partially since she is so adorable, but also because she is obsessed with bunnies . And she finally got a room makeover. Now she has a ton of bunnies to look at πŸ₯³ 

I make her count bunnies on the walls before going to bed (my little trick to get her to sleep πŸ˜…)

Watch the shocking before and a gorgeous after and let me know your thoughts in commentsπŸ˜πŸ°πŸ‡

#girlroommakeover #diymakeover #roomrenovation #littlegirlsroom #pinkbedroom #pinkbedroominspo #pinkbedroomideas #bunnythemedroom #ifonlyapril_makeover #diyprojects
It's a strange feeling to feel alone in a relation It's a strange feeling to feel alone in a relationship, to walk on egg shells every day and to hear that everything is always your fault. 

It took me years to get to this point, but slowly I got to realization that the only person I lost in this, was me. 

And I'm on the way to get that person back. 

Healing is not a journey, it's a crazy ride! Damn, buckle up your seats😁

#narcabuse #narcissisticabuse #singlemoms #singlemomlife #therapyiscool #healingjourney #narcsurvivor #narcissisticabusesurvivor
Load More... Follow on Instagram

Footer

↑ back to top

About

  • Disclaimer

Newsletter

  • Sign Up! for emails and updates

Contact

  • Contact
  • Media Kit

As an Amazon Associate, I earn from qualifying purchases.

Copyright Β© IfOnlyApril 2023

Share this ArticleLike this article? Email it to a friend!

Email sent!