

Does it happen to you that you make an entire structure over one item? Back in March, I picked up an 8 ft slide from the Facebook marketplace for $20 and while I was driving home, I knew that this slide will need a home. The idea of a fantastic DIY backyard playground was born that day.
I started my research and realized that there are not too many detailed plans for someone who wants to build a compact backyard playground with a slide. So I decided to record everything and share it with you! It will make such a great addition to our backyard. I already made a water sensory table for 2 last year and we will only need a sandbox for the full happiness ;D
Is it cheaper to build your own playset?
To buy this kind of structure is quite pricey, even if you are buying a playset kit. So I think it's definitely cheaper to make your own from scratch. The whole project cost me less than $350 and I'll give you a breakdown of it below.
You can also see the sketch I made, showing step-by-step how I made this backyard playhouse with slides. I hope it will be helpful! My husband helped me to build the base but the rest I did by myself and the overall time spent on this project was around 12-13 hours.
I show you below a step-by-step visual plan but if you'd like to download a professional 3D plan with step-by-step instructions, materials breakdown, and cut list, you can do it here. Thank you for your support!

What kind of wood should you use to build a playset?
Cedar and redwood are probably the best options when it comes to building a backyard playset. While those kinds of woods are gorgeous and durable, they are also can be very expensive. Using softwoods, like pine could be an option, but you need to keep in mind that regular pine isn't weather resistant.
That being said, you can use pressure-treated pine to build a playset. It is durable, weather-resistant, and will serve you for years to come.
Is pressure-treated wood safe for a playhouse? Since it's outside and isn't in a closed space, it is safe for the kids. Of course, cedar would be preferable, but with pressure-treated pine, you get the best for your money.
Watch me make this playground on YouTube here
COST: $336 (+ add-ons)
TIME: 13 HOURS
LEVEL: INTERMEDIATE/ADVANCED
Lumber: ($224)
Note: check with new plans for updated lumber list
- 4- 4x4x8 landscape timber ($32)
- 6 - 2x6x8 ($34)
- 17 - 2x4x8 ($85)
- 14 - 1x4x8 ($63)
- 3 - 2x2x8 ($10)
Materials: ($112)
- 32- 5/16” carriage galvanized bolts ($64)
- 32- 5/16” galvanized nuts ($8)
- 32- 5/16” galvanized washers ($8)
- 8 - 4” galvanized corner braces ($16)
- 2lb 3” deck screws ($10)
- 1lb 1 ⅝” deck screws ($6)
- 2 ½” pocket hole screws for outdoor use (I already had them and used a few)
Tools:
- Kreg jig
- Clamps
- Cordless drill
- Miter saw
- Circular saw
- Drill bit 5/16” - 6” long
- Drill bit small
- Wrench ½"
- square
Note: I’m not a professional builder. I’m just sharing my experience of how I built this slide base DIY backyard playground for MY kids. I'm not responsible for the playground you might make with my plans.
Instructions to build a DIY outdoor climbing structure
Step 1. Building the base for DIY backyard playground


Cut 2x6x8 at 48” (4ft) each.
The easiest way to start making the base is to lay down two 4x4s and attach 2x6 to it. You want a strong base, make sure to level everything.
Work your way around to make a box made of 2x6s on the bottom. Drill pilot holes and attach them with galvanized carriage bolts and nuts (make sure the bolts are galvanized since they are rust-resistant and made for outdoor use). Also, make sure your drill bit is long enough to get through 4x4 and 2x4. I had a short drill bit which made this job more complicated.

When the bottom “box” is done, It’s time to build the base for the second floor. Let’s call it the “upper box”.

Here is an interesting part. The position of this “upper box” will determine the height of the slide base and how tall it will be. Mine is 64”. when we finished building we realized it is a bit too high for my kids (3.5 and 1.5 years old). But well, it’s too late. We can’t just chop off a part of it. After brainstorming the way to make it more secure in case of the fall we came up with a solution, but more about it later.
Step 2. Build support for the second floor


Following the same steps as in the bottom box, cut (2)2x6s to 4 ft and build the base for the second floor, using carriage galvanized bolts
The next step is to add a 2x4x8 in the middle of the side where you plan to have a climbing wall. I decided to be overly cautious and make sure that the climbing wall is secure. Although, probably it was overkill. I attached it with 3” deck screws. The way this climbing wall is made makes me confident it won't fall apart when one of the girls will climb it.
Step 3. Add the first floor

When you are done with that plank, it’s time to make the flooring on the bottom of our fantastic DIY backyard playground. To do that, measure the distance inside the box and cut a 2x6”, making 2 joists for the floor. My joists were 47” each. Attach it with pocket screws using a Kreg jig.

*Note: I used 2x4” instead since I didn’t have 2x6”.
As now you have joists, you can line up flooring using 1x4” (1x6” would also be a good option but they were more expensive). I used 7 of them, cut in half (48” each) - 14 total.
While you are lining the flooring, you’ll face the problem of the beams being on the way. The easiest way to cut it to fit is to use a circular saw. I’m not very friendly with this type of saw so the cuts aren’t perfect but well, it doesn’t bother me.

I used 1 ⅝” deck screws to put it in place. I used 2 screws on each side for extra security and to prevent wrapping of the wood.
Step 4. Make the second floor


Now it is a turn to make a second floor. I put in 2 joists for flooring. At first, I was planning to secure floor joists with a Kreg jig. As much as I love it, I wasn’t sure it will hold up the weight. So I decided to add 4” corner braces to secure it. When I started working on it, I realized I don’t have enough pocket hole screws. So I only used corner brackets, 4 on each joist.
Cut the remaining 1x4s in half (you will have 14 planks) and attach it to the “upper box”. I again used double screwing for more support.
Add 2x4” in the middle of the side where the slide will go. It will serve as a handle and support when kids climb up the ladder. Mine is 37”
When you are done with the second floor, you can pat yourself on the shoulder, because the end is near 😀


Step 5. Build a climbing wall

I was debating if I should use 1x4”s or 2x4”s. I decided to go with 2x4”s since I feel it’s more stable and secure. Also, there was this esthetic element, where I wanted the wall to align with the top and bottom “box”. Cut your 2x4”x8’ in half and attach to the playground structure with 3” deck screws.

It's a straightforward but a bit time-consuming job. I started building the wall from the top since there was supposed to be a little gap and I'd rather have it in the bottom than on the top.
PIN FOR LATER>>>>>>>>>

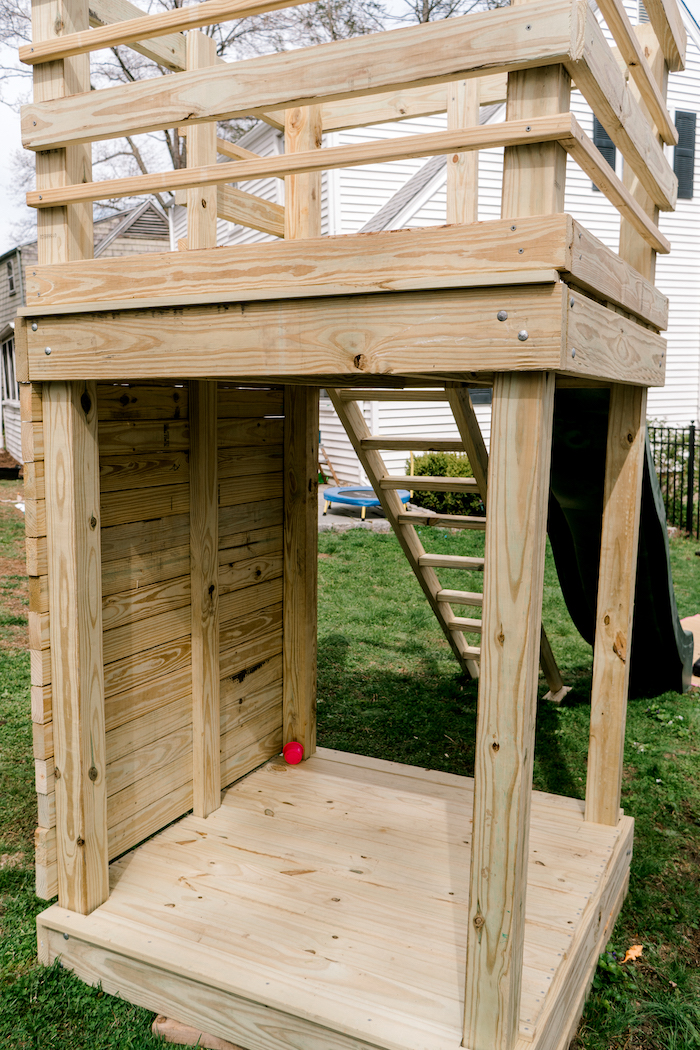
Step 6. Build a ladder


Believe it or not, that was the most challenging part of this project. I’ve never made a ladder before. I’m sure there are easier ways to make one but I’ll tell you now how I made mine.
First, I was planning to use Kreg jig for the joining but since I earlier discovered I didn’t have pocket screw holes, I moved on to the next best option.
I measured the length of the ladder and the angle it will go at. The idea was to make it less steep since it’s already quite high. In the end, I went an easy route and made my ladder under a 45-degree angle. On the miter saw, I made a 45 degree cut on the top and on the bottom.
Steps are 16” wide. I measured the right angle and attached it with regular nails for outdoor use. To make it secure, I screwed in 3” deck screws. Then I flipped it to the other side and put more 3” deck screws.
To attach the ladder to this DIY backyard playground, I put 3” screws from the inside out, 3 on each side.

Step 7. Attach rails on the top
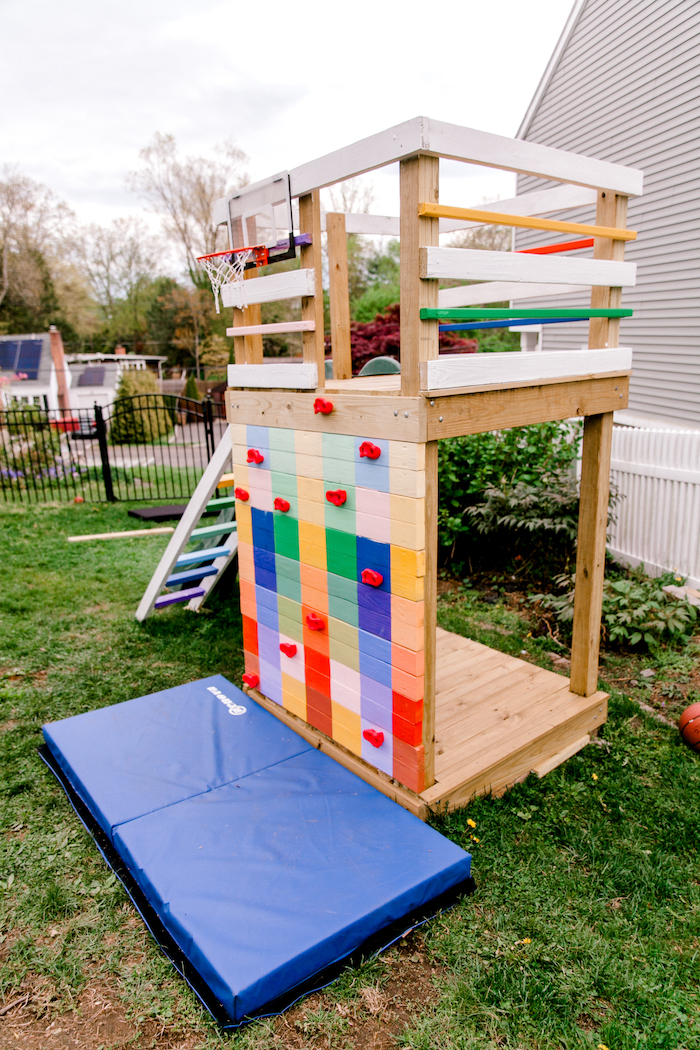
Note: my new plans have improved the railing system and I put them vertically instead of horizontally for a few reasons. First, it is safer for the kids to have railing vertically so they don't climb up. Second, it's also wasn't up to code when the railing was placed horizontally.

Here is what the new improved plan looks like. You can download it here.

To finish off this project, you need to make the rail on the top. I used 2x2s and 2x4s, just for aesthetic purposes. To make the spacing between rows even, I used a 2x4" block to help me keep it even. At this point, I discovered that I need a proper ladder and my tiny ladder won’t cut it. You also might need another pair of hands to help you hold it.
Clamps are definitely your best friends here. This is what I used.

AND.... At this point, YOU CAN ATTACH THE SLIDE! ;D
I know, your kids are so excited about it, but probably best if you test drive it first ;D Check my Instagram to see how I did a first test drive ahahha
Step 8. Sanding and painting
The next step is the most painful and is to sand the whole thing so kids won’t get any splinters while playing there. I used this palm orbital sander and it worked great. But I definitely wouldn't attempt to sand it by hand.

The most fun part was to paint it and work on the design for the climbing wall, but I'll tell you about that and all the "add-ons" for the slide next week so stay tuned to see how I spiced up the blank state of the fantastic DIY backyard playground ;D


STAY FOR A WHILE, YOU MIGHT ALSO LIKE

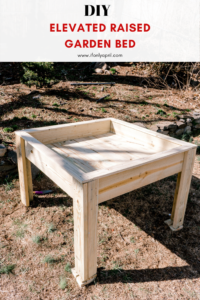
DIY ELEVATED RAISED GARDEN BED

Follow me on Instagram and YouTube to see more DIY projects!
xoxo,
April


Hi Just discovered your great playhouse build site. My own project is at the stair and slide point and sure would appreciate source info for the slide you used. It is the first one with a deck height same as mine (5&1/2 ft)and most slides seem to be for quite shorter decks.. How do I find part 2?
Thanks much Tom Dotta
Hi! I found the slide on Facebook marketplace for $20 so not sure where they got it from. Sorry I couldn't be more helpful