

Grimm's toys are no doubt the true inspiration of perfect open-ended toys. They are beautiful, versatile, and timeless. I'm nearly obsessed with them and would love to have them all! Especially this rainbow, this building set, stepped pyramid, and the large stepped pyramid. Unfortunately, they are so pricy and I can't justify buying something so expensive that I could easily make myself. And that's how the idea for this project was born. In this post, I'll show you step by step how I made this DIY Wooden Building Blocks Pyramid.

What you'll need to make DIY building blocks
- 2x2 premium pine - 27.5'. I had 6' (x5). Read below about sizing
- Miter saw or any other straight cut saw
- Sander
- Plywood for the base
- 1x2 - 4' for the base
- Acrylic paint
- Brushes
What size to choose for building blocks
Grimm's pyramid has 100 blocks, where the shortest is 1.6" and the tallest is 8". I couldn't find exact measurements but I assume that the width of their blocks is 1.6" (to make the shortest one a cube). Planks that I had, in fact, were 1.5" width and that's how I decided to make my blocks. My stepping pyramid is shorter than its original version.
So in the end, I have:
36 - 1.5"
28 - 3"
20 -4.5"
12 - 6"
4 - 7.5"
How to make wooden building blocks
1. Choose your wood wisely. Make sure it's straight, doesn't have any nuts, and smooth. I didn't want to sand a lot so I bought a premium pine, although if you want this project to be even cheaper, you can go with the regular pine. Just get ready to sand a lot.
2. Sand the sides of the plank before you cut it. It will be so much easier than doing it later. You'll thank me later.

3. Measure blocks and cut them to length. To make my life easier and not to measure my wood 100 times, I made a mark on my miter saw where the cut should be. My saw has a liner that was very convenient for this purpose. I finished cutting all the blocks in less than an hour.

PRO TIP: my first 5 blocks came out terrible. Try to practice a bit on scraps. Slowly put down the blade and stop it when it cuts through and still on the bottom. If you bring it up while it still running it might touch the block and make it bounce, leaving marks.

4. Now comes my least favorite part - sanding. You want to make sure every block is super smooth since little hands will be touching it. It might take a while. I used my orbit sander and it took me about 2 hours (as much as I remember. In my memory it was just annoyingly long). I couldn't even imagine how long it would take to sand it by hand.
 At this point, you are extremely happy that you sanded your blocks halfway through before you cut them.
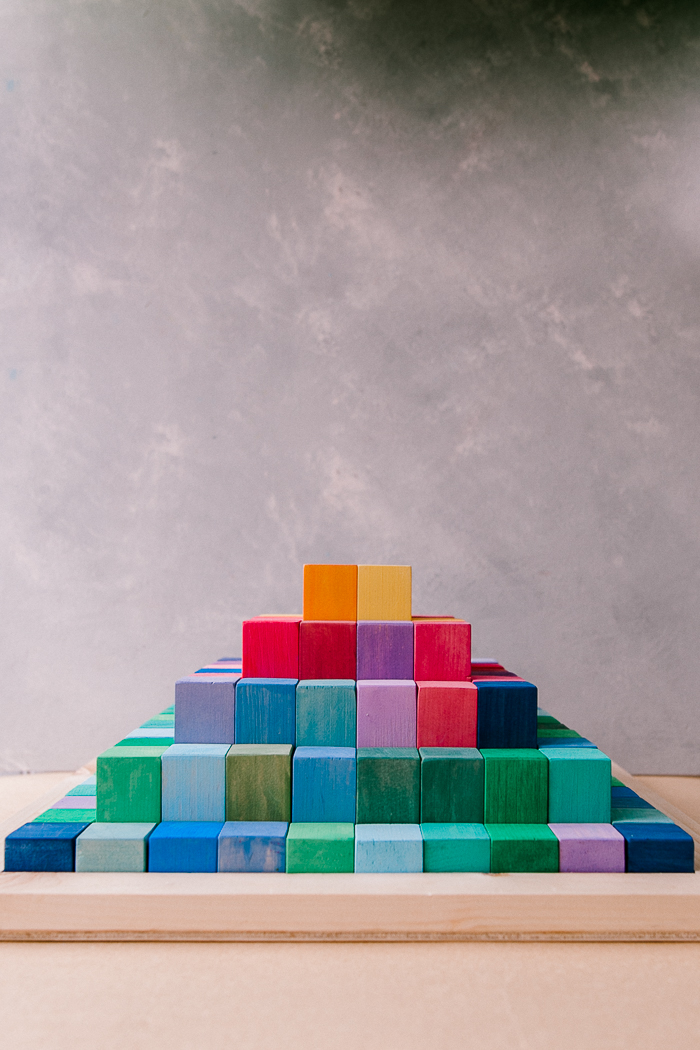
5. While you are enjoying the way blocks coming out, lay them in a pyramid in height order. 4 biggest go in the middle, followed by smaller ones. Isn't it amazing? I absolutely love the ultimate feeling of calm that you get while looking at it.
The hardest part is over.

When you are done gazing at it and being so proud of yourself, take measurements around to make a tray to hold this beauty.
Mine was 60" but I added 1" for blocks to fit a bit loose. You wouldn't want them to be so close to each other that they would be hard to fit.

6. I made a base simply by cutting the frame from 1x2s and attaching it to the plywood.

7. Here comes the fun part! Painting your blocks. To be honest, I was debating to leave it the way it is but decided to paint it since I feel it's nicer to have it in color.
How to paint wooden building blocks
1. Make sure you cover the table. Things will get messy very quickly. Use parchment paper to dry your blocks.

2. I chose acrylic wash, which is acrylic paint watered down to a more thin consistency. There not many kids friendly options for this purpose.
I've tried food coloring and as much as I love the vibrant colors and the texture of the wood in the end, it bleeds color when comes in contact with water. Not ideal if you have a baby around that wants to put everything in their mouths.
Another option is to use liquid watercolors but they are quite pricey and I didn't want to go down that rabbit hole and buy something extra.
I opted for acrylic paint. I'm going to wax it with this beeswax to ensure a safe finish. (I've used this wax for other projects and love it). Let me know in the comments if you know any other way to paint wooden toys.
So let's begin. Painting 100 blocks took me longer than expected. I started at 6 pm and thought I'll whip it up by 9 pm but nope, I finished it only after midnight. I was doing it on the counter kitchen top and had to finish before my kids woke up the next day.
So get the movie on, or some relaxing music and paint your soul away 🙂
Start with lighter colors since things will get messy. I think I already said it but it's important to set your expectations haha. I started with the biggest blocks and painted them in yellow hues. Yes, I tried to copy the original set. Can you blame me though? It is so lovely!!

The next layer was a mix of yellows and reds, gradually becoming purple and blue. The smallest row is in green and blue hues.
At first, I was just putting an acrylic wash on the blocks and let them dry. It worked for the first row of lighter colors but didn't do it for reds and blues. I still wanted to see the pattern of the wood and didn't want them to be in solid color. For all other colors (besides yellow), I wiped off the wash right after the application. (A lot of paper towels were needed). For different hues, I mixed a basic color with white. I read somewhere that to archive a lighter color you need to add more water to the original color but it didn't work for me. Since I was wiping it off with a paper towel, the colors were coming out dull.
Experiment with colors and find what works best for you.

To conclude this tutorial, I'd love to note that overall it took much more time than I expected, but the result is just lovely. I think it was totally worth it. Overall, I spent about $50 to make this set vs. $200 for the original Grimm's pyramid. But it's quite a lot of work, so if you'd want to buy it, I wouldn't blame you 😀
If you'd rather buy:
I couldn't find Grimms large pyramid on Amazon but this company seems to make a great dupe of it and at a better price point.
So if you'd like to buy it, I'd go with this option.
I hope you enjoyed this tutorial! If you like it, follow me on Instagram @ifonlyapril. I try to post in stories my progress with all the projects.
Here is the link to my YouTube Channel where I post videos about simple DIY decor, mom hacks, and activities for kids.
Also, don't forget to follow me on Pinterest, where I create inspiration boards for my next projects.
YOU MIGHT ALSO LIKE
DIY ACTIVITY CUBE FOR TODDLERS
DIY SENSORY MONTESSORI-INSPIRED PLAY TABLE

TOY TREE HOUSE FOR PRETEND PLAY

xoxo,
April


Leave a Reply