

Last year when I went to visit my sister, some magic happened! We created the dream come true charcuterie table.
Charcuterie-style boards are such an easy way to entertain guests and make an impression without putting too much effort into it. Well, instead of a classic charcuterie board we decided to blow it up and make an epic charcuterie table! And it was so much easier than I thought it would be!! Let me tell you how I made it and a few tips on how to make it extraordinary!!
It's really the easiest way to impress all your guests with minimal effort.
Tips to make an epic charcuterie table
Step 1. Find inspiration
Pinterest would be your best friend to find inspiration for the charcuterie table. There are tons of ideas, different themes for this kind of table. It could be themed for special holidays, like Halloween (black and orange), or Christmas (with some greens and reds). Or you can just be artistic and throw everything into creating a colorful palette.
Our charcuterie table didn't have any theme but was all about bright colors!

Step 2. Find a perfect place for it
Find a perfect space for it. Making the whole table into an epic charcuterie table is one sure way to impress your guests. If you are hosting only a few people, then you can choose a smaller board. Find a tutorial here on how to make a simple charcuterie board in 15 minutes.
If you choose to make a whole table, there is no simpler way to do it than to use butcher or craft paper. Put the paper on the table, add little accent plates and small boards. The good thing about it is there are no rules!! I love the rustic look of these small wooden boards and bowls.
If you are adding things like olives, dips, or jams, you can put them in small bowls around the table since wetter products can ruin the craft paper.
This table will be a focal point of gathering, so think it through where you want to locate it.
PIN IT FOR LATER

Step 3. Get your goodies
Let's talk about what to put on the charcuterie table.
We went to Costco and Trader Joe's to get some cheese, berries, fruits, nuts, and bread.
I love both of the stores because they give you a variety of different products. Trader joe is especially perfect for it if you want your table to be dynamic and have different things on it, since the same smaller portions are for sale. But there are tons of interesting things in Costco that you could incorporate into your table.
Prepare and cut all your fruit and meats in advance, so you can effortlessly fix this table in no time before guests arrive.

Step 4. What to add to your epic charcuterie table
- Cheeses: soft or hard, everything can go. My favorites are: brie cheese, manchego (my absolute favorite), cheddar, blue cheese, smoked gouda, Parmigiano, burrata, goat cheese
- Crackers: you can get a variety of crackers from Costco (it comes in a pack of 6), or stock up from Trader Joe's. I love their seasonal crackers. You can also add tortilla chips.
- Bread: Besides crackers, we used an artisan bread from a local store, mini croissants (an absolute crowd favorite), breadsticks. You can also add fresh baguette slices.
- Meats: The meats should be sliced in advanced, stacked, and kept refrigerated until the platter is ready to be assembled. My go-to is prosciutto, dried cured salami, pepperoni. Costco also carries a variety of packs of different presliced meets. I find them perfect, hassle-free items to add to the epic charcuterie table. Remember, you want to minimize the work that goes into creating this table, plus pre-cut meats are sliced perfectly and you wouldn't have to be worried to cut it yourself. I also like cheese wrapped in salami. You can also find it at Costco.

- Mixed nuts: different nuts can add a lot of texture and character to your charcuterie table. I like to add cashews, almonds, and pistachios. Just make sure that adults who are coming over don't have any allergies, especially kids, who could grab nuts from the table when no one is around.
- Fruits and berries: Oh, I feel the fruits are essential to any charcuterie table, big or small. The brighter color is better. Bright red strawberries, raspberries, oranges, mandarins, kiwi, green apples, and of course, all sorts of grapes! Those are the items that will bring life and color to any table. So don't shy away!!!
- Salty things: olives, pickles are a perfect addition! Remember, you want your table to be as diverse as possible for all your guests to find something to satisfy their cravings.
- Vegetables: fresh veggies, like cucumbers, celery sticks, carrots, cherry tomatoes also would add a lot of texture and character to the board so don't discount them.
- Sweet things: chocolate-covered açaí berries, dried fruit (like apricots, figs, dried mango slices)
- Spreads and jams: Get a small bowl and don't forget to add a spoon to it. We added guacamole, hummus, and spinach dip.

Tips to style the charcuterie table
- You'd want to start styling your epic charcuterie table by placing bowls and boards first. Define what items you'd like to have that require a bowl and what would you like to have as an accent. Then put it on the cute wooden board and let it pop up.
- When the bowls and small boards are set, start adding cheeses and meats. You can line them up, or place them as a group. Either way, try to keep the balance and don't put the same things together.
- Add breadsticks, bread, and crackers. I like to line them up in a straight line or as a wave. If you put crackers randomly, I feel they'd ruin a visual balance. So try to keep them in order.
- Bright strawberries in a row on a cute wooden dish are going to pop up, bringing structure and visually pleasing effect.
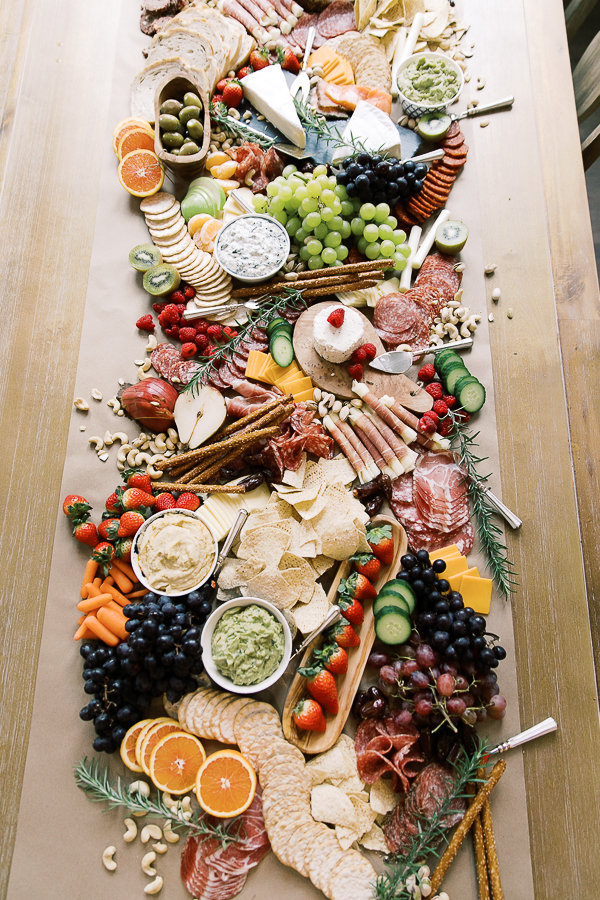
- The last step is to decorate the charcuterie table with colorful fruits and veggies. Don't put items with the same colors next to each other, but rather try to balance it out through the whole table. Cut fruits in half for an extra pop of color.
- The last thing you'd want to add is nuts and some greenery to add texture and bring this table to life. We just added a few rosemary benches here and there and I think they look gorgeous!!!
Step 5. Break the rules
The most important thing to do to create a truly unique, balanced experience in the form of a charcuterie table is to completely break the rules! Follow the basic tips on how to create this table but have fun, add your touch, and just enjoy the process!
The charcuterie table is such an easy way to impress your guests. Have you tried to make the charcuterie table yet? What was your experience with it?
WE THOUGHT YOU MIGHT ALSO LIKE:
How to make DIY dinosaur party decorations

How to throw a fun birthday party for a toddler at home

Don’t be a stranger! Comment below or email me, I’d love to chat!
Follow me on Instagram @ifonlyapril. I try to post in stories my progress with all the projects.
Here is the link to my YouTube Channel where I post videos about simple DIY projects, home decor on the budget, and thoughtful present ideas.
xoxo,
April


Leave a Reply