• Skip to primary navigation
  • Skip to main content
  • Skip to primary sidebar
If Only April
  • MEET APRIL
  • DIY PROJECTS
    • Kids projects
    • DIY furniture
    • Design plans
    • DIY holiday projects
    • Macrame
    • Transformations
    • Woodworking
  • VIDEOS
  • CONTACT
  • SHOP
    • Facebook
    • Instagram
    • Pinterest
    • YouTube
menu icon
go to homepage
search icon
Homepage link
  • MEET APRIL
  • DIY PROJECTS
    • Kids projects
    • DIY furniture
    • Design plans
    • DIY holiday projects
    • Macrame
    • Transformations
    • Woodworking
  • VIDEOS
  • CONTACT
  • SHOP
ร—

How to make shoe cubbies

Please note, that some of the links below are affiliate links and I will earn a commission if you purchase through those links (at no additional cost to you). Thanks for your support this way.

FacebookPinPrintEmail

I recently started a makeover of our entryway coat closet. It was so dysfunctional that I knew I could change it for the better. To contain the shoe mess I wanted to make build-in shoe cubbies. And today I'll show you how to make shoe cubbies.

At first, the plan was to make build-ins but since I'd like it to be as flexible as possible, I decided to make them free-standing and do not attach to the walls. And I'm pretty happy with the result since I can move them around and change up a bit of functionality.

The overall dimensions for the tall cubby are 24 ยฝ" long x 25 ยผ" tall x 12" deep and the short one 12" deep x 24 ยฝ" long x 16 ยผ" tall.

You can get printable plans for the DIY shoe cubbies here and adjust them to fit your space.

Related:

  • Coat closet makeover plans and ideas
  • Pantry closet refresh
  • How to organize a small closet
  • How to make drawers

Materials

  • 4x8x8' plywood
  • 1 ยผ" Pocket hole screws
  • Wood glue
  • Paint
  • Stain
  • Brad nails

Tools

  • Miter saw or any saw for straight cuts
  • right angle clamp
  • Kreg jig
  • Drill
  • Brad nailer

Instructions

Step 1 - cut the plywood

Cut plywood for the shelves. Since the width of the shelves is 12", I asked to precut the plywood sheet into 4 at Home Depot. That saved me time and a clean-up after the table saw at home.

You can get all dimensions that I used for my closet here and adjust them for your space.

Step 2 - assemble boxes

Attach sides on the bottom

Using Kreg jig make pocket holes where it's needed and use pocket hole screws, attach sides and the bottom. I also used wood glue for the assembly. Make sure to always check for square so the structure is at a perfect 90-degree angle.

PIN IT TO MAKE LATER

How to make shoe cubbies

Step 3 - attach shelves

To attach shelves I also used a Kreg jig. I made a pocket hole on the top but if you'd like it to not be visible then you should attach the shelves from the bottom. You might need a special drill bit to get into a narrow space.

Since shoes will be covering shelves anyway, I couldn't be bothered haha.

I left 10" clearance on the bottom for the tall boots (that's the tallest that I have) and 6" and 5 ยฝ" for the top shelves. This way it gives more variety for different shoe sizes.

Step 4 - attach the top

Attach the top to finish the shoe cubby

I used brad nails to attach the top since it's not a structural board and it doesn't have to be properly secured with screws.

To finish it off, I added a board that I stained with Early American wood stain by Minwax.

How to make shoe cubbies

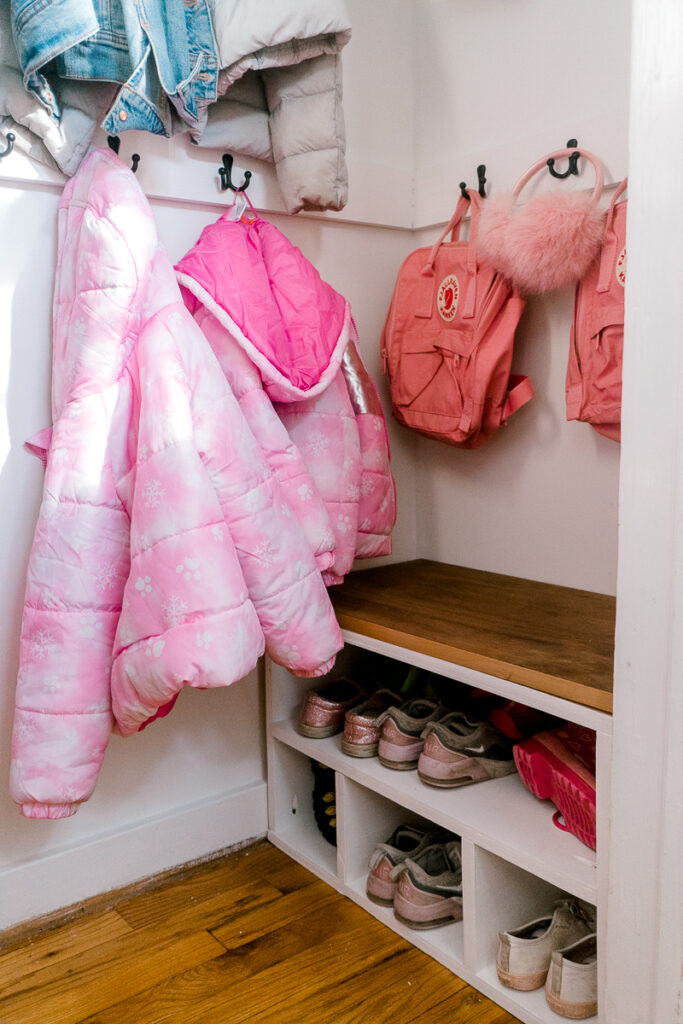
This is how to make shoe cubbies! It's that easy but has a huge impact on the space.

For the short cubby that we'll be using for kids shoes, I added also dividers on the bottom shelf. This way kids shoes won't get tangled and every pair has a place to stay.

Here are the dimensions for the lower cubby.

Adding shoe cubbies to the closet made such a huge difference! Check out here the final result of our coat closet makeover.

If you'd rather watch me doing a makeover then you can visit my YouTube and watch the whole process.

Watch coat closet makeover here
How to make shoe cubbies

xoxo,

April

« A homemade natural reed diffuser in a cool amber bottle
DIY toddler learning tower kitchen stool. IKEA hack »
FacebookPinPrintEmail

Reader Interactions

Leave a Reply Cancel reply

Your email address will not be published. Required fields are marked *

Primary Sidebar

Hi, I'm April! I love woodworking and making things! I hope you will stay for a while and get inspired to make something!

More about me โ†’

Popular

  • 5 Simple Mistakes To Avoid Getting Into DIY
  • How to DIY a gold Parisian mirror frame
  • How to make a Montessori floor house bed (full size)
  • 12 IKEA Alex drawer hacks that will inspire you (must see)

ifonlyapril

DIY Lifestyle Mom | ๐Ÿ“CT
New week, new build๐Ÿ˜Š I was so excited to replic New week, new build๐Ÿ˜Š I was so excited to replicate my first build ever that I made 3 years ago for one wonderful girl this week.

Plans are available on my blog ๐Ÿ˜Š
#ifonlyapril_diy #diyfloorbed
A friend of mine today told me that as a "not a DI A friend of mine today told me that as a "not a DIYer" she can't fully appreciate what I did to this closet. To her it doesn't feel like this transformation is so magical. 

So my DIYer friends, let's take a moment and appreciate what I did with this closet!! 
Swipe to see the "before"๐Ÿ™ˆ
#diymakeover #diyclosetmakeover #ifonlyapril_diy #diyyoutuber
Christmas decor video is live on YouTube ๐ŸŽ„ Swi Christmas decor video is live on YouTube ๐ŸŽ„

Swipe to see my almost successful experiment with epoxy and wooden rounds๐Ÿ˜„ watch the video to see what went wrong and how I think you could fix it. 
Details are on the blog and YouTube.
#diychristmas #diychristmaswreath #diychristmasdecor #christmaswithapril
This year I decided to update our stocking holder This year I decided to update our stocking holder and create this beautiful village.

The problem occurred when I couldn't decide how to finish it - to leave the wood as is or paint cute details in traditional Christmas colors.

So I made both ๐Ÿ˜
Which one would you choose?

Find full tutorial on the blog and YouTube.

#diychristmasdecor #diychristmas #diyyoutuber #christmaswithapril
Guess what?๐Ÿ˜๐Ÿ”ฅ It only took me about 6 month Guess what?๐Ÿ˜๐Ÿ”ฅ

It only took me about 6 months but I finished the playroom! ๐ŸŽ‰๐ŸŽ‰๐ŸŽ‰

EVERY piece of furniture is made by me over the course of last 6 months๐Ÿ˜ and decor tooโ˜บ๏ธ are you excited to see it?

I'm so excited! There are no words to describe it! 
The reveal will be on YouTube tomorrow at 10am est. Subscribe and turn on notifications to not miss it!!! It's epic!๐Ÿ˜๐Ÿ”ฅ 
#diymakeover #playroommakeover #ifonlyapril_makeover
NEW video is live on YouTube ๐ŸŽ‰ Last week I mad NEW video is live on YouTube ๐ŸŽ‰

Last week I made this Pottery Barn inspired bulletin board and I'm in love๐Ÿ˜ it turned out so much better than I imagined๐Ÿ˜
Read about all the details and material list on the blog.

And now to the real question - should I put it in the kids playroom (as intended) or keep it to myself?๐Ÿ˜๐Ÿค”

#ifonlyapril_diy #makersgonnamake #makersofinstagram #diyhomedecor
Witch wears Louboutin ๐Ÿ˜‚๐Ÿ‘ป @louboutinworld #d Witch wears Louboutin ๐Ÿ˜‚๐Ÿ‘ป

@louboutinworld #diyhalloweendecor #diyhomedecor #diyhalloween
Oh my! If someone told me 2 years ago when I just Oh my! If someone told me 2 years ago when I just picked up some power tools that eventually I'll be able to make drawers I'd think they were joking!!
But here we are! This day came when I can proudly say that I built a desk with DRAWERS!!! 

I was so so intimidated by drawers that I felt I'd never be able to make them.

Well, here we are! I'm presenting my new furniture design - kids desk with flutted drawers โ˜บ๏ธ

Watch my kids reaction in stories :) and official video will come live to YouTube on Monday. ๐Ÿ˜Š

Plans will be available in 2 weeks on the blog. Since I'm traveling ๐Ÿ˜… watch stories for that too!
Kisses ๐Ÿ˜˜๐Ÿ˜˜๐Ÿ˜˜

#diydesk #diykidsdesk #diyprojects #ifonlyapril_diy #makersgonnamake #ryobitools #diyfurniture #trendyfurniture #girlsehobuild
Load More... Follow on Instagram

Footer

โ†‘ back to top

About

  • Disclaimer

Newsletter

  • Sign Up! for emails and updates

Contact

  • Contact
  • Media Kit

As an Amazon Associate, I earn from qualifying purchases.

Copyright ยฉ IfOnlyApril 2022

Share this ArticleLike this article? Email it to a friend!

Email sent!