
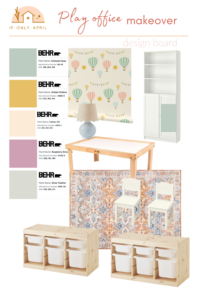
A few months ago, I started my oldest daughter's bedroom makeover. She is six years old now and requested a bedroom with flowers. Your wish is my command, kid. I made a mood board for her room with a general idea of how I'd like it to look. And then it was time to start. It took me longer than expected since life happened, and something always comes up that requires my attention. But progress is better than no progress, so I'm not beating myself up.
This is how the room looked before


Demo
Like in Sia's bedroom, we had these shelves on top of the windows. They might look lovely to someone, but to me, they don't. So they had to go. After removing the shelves, I feel the room looks bigger, and the ceilings are taller.

I also had to remove this ugly mount light that did not fit into my vision. A few surprises were waiting for me in the process. At some point, I thought I touched the wrong wires and was a second short of being electrocuted. Here is my reminder: Always proceed cautiously when dealing with electricity.
I removed old hardware from the doors and was ready to beautify this room.
Trim
As I love the crown, the installation part sounds terrifying. I called my friend for rescue again, and he gladly helped me to install the crown. This time, I was more intelligent and bought 12' boards, making the process much easier.

Look how much better it looks with the crown!
Unlike Sia's bedroom, I made an accent wall in Sasha's room. She has three windows in this room, and if I added trim all the way around, I think it would look too busy. So, the accent wall was perfect for this room.
There are so many ideas on Pinterest on how to make an accent wall. I decided to go classy and add 3 picture boxes with wallpaper inside.

As usual, this process took me longer than I expected (Note to self: don't underestimate the time a project would take). It took forever between cutting the trim, nailing it, and patching up holes and imperfections (yes, there are plenty of those). But oh my! Doesn't it look gorgeous?
Paint and wallpaper
I chose the "Resort Sunrise" color by Behr for this room. We have already chosen a wallpaper. And when I say "we," I mean Sasha actively participated in the process. I chose for her five different types of wallpaper, and this is the one that she picked. Other options are equally gorgeous, but this one was also my favorite.
I decided to paint the whole room in the same color, with contrasting sheens. During the process, I messed up the ceiling and painted it with shiny paint, so I had to add another layer and redo the whole thing. It's not a big deal, especially when, in the end, it looks sooooo gorgeous.


Furniture
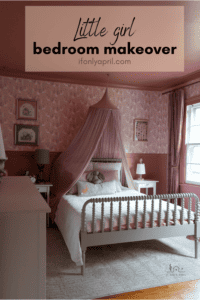
Sasha got the bed from Crate and Barrel, and delivery took over seven months. So when it finally arrived, I was more than happy. And it looks perfect! I'm so happy with the color combination.
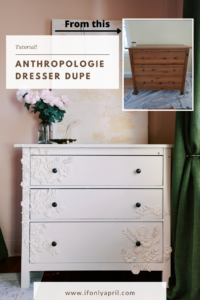
I got lucky again on FBMP and scored this IKEA dresser for $40. I have plans to upgrade it to look like an Anthropologie Enchanted dresser. So stay tuned for that project.
I also got a nightstand for $10 that I painted in chalk black paint from Dixie Belle.
When choosing curtains, these rich green linen curtains were a perfect candidate. They bring spring to the room and add some freshness and unexpected elements.
The next step is to install a chandelier, get a rug, decorate the room, etc. But we are on the finishing line!


xoxo,
April


Leave a Reply