
 It became more difficult to find sports equipment during the pandemic. I was in need of 20lb dumbbells but couldn't find anything at a good price and that could be delivered fast enough. So I decided to make my own set of DIY dumbbells. In this post, I'll show you how to make homemade gym equipment.
150 for a set of 20 lb dumbbells? No, thank you! Our DIY version is so much cheaper and maybe I'm biased, but I think it also looks great!
A few months ago I made a DIY barbell and my husband is still using it every week. To make dumbbells I used the same material - cement and galvanized steel pipe (I used a regular steel pipe for the barbell but some of the people in our DIY community suggested that regular pipe and cement isn't a good combo since it can cause corrosion of the metal).
So I had to upgrade to the galvanized steel pipe. As per other recommendations, I've seen people using PVC pipes instead of galvanized steel pipe. I can't speak to that but I always felt that it wouldn't be strong enough to carry the weight.
For the buckets to harden cement in, I was looking to get painters buckets! But they were all gone at my local store!! It's either people are painting like crazy or they are making some DIY dumbbells at home :D. Either way, I had to find buckets for the end. From all containers that we had, buckets for sour cream and Philadelphia cheese were the best candidates. What a great way to upcycle things you already have at home! When our containers were empty, I started my DIY dumbbells project.
Materials:
- 2x galvanized steel pipe 12"
- 4x galvanized steel caps
- 4 x buckets from Philadelphia cream cheese or sour cream (the ones from Costco)
- concrete mix
- flex seal spray (optional)
- tennis wrap (optional)
If you prefer a video version, subscribe to my If Only April DIY YouTube channel and watch it here:

Instructions:
1. Weight the galvanized steel pipe with caps on. I'd assume if you are using PVC pipe it's not as crucial but steel pipes are heavy and would add to the calculation.
Mine was 1.6 lb.
I was trying to make 20 lb dumbbells (Disclaimer: they came out 16 lb in the end and I'll talk later about what might have caused this miscalculation)
20 - 1.6 = 18.4 lb
18.4/2= 9.2 lb
So I had to mix 9.2 lb of cement to each side of the dumbbell.
2. Add vaseline or oil to release the plastic buckets from cement when it dries.
Mix cement as per box instructions.
I think that mixing cement in the same bucket as I used last time for the barbell was a big mistake and that caused me to screw up my calculations.
When I took the bucket, there was already some cement left and the scale didn't work properly. So I ended up using less cement as I was supposed to.
But let's continue with the making process.
3. Place the pipe in the middle and add cement to the bucket. Do the same thing for another dumbbell. If you want to avoid bubbles when the cement dries, shake the bucket to let all the air out. ( I didn't follow this advice and mine have some bubbles in cement). Put the homemade dumbbells to dry, measure the pipe to make sure it's straight.
PIN FOR LATER>>>>>>>>>>

4. Wait for a few days. When I got back 3 days later I tried to take dumbbells out of the bucket. Remember, I put vaseline inside in hopes it will release the bucket and I could use it for another side? Well, that didn't work. Maybe I didn't wait long enough, or maybe it's just doesn't work. Either way, I had to wait till we finish another bucket of Philadelphia cheese and sour cream. Hahah do you see now why I need DIY dumbbells?
5. A few weeks later I was able to continue this DIY concrete dumbbells project. Mix cement for another side and repeat the same process as before. Let me note that it might be difficult to place it straight. I use my workbench and tied it with a rope to a leg. This way it wasn't moving anywhere and could dry perfectly straight.

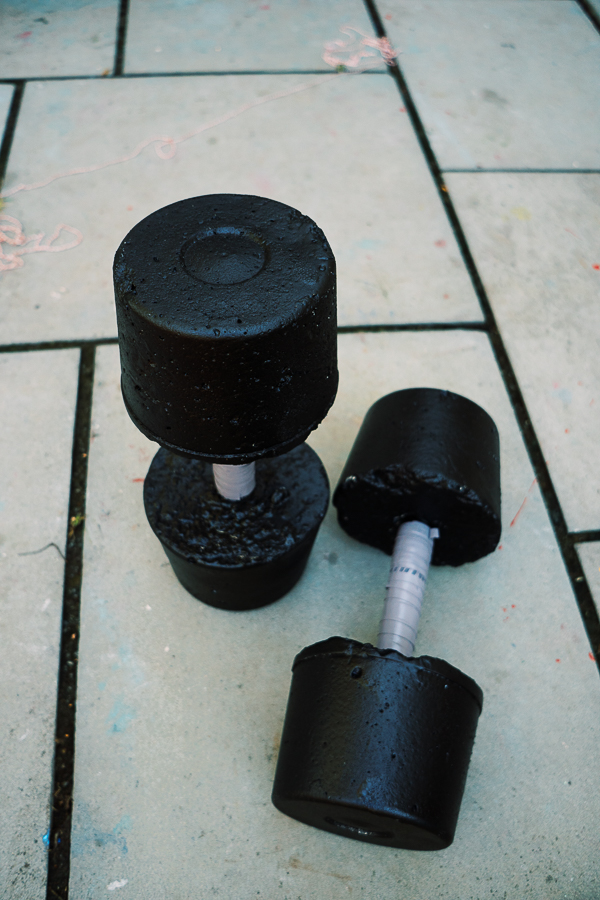
6. When cement cures you can start making it look more pretty or you can leave it as it is. I trained with them for a few weeks before I decided to coat it. Don't forget that concrete can chip and it can get dangerous. Every time I'd do a bench press, some cement would fall into my eyes.
7. I tried a few things, including wrapping it in fabric (which was a complete failure) before I came up with a brilliant solution: liquid rubber!!! (*ovation now haha). This product is sold in a spray can and you simply spray DIY dumbbells with it and when it cures it becomes like rubber - it fully coats the cement and a handle and there is no way for the cement to chip. 
I'm so obsessed with this solution and going to spray paint the DIY barbell I made before as well! Lol, to be honest, I want to spray it all!
I'm not sure how long it will last and how durable it is but I'll keep you posted (it seems that it can go like this forever).
For convenience, I also wrapped the handles with tennis wrap to get a better grip and be more comfortable room use.
In the end, my dumbbells came out 16lb each. I'm not sure what caused that but have a few suggestions:
- mix cement in the empty container (I used the one where I mixed cement before and I assume the dried cement added to the weight and hence my calculations were off)
- use bigger containers (if you need heavier weights)
- shake thoroughly so there are no bubbles in between cement and it fills all the space of your container.
*** While I was making a video I realized that I miscalculated it from the beginning, so don't trust my calculations, trust the process! And do your own math! 😀
Follow me on Instagram @ifonlyapril to watch in stories behind the scenes!
How do you like it? Would you make it yourself? Leave me a comment below and happy creating!
WE THOUGHT YOU MIGHT ALSO LIKE
How to make a cement barbell

xoxo,
April


Leave a Reply