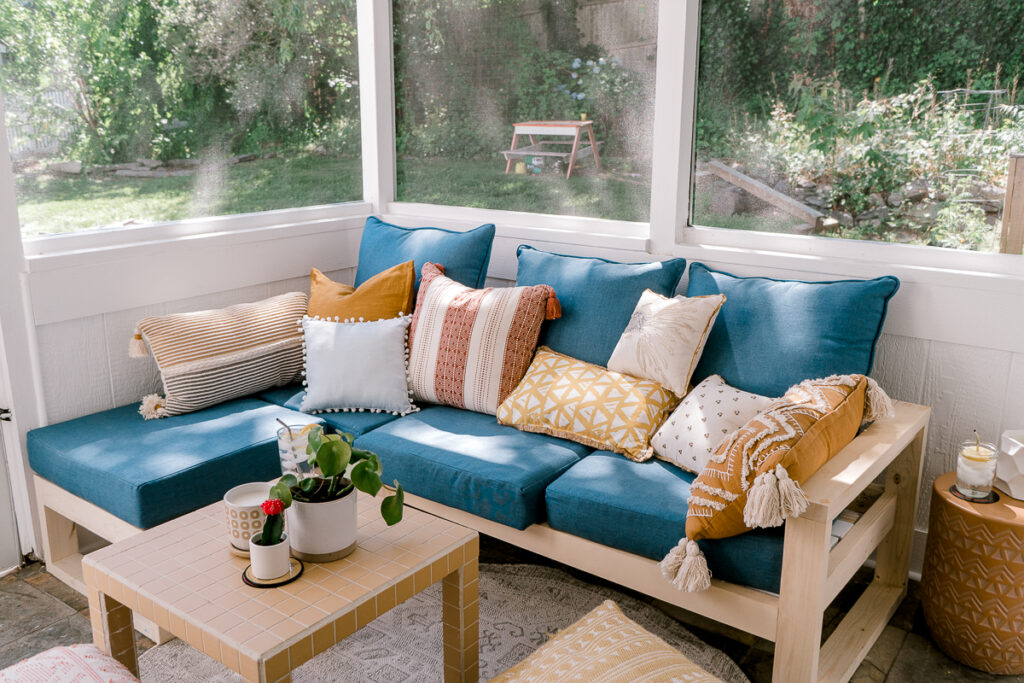
It's the middle of summer, and I finally tackled the DIY outdoor sectional sofa project 🙂 It's so perfect for our patio, and today I'll show you how you can make one for your outdoor area.
I divided tutorials for this outdoor sectional sofa into three parts. In this part, I'll explain step by step how to make a one-armed outdoor sofa as a part of this sectional. For other parts, click below.
How to make a corner unit for an outdoor sectional
As a lot of you know, I participated in a One Room Challenge in Spring 2021. And if you don't know, then you can read about it on my blog here.
While doing a makeover of our screened-in-porch, I looked for outdoor chairs that would fit perfectly there. I found these beautiful chairs from West Elm, but the price tag was far from ideal. I decided to make my own. I asked my beautiful readers over on Instagram if I should make 2 chairs or a sectional to fit most of the place, and most of you voted for a sectional.
I was convinced, haha, And then I saw an outdoor chaise sectional from West Elm, the same collection that the chairs were from. My heart skipped a bit, and I knew I'd make it!
This is how I started to build an outdoor sectional sofa. Quite a story 😁
You can download a printable PDF plan that includes a material list, cut list, and step-by-step instructions on how to build this sectional modular outdoor sofa.
Thank you for your support!
Few words about lumber
I used a regular pine. I intend to keep them on the screened-in porch, and they won't be too exposed to the elements. Ideally, the perfect wood for outdoor furniture is hardwood like teak, cedar, redwood, cypress, or, if you are on the budget, pressure-treated pine.
Hardwoods are expensive, and I don't particularly appreciate working with pressure-treated wood. It's softer and is quite different to work with. I've done many projects with it, like the playground, sandbox picnic table for kids, raised garden bed, etc. It just doesn't feel right, especially if you plan to square the edges to get a more custom look.
Construction lumber that comes in 2x4" has rounded edges. There is nothing wrong with it, but if you aim for a more professional custom look of the furniture, you need to rip the rounded sides (basically trim them off).
And then sand it very very well. That part will take awhile but it's very much worth it.
Just trust me on that part.

That all being said, the cost of this DIY outdoor sofa will depend on the wood that you choose. I'm planning to seal this couch with timber oil, but I'm aware that this outdoor sofa probably won't stand the test of time. But considering lumber prices these days, this is a cheap solution to our screened-in-porch.
I also reused some 2x4"s and 1x3"s that I had around (from the Montessori Floor house bed, to be exact). I used it for the support under cushions, where the wood wasn't exposed anyway.
That's a great way to save money on lumber - to use lumber that you already have to line under the cushions.
About design
I had an option of making something similar to the West Elm sofa that inspired me. It consisted of two parts that could stand next to each other - a lounge and a one-armed sofa.
While I like that setup, I thought it would be better to break it into 3 pieces. It would consist of a one-armed sofa, a corner unit, and an ottoman. I feel this is more convenient to move and also it could be put as a long couch if you move the ottoman between the other two.
And let me tell you, I'm very happy with this decision!!!
I also decided to make my couch extra deep. Most of the plans that I've seen don't have a back. This plan has a reclined back and seats pushed a bit further, making this DIY outdoor sofa so comfy and relaxing that you wouldn't want to leave it.

You can find the exact measurements that I used in the downloadable plans. It fits standard 24x24" cushions from Home Depot.
I highly encourage you to buy cushions first and adjust my plans to fit them.
So let's build this DIY outdoor sectional!
As I mentioned before, for the reader's convenience, I'll break this build into 3 parts, and here I'll tell you step-by-step how to make a one-armed outdoor sofa.
Materials
- 2 ½" exterior grade screws
- 2 ½" pocket hole screws
- wood glue
- sanding discs (80, 160, 220 grit)
Tools
Step-by-step how to build this outdoor sofa
If you want to make just a two-seat sofa, you could also do it with these plans. Just adjust the plan and make two tall armrests.
STEP 1. Cut and assemble the armrest of the sofa

There are probably many ways to assemble the sofa, but I started with building the sides first.
To make an armrest of the sofa, I cut two sides from 2x4s at 27 ½" long, one at 30 ½". And two boards from 2x4s at 20 ½" long.
I started using screws to assemble it since I realized that I don't have pocket hole screws with me. (Why didn't I check it before starting? We'll never know)

The thing is, you can use either method. I find using a Kreg jig is a lot easier, and the screws are hidden. If you use regular screws, you'll have to go through an extra step and use wood filler later. So it's totally up to you if you decided to use screws or assemble with a Kreg jig. Just make sure it's galvanized.

When you build a basic frame, you need to add a connecting 2x4" board between. This is basically where the seats will be.
The seat for this outdoor sofa is 12" from the floor. So I assembled the board at 8 ½" off the floor. Make sure you attached it in the right place, and by that, I mean on the inside of the couch.
Reminder: figure out before building which side will be with a one-arm side and which side will have the lounge. This will make a difference when you put this connecting piece.
After that add the 2x2" under the armrest. I used screws and wood glue to do that.
STEP 2. Cut and assemble another side (the short one where it will connect with the corner piece)

Cut one 2x4" at 20 ½" and one 2x4" at 12", attach it with the two 2x4s cuts at 27 ½".
At this point, I started using a Kreg jig and found it more convenient, but again, it's totally up to you. To help me hold this structure together while assembling it, this Kreg jig clamp was super helpful.
Always check for square when assembling furniture.
Also, don't forget to add wood glue to make it strong!
STEP 3. Connect the sides with support

From 2x4s cut out two boards at 45".
This part will solely depend on your cushions. This is why it's so important to get cushions before this build.
My cushions are 24x24" so the width of the couch is 51 ½"
I used the Kreg jig and made pocket holes and was a bit jittery attaching it since I was worried it would cross the other screws on the other side. But all went well! Phew!
For the back piece would make sense to flip the sofa over and attach it from the inside to avoid the screws being visible.

STEP 4. Add brackets for the seat support

Cut two 2x2"s at 27" and add them on the sides of the couch. This will serve as a support for slats for the cushions.
Make sure that those supports are a bit longer than a cushion depth, so we could attach a back to it later. This is why I cut brackets at 27".
You could also rip the 2x4" to make a 2x2 if you don't want to buy an extra board.

I just used a scrap wood that I had after the Montessori bed.
Use wood glue and screws to attach it.
Cut a 2x4" at 27 ½" and attach in the middle. Use pocket hole screws if you don't want them visible from the outside or just regular screws, but don't forget to use wood filler to cover the holes later on this DIY outdoor sofa.
STEP 5. Add slats

For slats, you can use pretty much any wood. Again, I had leftover wood from the Montessori bed, mostly 2x3s and 2x4s. They were already painted, but who really cares what's underneath the cushion? Right, no one. So it worked great!
I cut slats at 46 ½" and attached them with screws to the 2x2"s support.

STEP 6. Cut and attach the back

For the back, I used 2x3"s.
Cut two 2x3"s at 46 ½" and three at 13".
Make pocket holes in a shorter board and attach them to the longer ones.
After I was done I also added 2x4"s in the middle for better support.
Attach the back from the bottom using galvanized screws.
STEP 7. Sand and apply timber oil
After you finish the assembly of a whole unit, give it nice sand with 220 grit paper.
Right after that, wipe off all the access and apply timber oil. At first, I got the transparent cider, but it didn't work in my space. It's a lovely color, but with so many other colors on the patio, bright orange feels a bit excessive. So I switched to the clear coat of exterior sealer, and I think it was a perfect choice for our DIY outdoor sofa.


I prepared for you a downloadable plan with the lumber list, suggested cuts, and 3D step-by-step instructions on how to make this DIY outdoor sectional sofa.
Making this DIY outdoor sectional sofa was such a rewarding experience. Now I get to enjoy hot summer nights in the beautiful patio settings.
As usual, let me know if you have any questions. I'm always happy to help.
xoxo,
April