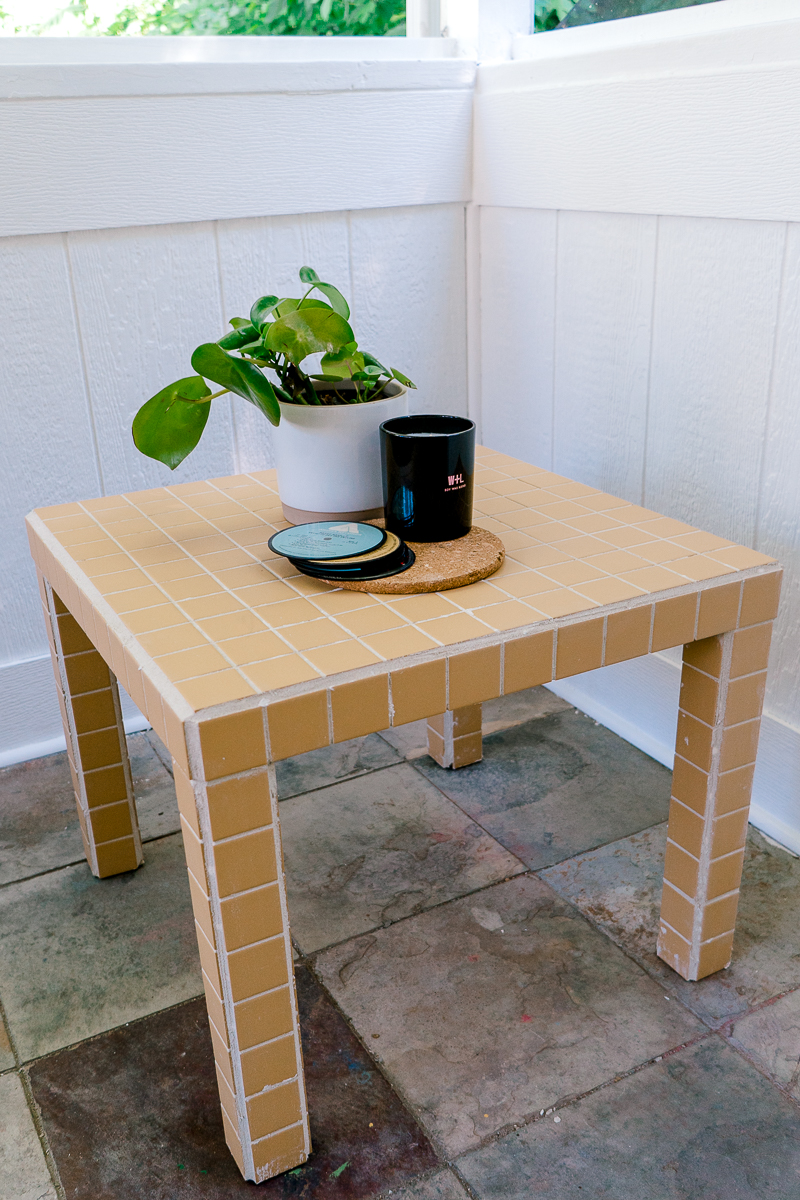
If you are familiar with TikTok, you definitely have seen this DIY tile table that went viral. I'm currently renovating my patio for a One Room Challenge and I had to find/make a coffee table.
I decided to take IKEA lack table and tile the hell out of it 😁 , And I will tell you, it was so much easier than I thought! So let me share some tips and what I've learned during this extremely satisfying process of tiling this tabletop.
Jump to:

What tile to choose?
My answer is straightforward - the cheapest 2x2" tile you can find!
Surprisingly, it wasn't that easy to locate. I checked a local Home Depot but they were out of stock on any 2x2"s tiles. Amazon also had some ridiculous prices on the sheets of 12x12" tiles.
And then I found this store - Bedrosian's tile & stone. And oh goodness, the perfect tile that I was looking for was on sale for $2.99. Hurry up; they have a lot of other beautiful colors!
The tile is great! I ordered 10 sheets (12x12") but only used 8 and a few squares.
Can't wait to get my hands on leftovers and make something fun with it!
It's a matter finish, which I love! But if you are looking for an easier way, probably get the glossy type. When I applied the grout, it wasn't easy to wipe off, and I had to go an extra step to ensure this DIY tile table was shiny clean.
On this note, I've seen people painting the tiles over, but that might end up super messy, in my humble opinion. I'd recommend choosing the color that you would love to stare at for a long time.
PIN IT TO MAKE LATER

What grout to choose?
The next important thing to mention is that you need to choose an appropriate tile adhesive and grout.
There are a lot of different grouts but let's focus on a few components.
Sanded vs. unsanded.
I'll be honest with you, I had no idea there were different types of grouts but here we are. I clearly got the sanded version, which had little parts of sand and was a bit rough to the touch. Unsanded grout is supposed to be smoother and as a result not scratch the tile too much.
I can't say that it bothered me too much, but the part of the big sand was somewhat inconvenient.
After I did more research about it, it turned out that I made a perfect choice.
Sanded grout is usually used on larger gaps since sand provides more bonding with the surface. Unsanded grout is used on a small 1/16 to ⅛ inch wide and might crack if applied on a wider area.
Boom! We are good!
What table to choose?
IKEA LACK side table is perfect for this! It has 2" square legs and 2" square thickness of the table top.
But don't rush to IKEA just yet! Instead, check your local thrift store or Facebook marketplace. I got mine from the Facebook marketplace for free, and you can imagine how excited I was to transform it!

Materials
- IKEA LACK side table
- 2x2" tiles (9 sheets 12x12", the one I used is discontinued ;(, but here is the same in a different color)
- Tile adhesive ( I used this one, also on Amazon)
- Grout (I used pre-mixed in Alabaster color)
- Adhesive spreader
- Old credit card
- Sponge
How to make this viral TikTok tile table
STEP 1
Position tile sheets on the table top, to see how you would like to lay them out.
I had 2 tile sheets that were perfect on the top and 2 that I had to fold to the side. I've seen people cut the tile to the side but I don't see a point in it. Either way, it will be the same gap on the edge.

STEP 2
Wipe your table with a wet cloth to make sure it's clean. Then, take the adhesive spreader and put the adhesive on the table. Choose the spreader that has V-notch.
Few things to mention about the process. You should be generous with the adhesive, so the tile will stick, but not too generous, so it comes out of the spaces in between and messes up the whole thing. I feel it's more of a trial and error, and everyone should find the perfect amount for themselves. I'd say apply a ⅛ inch and spread it evenly.
If you end up putting too much adhesive and it comes out from the gaps, wipe it off, don't let it harden. You'll save yourself so much time later.
STEP 3
Put the tile down on the tabletop and gently but firmly at the same time (whaaat??), press the tile to the adhesive. As I mentioned before, wipe all the access with a cloth. Try to use something that doesn't have too many particles (like paper towels don't work, for example, since they leave small fibers behind and it's not a good look).
When you get to the edges, it's also relatively simple. Just press the tile sheet on the side and hold it for a few seconds.
Then I'd recommend to move to the sides and tile the sides. I actually started tiling legs first, but if you tile the edge before legs you'll have a smaller gap between the edge and the leg.
Cut the strip from the tile sheet and apply it on all the edges.

STEP 4
Tile the table top is relatively easy to put together, fun starts at tiling the legs.
The great thing about it is that you need exactly 1 sheet to wrap up around leg. And then you need to add 8 small tile on the bottom.
The biggest challenge I faced when tiling this DIY tile table was to apply tile sheets on the legs. Probably if I'd cut the sheet into strips it would be easier to put on, but who is looking for an easy way here?
To my defense, if would be more difficult to align tiles together if they were all different strips, so I did the right thing!
In the beginning tiling sheet was unwrapping and didn't want to stick together. So masking tape came to the rescue!
It was such an easy fix and it held the tile sheet on the leg perfectly till it was dry.
After you apply a big sheet of tile on the leg, cut out a smaller part to cover the bottom of the leg. Do it 4 times and let it dry for 24 hours before moving to the next step.

STEP 5
When the adhesive is completely dry, and oh you'll know when it is, it's time for the next messy step - grouting!
I've seen people adding acrylic paint to the grout to create different colors, but I opted for Alabaster white since I think it is a perfect choice for these beautiful yellow tiles.
To apply the grout, take an old credit card and start wiping it to the gaps between the tiles.
As with adhesive application, you'll soon figure out for yourself how to apply it the best. I found if you spread the grout on the edge of the credit card and kind of shovel it inside the gap, that was my golden move.
When there is enough grout, wipe off the access with a damp sponge. Rinse the sponge before going to the next section. Don't expect it to be all gone after the first wipe, it probably will take a few swipes and a wipe with a dry cloth.
For corners, you can use your fingers or the same old credit card. Make sure that you apply the grout close to the tile. I didn't like how it looked a bit dipped and applied another layer to square it out.

STEP 6
Leave the grout to dry and polish the tiles. Use the soft cloth and polish the tiles, one by one. It's very important that you don't touch the grout if it's not fully dried yet.
Note: Try to wipe off as much as you can. If the tile dries on this particular, not glossy tile, it will be very hard to remove it.
I probably should've read the description on the tile before grouting it. It clearly stated that you should seal the tile before applying grout.

After I waited for grout to dry (and I was sure that I'd be able to take it off), to my disappointment, I discovered that grout hardened so much that it was tough to remove it.
I've tried it all - vinegar, olive oil, alcohol, even bought the grout haze remover, but nothing worked! Till I discovered a magic trick - a good ol' magic eraser!
It removed the grout haze with ease. Well, maybe not with ease but at least it worked!
STEP 7
Apply a grout sealant if you plan to use it outside so you don't ruin your beautiful work.


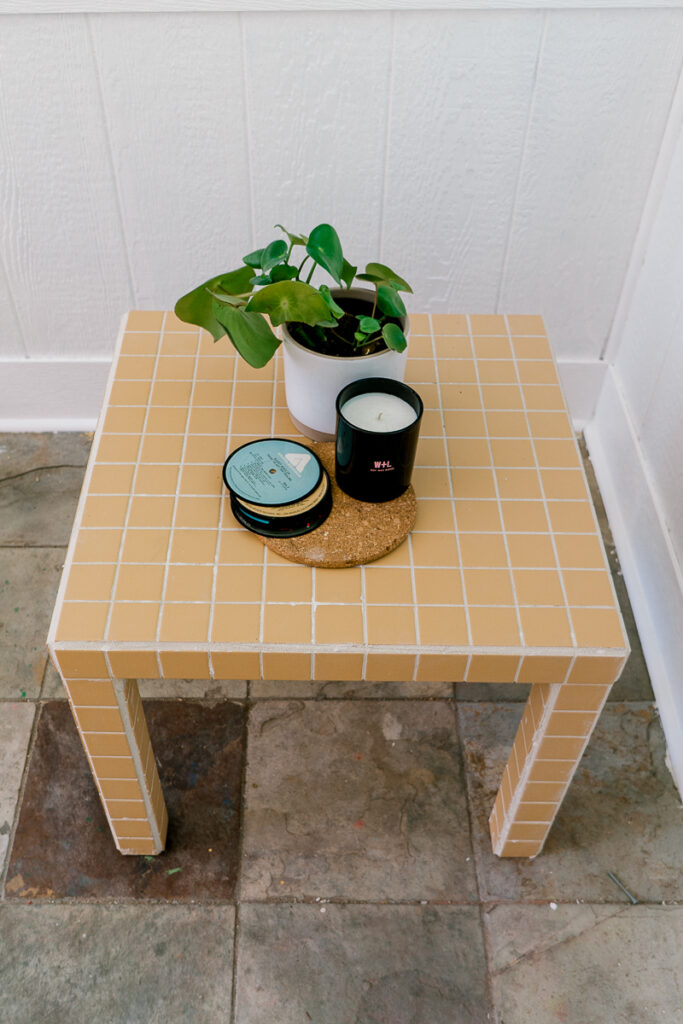
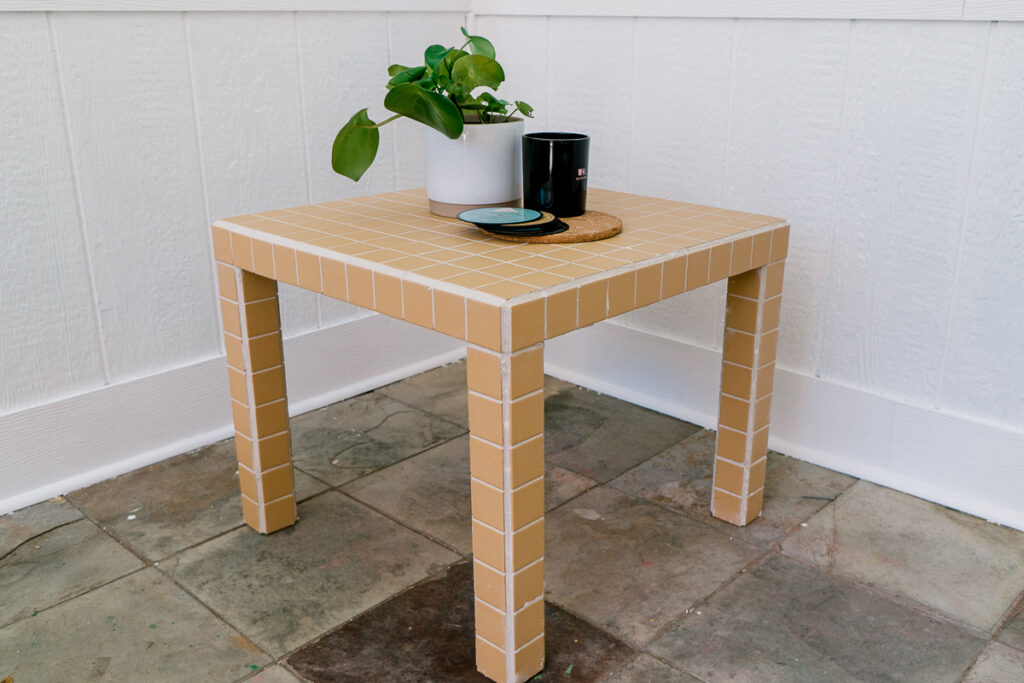
I think it turned out fabulous! It's perfect for my screened-in-porch patio makeover. I'm participating in the One Room Challenge. Tune in next week for the patio reveal!
I'm not sure I'll be able to stay away next time I'll come across the LACK table 😀 I want to tile all the tables!! Especially since now, I know how to DIY tile table the easy way 😉
What are you waiting for? Get yourself a LACK table and start tiling!!
xoxo,
April
Watch me make it on YouTube