• Skip to primary navigation
  • Skip to main content
  • Skip to primary sidebar
If Only April
  • MEET APRIL
  • DIY PROJECTS
    • Kids projects
    • DIY furniture
    • Design plans
    • DIY holiday projects
    • Macrame
    • Transformations
    • Woodworking
  • VIDEOS
  • CONTACT
  • SHOP
    • Facebook
    • Instagram
    • Pinterest
    • YouTube
menu icon
go to homepage
search icon
Homepage link
  • MEET APRIL
  • DIY PROJECTS
    • Kids projects
    • DIY furniture
    • Design plans
    • DIY holiday projects
    • Macrame
    • Transformations
    • Woodworking
  • VIDEOS
  • CONTACT
  • SHOP
ร—

How to attach pegboard to a cinder block

Please note, that some of the links below are affiliate links and I will earn a commission if you purchase through those links (at no additional cost to you). Thanks for your support this way.

FacebookPinPrintEmail

When I was renovating my garage and making an Ultimate tool bench, I had the vision to attach a pegboard to the wall. I thought it would be easy peasy, and I can just screw it directly to the wall. Well, not so easy, since I have cinder block walls in my garage, so I had to attach a pegboard to a cinder block or a cement wall.

I first had an encounter with it last summer, when I put storage shelves on the wall.

It's not complicated but requires a bit of work. Let me walk you through how to attach a pegboard to the cinder block.

Materials

  • 3 - 1x3x8 (I didn't have it so I used plywood ripped in approx 3in)
  • 4x8' Pegboard (the whole sheet didn't fit into the car, so I cut it in half at the store)
  • Concrete screws
  • Masonry hammer drill bit

Do you prefer a video format?

WATCH VIDEO VERSION HERE

How to attach pegboard to concrete wall

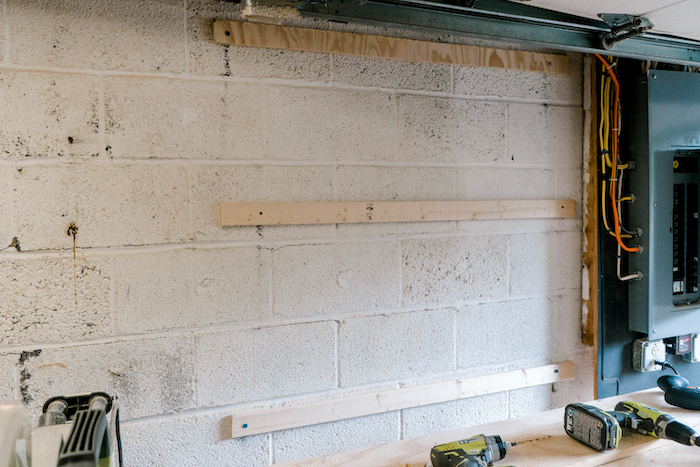
1. Cut your wood to lengths. Mine was 4ft long, so it was easy.

You need to make a "frame" that will go under the pegboard.

I drilled holes with hammer drill bits and attached planks to the cinder blocks, using concrete screws.

This part is the hardest! It takes some strength to drill the holes, and I'm glad that I don't have to do it any time soon again.

2. Attach 3 planks across, creating a frame. You can also put it on the sides, but I had enough of drilling through concrete, so I just left it at horizontal planks.

3. Using small screws, attach the pegboard to the planks. Use the screws with bigger heads, so it doesn't go through the pegboard holes.

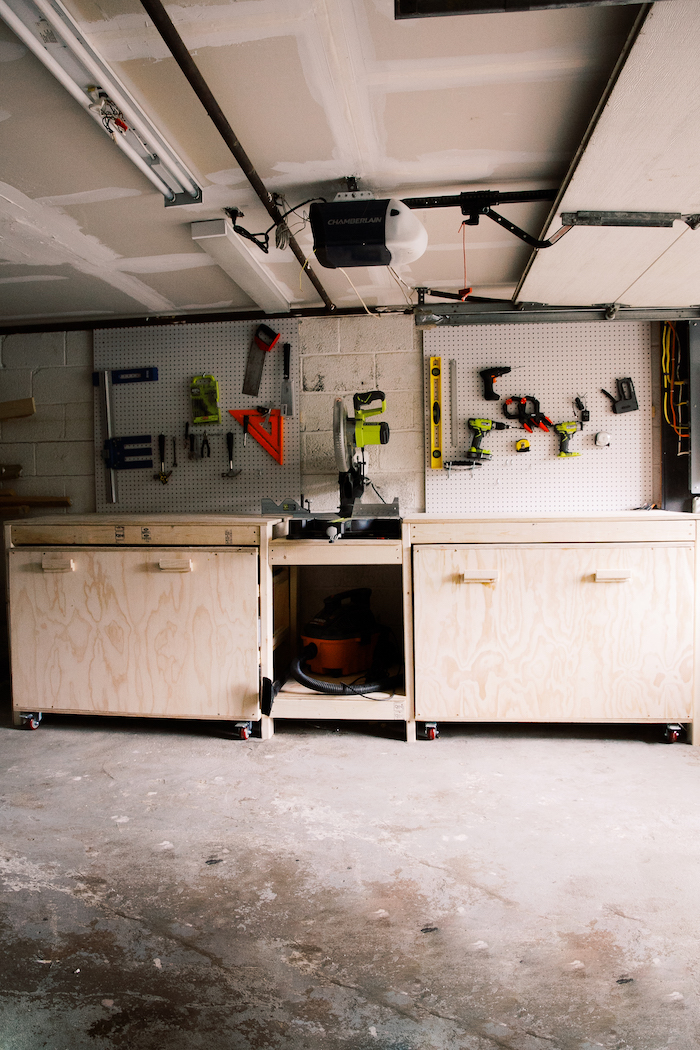
And you are done! You've got yourself a pegboard attached to cinder blocks.

What should we put in the middle?

I'm thinking to create a logo and attach it there! And maybe also to frame the pegboards? Hmm... but this is some other time!!

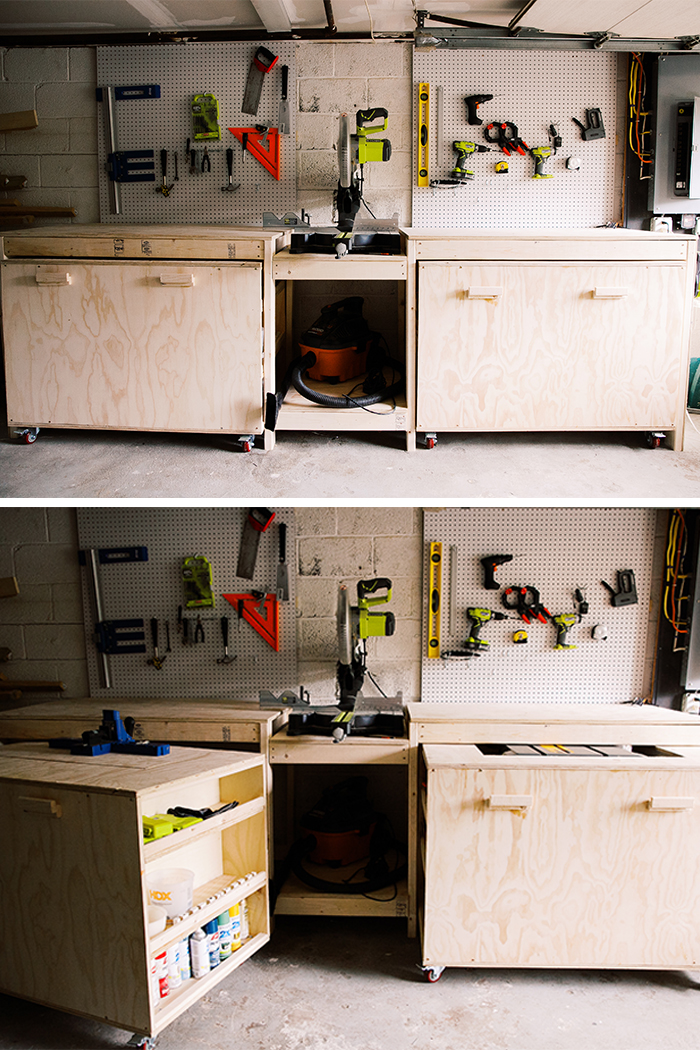
Let's take a second of appreciation for this Ultimate tool bench! Isn't it perfect? Omg! I think it's amazing!!! Go check out how I made it if you haven't seen it yet.

If you'd like to follow my garage makeover journey, follow me on YouTube and watch it on video!

YOU MIGHT ALSO LIKE:

Read how I made simple garage storage shelves, spending only $40 on lumber. Find it here.

Here is an interesting blog about how I upgraded IKEA Alex drawers and also made an easy oak tabletop last summer.

I hope to see you very soon!

Let's be friends on social! I try to post on Instagram the progress of my projects! And also started a YouTube channel where I post videos on how I make all sorts of things!

xoxo,

April

« THE LITERARY PRESCRIPTION {thoughtful way to gift books}
How to build an ultimate tool bench with rolling carts (using Ana Whiteโ€™s plans) »
FacebookPinPrintEmail

Reader Interactions

Leave a Reply Cancel reply

Your email address will not be published. Required fields are marked *

Primary Sidebar

Hi, I'm April! I love woodworking and making things! I hope you will stay for a while and get inspired to make something!

More about me โ†’

Popular

  • I Want To Paint Our Library Moody Dark Blue
  • How to build a brick hearth for a wood stove
  • Home Improvement Projects I'd Like To Finish In 2022
  • Looking for a house as a first time home buyer

ifonlyapril

DIY Lifestyle Mom | ๐Ÿ“CT
It's not perfect but I wouldn't love it any other It's not perfect but I wouldn't love it any other way ๐Ÿค—

Phase 1 of an unexpected renovation that I had to complete in 2 weeks is under my belt ๐Ÿ’๐Ÿปโ€โ™€๏ธ

This brick hearth was such a challenge and oh boy, how much I've learnt from it! Will I look at bricks any time soon? Probably not ๐Ÿ˜… 
now I need to decide if I want to white wash this hearth (probably yess since I messed up with mortar cracks) and what to do with the back wall. Any ideas?๐Ÿค”

Full blog with all details is available at www.ifonlyapril.com (type in search brick hearth) and a video will be on YouTube tomorrow! 

#diyhomedecor #diylife #diybrickhearth #ifonlyapril_diy #oldhouse #oldhousenewhome #
New week, new build๐Ÿ˜Š I was so excited to replic New week, new build๐Ÿ˜Š I was so excited to replicate my first build ever that I made 3 years ago for one wonderful girl this week.

Plans are available on my blog ๐Ÿ˜Š
#ifonlyapril_diy #diyfloorbed
A friend of mine today told me that as a "not a DI A friend of mine today told me that as a "not a DIYer" she can't fully appreciate what I did to this closet. To her it doesn't feel like this transformation is so magical. 

So my DIYer friends, let's take a moment and appreciate what I did with this closet!! 
Swipe to see the "before"๐Ÿ™ˆ
#diymakeover #diyclosetmakeover #ifonlyapril_diy #diyyoutuber
Christmas decor video is live on YouTube ๐ŸŽ„ Swi Christmas decor video is live on YouTube ๐ŸŽ„

Swipe to see my almost successful experiment with epoxy and wooden rounds๐Ÿ˜„ watch the video to see what went wrong and how I think you could fix it. 
Details are on the blog and YouTube.
#diychristmas #diychristmaswreath #diychristmasdecor #christmaswithapril
This year I decided to update our stocking holder This year I decided to update our stocking holder and create this beautiful village.

The problem occurred when I couldn't decide how to finish it - to leave the wood as is or paint cute details in traditional Christmas colors.

So I made both ๐Ÿ˜
Which one would you choose?

Find full tutorial on the blog and YouTube.

#diychristmasdecor #diychristmas #diyyoutuber #christmaswithapril
Guess what?๐Ÿ˜๐Ÿ”ฅ It only took me about 6 month Guess what?๐Ÿ˜๐Ÿ”ฅ

It only took me about 6 months but I finished the playroom! ๐ŸŽ‰๐ŸŽ‰๐ŸŽ‰

EVERY piece of furniture is made by me over the course of last 6 months๐Ÿ˜ and decor tooโ˜บ๏ธ are you excited to see it?

I'm so excited! There are no words to describe it! 
The reveal will be on YouTube tomorrow at 10am est. Subscribe and turn on notifications to not miss it!!! It's epic!๐Ÿ˜๐Ÿ”ฅ 
#diymakeover #playroommakeover #ifonlyapril_makeover
NEW video is live on YouTube ๐ŸŽ‰ Last week I mad NEW video is live on YouTube ๐ŸŽ‰

Last week I made this Pottery Barn inspired bulletin board and I'm in love๐Ÿ˜ it turned out so much better than I imagined๐Ÿ˜
Read about all the details and material list on the blog.

And now to the real question - should I put it in the kids playroom (as intended) or keep it to myself?๐Ÿ˜๐Ÿค”

#ifonlyapril_diy #makersgonnamake #makersofinstagram #diyhomedecor
Witch wears Louboutin ๐Ÿ˜‚๐Ÿ‘ป @louboutinworld #d Witch wears Louboutin ๐Ÿ˜‚๐Ÿ‘ป

@louboutinworld #diyhalloweendecor #diyhomedecor #diyhalloween
Load More... Follow on Instagram

Footer

โ†‘ back to top

About

  • Disclaimer

Newsletter

  • Sign Up! for emails and updates

Contact

  • Contact
  • Media Kit

As an Amazon Associate, I earn from qualifying purchases.

Copyright ยฉ IfOnlyApril 2022

Share this ArticleLike this article? Email it to a friend!

Email sent!