• Skip to primary navigation
  • Skip to main content
  • Skip to primary sidebar
If Only April
  • MEET APRIL
  • DIY PROJECTS
    • Kids projects
    • DIY furniture
    • Design plans
    • DIY holiday projects
    • Macrame
    • Transformations
    • Woodworking
  • VIDEOS
  • CONTACT
  • SHOP
    • Facebook
    • Instagram
    • Pinterest
    • YouTube
menu icon
go to homepage
search icon
Homepage link
  • MEET APRIL
  • DIY PROJECTS
    • Kids projects
    • DIY furniture
    • Design plans
    • DIY holiday projects
    • Macrame
    • Transformations
    • Woodworking
  • VIDEOS
  • CONTACT
  • SHOP
×

Unique inexpensive ALEX drawer upgrade (IKEA hack)

Please note, that some of the links below are affiliate links and I will earn a commission if you purchase through those links (at no additional cost to you). Thanks for your support this way.

FacebookPinPrintEmail

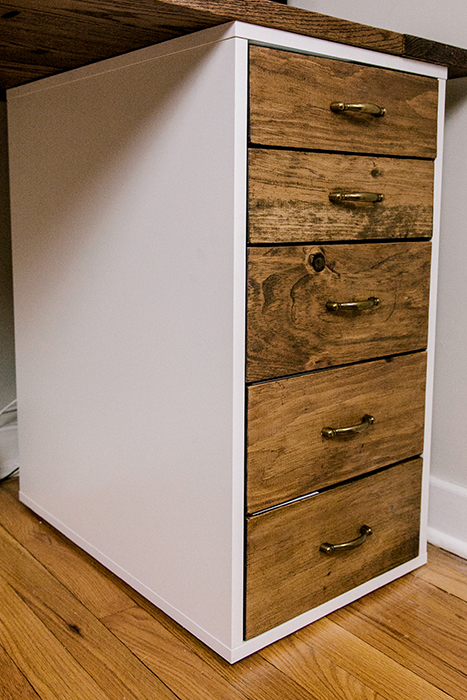
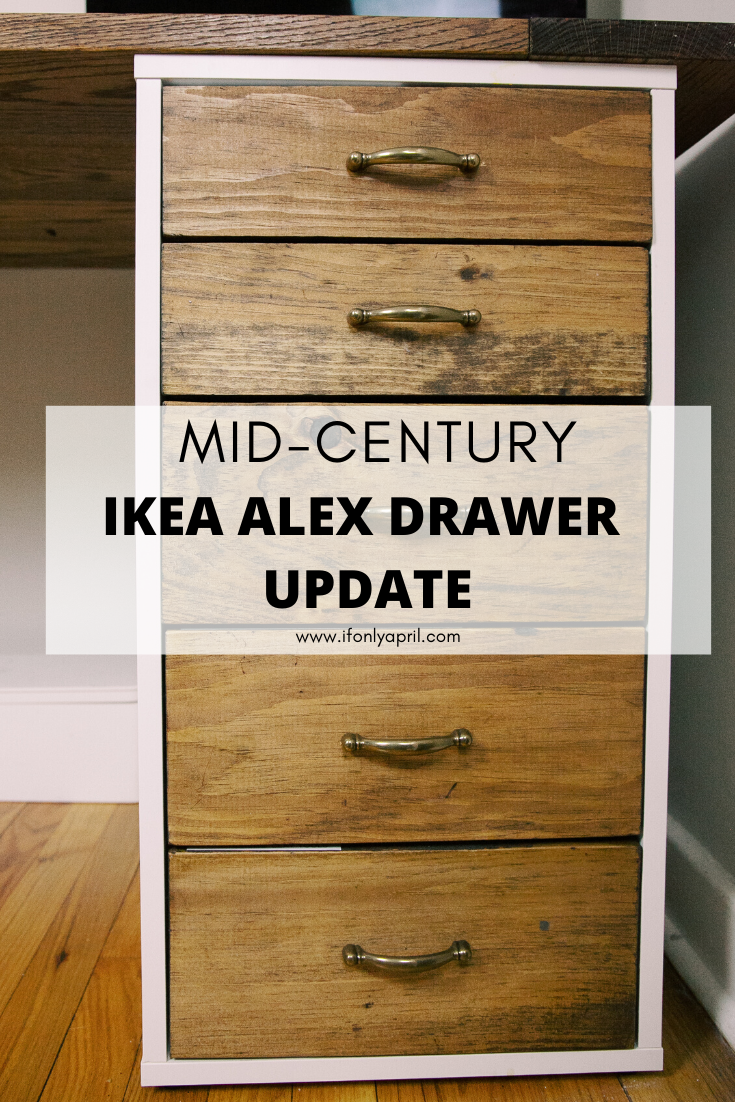
Recently I renovated my office desk. I made a huge red oak desktop. You can find how I built it here. I bought a FINNVARD Trestle with a shelf and had to find a drawer that would fit by height on the other side. ALEX Drawer unit seemed perfect for the occasion, but I couldn't settle for the standard look. I decided to upgrade the ALEX Drawer Unit so it would be in the same rustic style as my handmade desktop.

I have to admit; this was one of my most challenging projects so far since I didn't have a table saw to make rip cuts. I ended up using a circular saw and Kreg Jig Rip-Cut Circular Saw guide, and let me tell you, that was revolutionary.  The main task in this project was to make drawers flush. After all, Ikea has a factory to make it all aligned, and it required a bit of extra measuring and patience. 

This Alex drawer hack will transform your room!

Contents hide
1 What you need to upgrade Alex drawer
1.1 Materials
1.2 Tools
2 How to make the upgrades for Alex drawer
2.1 Share this:

 What you need to upgrade Alex drawer

Materials

  • 1x12x48 wood
  • Minwax stain in Provincial finish
  • Five drawer knobs. Similar here

Tools

  • Kreg Jig Rip-Cut Circular Saw guide
  • Circular Saw
  • Drill and drill bits
  • Sander
  • Miter Saw (to make dado cut for the bottom of the drawer if you don't have a table saw) 

How to make the upgrades for Alex drawer

  1. After you assemble a drawer unit as instructed, you need to make an exact copy of the front drawer units. I was hoping the size would match one of the store-bought planks, but it didn't happen. Top 2 drawers measure at 4," and three bottom drawers are 5 ¾". I hat to cut it to size and make a rip cut. Table saw would be perfect for rip cuts, but since I had only circular saw and miter saw,  Kreg Jig guide came to rescue.

2. Sand it down very well, especially if you are using a circular saw as is in my case.

PIN FOR LATER>>>>>>>>>>

3. Drill holes in designed places. To make it exact, I used paper to see where to drill. I measured how deep the holes should go and put masking tape on my drill bits to get to a perfect depth and not to drill through. Keep in mind that holes are different sizes: few are made for dowels and others a bit smaller for screws.

4. Now is the tricky part. If you don't have the right tools for dado cut (cut that doesn't go all the way through and creates the space for the bottom of the drawer to fit into), you can use a miter saw. Measure the plank carefully where you need the cut and slightly take the miter saw down, creating a small dado cut. Be very careful not to cut it through.

5. If you got to this point, then you can pat yourself on the shoulder! The tough part is behind. 

Now you need to stain your drawers to the desired color (or skip this step if you are going for a natural look). Here I stained my drawers to a Provincial finish to match the desktop. When you are finish staining, leave it to dry for as long as needed and finish assembling the drawer with Ikea instructions.

 6. Add knobs for drawers to finish a rustic look. I got mine from the local hardware store for $1 each and didn't want to spend a fortune or wait for a delivery (When I need something I need it now ;D).  I've seen some gorgeous brass pulls on amazon that would definitely bring these drawers to a new level. Also, these ones would look spectacular.

What do you think about this Ikea hack of Alex drawer upgrade? I absolutely love how it turned out and so proud of myself for finishing this project.

YOU MIGHT ALSO LIKE:

IKEA PLAY KITCHEN MAKEOVER

DIY OVERSIZED CHALKBOARD

ENTRYWAY ORGANIZER FROM SCRAPS

ETRYWAY ORGANIZER DIY

RUSTIC MIRROR FRAME FOR $20

What's your favorite Alex Drawer IKEA Hack? Comment below! I'd love to hear it!

I hope you enjoyed this tutorial! If you like it, follow me on Instagram @ifonlyapril. I try to post in stories my progress with all the projects.

Here is the link to my YouTube Channel where I post videos about simple DIY decor and planning to make a video version of my office tour.

xoxo,

April

Share this:

  • Tweet
  • Print
« DIY oversized chalkboard - a great addition to kid's space
Custom easy desk »
FacebookPinPrintEmail

Reader Interactions

Comments

  1. donna

    January 31, 2021 at 4:10 pm

    I wish someone would fix the drawers to where they extend out more!

    Reply
  2. Caro

    April 13, 2021 at 4:01 pm

    What's the depth for the desk?

    Reply
    • April

      April 13, 2021 at 6:48 pm

      29”

      Reply

Leave a Reply Cancel reply

Your email address will not be published. Required fields are marked *

Primary Sidebar

Hi, I'm April! I love woodworking and making things! I hope you will stay for a while and get inspired to make something!

More about me →

Popular

  • The progress of Sia's bedroom and my favorite finds for her room
  • 10 LEGO table ideas that kids would be excited about
  • Sia's room makeover moodboard
  • Step-by-step tutorial on how to reupholster a chair

ifonlyapril

DIY single mom | 📍CT
Hi 👋🏻 I haven't done this in awhile so thoug Hi 👋🏻
I haven't done this in awhile so thought I'd introduce myself.

Im a DIYer by passion, art business MA by education. 

I came to USA from Russia 13 years ago. I had an itching urge for adventures 😅

I lived in NYC for the most part and worked at the auction house till I had kids and had to move and adjust to suburban life. 

My passion for DIY started when I had my first baby and saw a Montessori baby gym. So I thought.. I probably can make it too! 

And I did 😅 

When we already moved to CT, I saw a Montessori floor house bed that was well over my budget, so I thought I'd try it out too... 

That's when I got my first power tools as an anniversary gift and the rest was history😂

Now I'm a single mom to 2 little girls (Sasha and Sia) and a beautiful long coat German Shepard puppy, named Drogo (after khal Drogo from GOT😁)

We bought our first house in the summer - a 1900s beauty so I had to switch gears from woodworking and start working on room renovations, to make this house our home. 

The progress is very slow, since life always gets on the way🤦🏻‍♀️ but my motto is progress, even slow is better than nothing. 

I can't wait to get a shed so I can pick up my woodworking projects again. Working out of my porch in the winter is not pleasant 🥶

If you'd like to know me more, sign up for my newsletter in link in bio! ☺️

Thank you for following my journey, now tell me something about yourself! 

#introduction #ifonlyapril
I'll get a cookie if I'll finish this bedroom at s I'll get a cookie if I'll finish this bedroom at some point 🤣 it's moving so slow but progress is good😁  @spoonflower 
#kidsbedroom #diykidsroom #homeimprovement  #ryobi #behrpaint #spoonflower
Three evenings well spent. Amazing DIY project, gr Three evenings well spent. Amazing DIY project, great conversations and now I have a beautiful 3-D book nook on my library shelves😍❤️ @byanavrin #diybooknook #ifonlyapril_diy
Yep, another "progress shot"... although I feel th Yep, another "progress shot"... although I feel the end is near 😁 follow @ifonlyapril to see this room transformation for my little bunny🤗☺️ 
#diyroomtransformation #diymakeover #diykidsbedroommakeover #makersgonnamake #kidsroominspiration #kidsroomdesign
I can't express it in any other words then... I ju I can't express it in any other words then... I just hate it🤷🏻‍♀️#roommakeover #kidsroommakeover #ifonlyapril_diy #ihateprimer #paintingdoors
We all love beautiful "before" and "after" room tr We all love beautiful "before" and "after" room transformations. But truth is... there is a lot of "work in progress" in between 😁 #diyroommakeover #diy #roomtransformation
Haha so here is a thing... I'm not sure how often Haha so here is a thing... I'm not sure how often you wash your hair, but I do it every 4-5 days. And my entire schedule depends on a "hair day"🤣

I'd never do a workout or a messy project if I just did my hair that morning😁 

Making videos every day with fresh hair is quite hard lol 

Now I'm trying out a new thing... I make "lifestyle", nice reels on my hair day and leave all messy projects for "not a hair day" 🙈😁

Can you relate? Or am I the only one?😁
Would you ever do a workout or a messy project if you just did your hair in the morning? 😅 
#dayhairdontcare #dontmesswithmyhair
Haha New Yorkers has seen it all 😅 so who cares Haha New Yorkers has seen it all 😅 so who cares🤣 #hairstyles #hairstylegoeswrong #funny #lifemoments
Load More... Follow on Instagram

Footer

↑ back to top

About

  • Disclaimer

Newsletter

  • Sign Up! for emails and updates

Contact

  • Contact
  • Media Kit

As an Amazon Associate, I earn from qualifying purchases.

Copyright © IfOnlyApril 2023

Share this ArticleLike this article? Email it to a friend!

Email sent!