
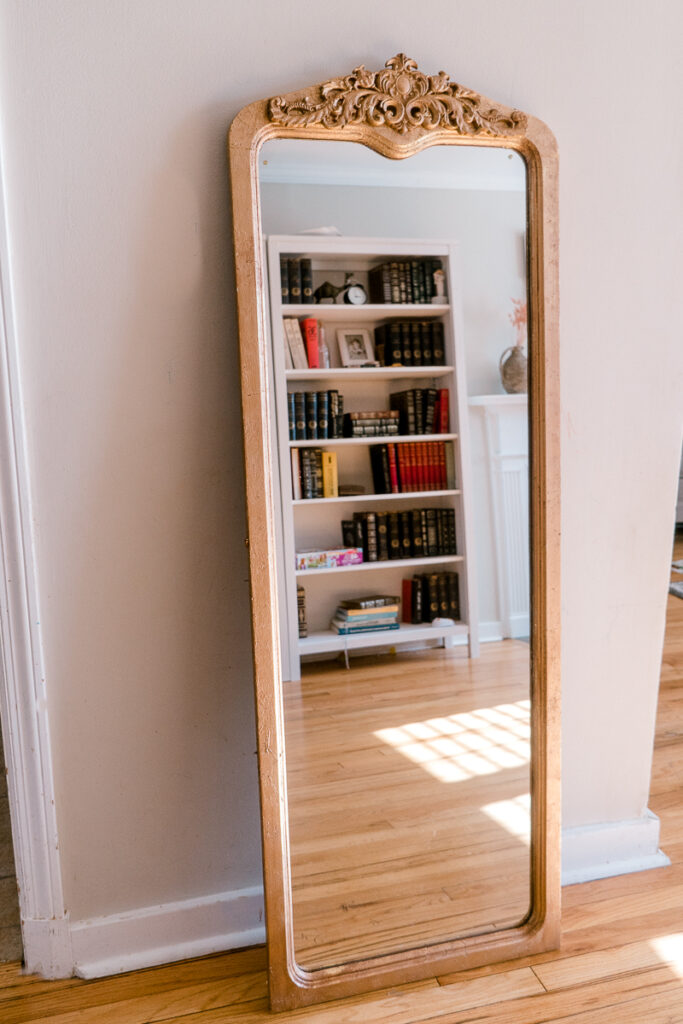
You probably have seen those gorgeous golden baroque mirrors with beautiful ornaments and details. You also have seen a price tag on it as well. Yes, some of them can go up to thousands of dollars like this beauty here and a Primrose from Anthropologie. I decided to try my hands on DIY a mirror frame, to make it from old brown and very average to one-of-a-kind gold Parisian mirror frame.
Ugh, that was quite an adventure! I used gold leaf once before when I made these cute epoxy/cement trays but didn't learn much. So let's start from the beginning.
I had an old thrifted floor-size mirror that I planned to use at some point. It used to have a stand on the back but was all gone by the time it got to me. This brown color definitely could take a bit of updating and get a bit of gold on it.
Related: DIY rustic mirror frame


The whole process of using gold leaf was new to me and I didn't know what to expect. But here is what I've learned from working with gold leaf for the first time.
How to apply gold leaf to wood
Step 1 - choose the gold leaf
Technically, anything you'll be using is a gold leaf imitation and not actual gold. Imagine how expensive it would get?
I used these cheap gold leaf sheets from Amazon and frankly, was quite disappointed. I'm not sure if it was a manufacturing fault or the way they packed it, but every single sheet had a tear in the middle. That was a crucial flaw considering I needed ⅔ of the sheet to wrap around the wooden frame.
I found a way to work around it in my project but want to try another set in the future to see if it works better.
I already purchased this gold leaf kit from Old Wolrd Art and will give you my feedback when I try it out.
Step 2 - apply a thin layer of sizing to wood

"Size" is an old word for glue. You need to choose the sizing you'll be working with. Ideally, you could get a special sizing for the gold leaf application. But I didn't have it and also didn't have the patience to wait for one to arrive. I opted out to use mod podge and it did a great job. I have nothing to compare, of course, but it did what it suppose to do - connecting the gold leaf sheets to the wood.
I learned that a thin layer of mod podge works better. If you put too much sizing it will take considerably longer to dry. Also, important to note that the brush for mod podge application should be synthetic and a bit coarse.
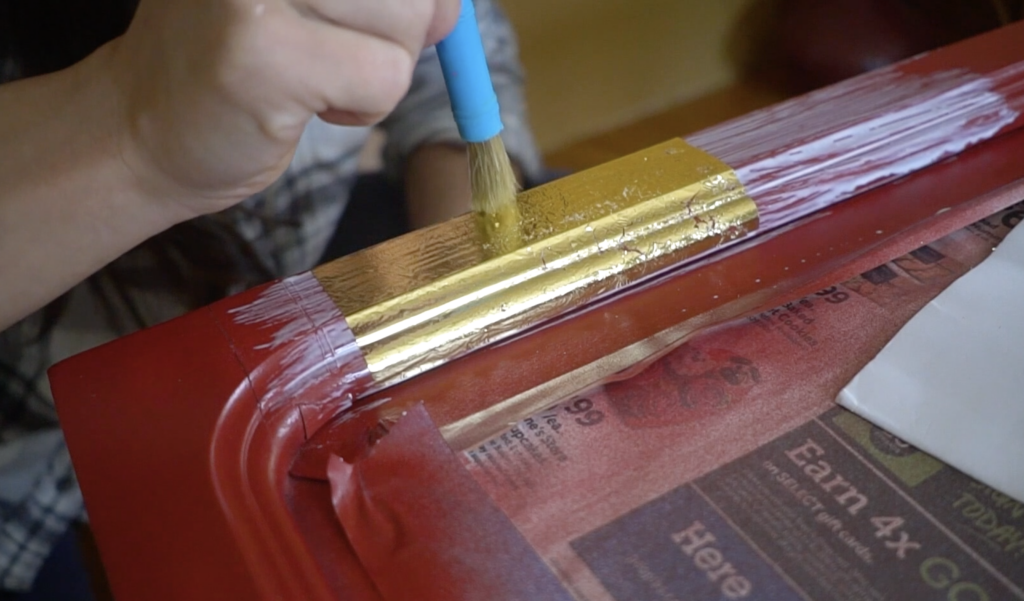
Step 3 - lay down a gold leaf sheet

Try not to breathe when you take the gold leaf sheet. I found that taking cardboard and using it to pick up a gold leaf sheet worked the best. Try to lay it down on the wood as smoothly as possible. As soon as it touches the mod podge, it will be impossible to move without breaking. A few breaks, in my opinion, are great - they add a fun texture, but too much doesn't look that good.
When the gold leaf sheet is on the wood, take a dry brush and gently dab it on the sheet. Try not to make any "brushing" movements and only tap from the top, very gently.
Step 4 - let it dry
Let it dry for as long as you can. Gently touch it a few days later to see how dry the gold leaf sheet is and you are done! You can apply a protective layer on top to preserve the gold leaf sheet.
That's how I applied the gold leaf sheets to wood. But let's see how we can make an antiqued golden frame that would look stunning.
PIN IT TO MAKE LATER

How to make a golden Parisian mirror frame
Materials
- An old mirror
- Gold leaf
- Decorative applique
- Brushes
- Mod podge (or a special kit)
- Rub'n buff
- Spray paint
- Painters tape
- Paint (burnt sienna, burnt amber)
- E6000 glue
Step 1 - paint the frame
First things first, you need to wipe all the derbies and dirt off the frame. When it's clean, tape the mirror part off and prepare wood for painting by sanding it down.

Then you'd need to prime and spray paint the frame. I chose a red color for the top layer. I think when a touch of red shows through the gold it creates a special antiqued effect. Fast forward, I wasn't disappointed.

Let it dry as per instructions on the paint. It's important the paint is fully dried before the next step.

Step 2 - apply gold leaf
This was my first time working with gold leaf and oh boy, it took some time to get a hang of it.

The difficulty in working with gold leaf is that it's so thin and literally flies out with a little breath. So the best way to handle it is with extra care while holding your breath haha
I wrote above a step-by-step how to apply gold leaf sheets on wood. When you are finished with the gold leaf application, let it dry.
When it's fully dried, take a dry brush and remove all the loose gold leaf that you have on the frame.
Bare with me, it will get ugly before it will be beautiful!

Step 3 - apply rub'n'buff
I was quite disappointed with the effect of a gold leaf only. It looked too shiny and I didn't do a fine job applying it. I blame bad gold leaf sheets for it. Hahah

So I had to pivot and apply something else on top. I never worked with ruf'n buff before, but let me tell you, now I see what the fuzz is about. This little tube is pure magic. I used the antique gold color and applied it on top of the gold leaf. Gold leaf gave me a nice texture to work with, and rub'n buff on top added an amazing antique gold color.
Now it truly started looking like a DIY gold Parisian mirror frame. Amazing!
Step 4 - "antique" the gold leaf
After I finished with rub'n buff something was still missing. It looked still very polished and 2 dimensional.

To "antique" the frame I used a mix of acrylic paints (burnt sienna and burnt amber) from Arteza paints, my go-to paints for all my projects.
Simply mix these two colors and dilute them with a bit of water. Apply this mixture to the frame and wipe it off right away. What it does, the paint goes into small nooks and crevices and stays there, imitating the dirt that was collected over time and creating a unique old look.
Step 5 - prepare the decorative applique

While antiquing the frame, do the same steps for the decorative applique. It was a bit tricky to apply gold leaf sheets on it, so I took my gloves and rubbed the gold leaf between the small detailing. That gave the molding a unique look.
Red paint definitely shows through way more in the detailing, but I love the way it looks.

Repeat all the steps for the applique as you did for the frame and glue it with E6000 to the frame.
Dust off all the access, take off the tape from the mirror and you've got a gorgeous DIY imitation of a gold Parisian mirror.


What do you think about this DIY?
It is one of my favorites! I can't wait to find a perfect place for it in the house and use it every day!
If you'd rather buy

Watch a video tutorial on how to make this DIY gold Parisian mirror frame on YouTube.

Check my Instagram @ifonlyapril where I post behind the scenes of what's is happening in If Only April world 🙂
xoxo,
April


Leave a Reply