• Skip to primary navigation
  • Skip to main content
  • Skip to primary sidebar
If Only April
  • MEET APRIL
  • DIY PROJECTS
    • Kids projects
    • DIY furniture
    • Design plans
    • DIY holiday projects
    • Macrame
    • Transformations
    • Woodworking
  • VIDEOS
  • CONTACT
  • SHOP
    • Facebook
    • Instagram
    • Pinterest
    • YouTube
menu icon
go to homepage
search icon
Homepage link
  • MEET APRIL
  • DIY PROJECTS
    • Kids projects
    • DIY furniture
    • Design plans
    • DIY holiday projects
    • Macrame
    • Transformations
    • Woodworking
  • VIDEOS
  • CONTACT
  • SHOP
×

Make an easy wall wooden panels art

Please note, that some of the links below are affiliate links and I will earn a commission if you purchase through those links (at no additional cost to you). Thanks for your support this way.

FacebookPinPrintEmail

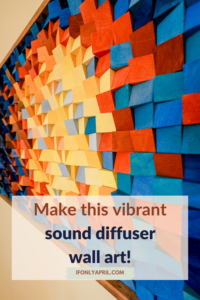
Wood and paint are where my two passions collide. When I looked at the empty space above the couch in my living room, I immediately thought about combining these two and making easy wooden panels art wall home decor.

They are so easy to make and this project would be perfect for a beginner DIYer since technically you only need to know how to use any straight cuts saw. I used my favorite miter saw, but this project could be done with a circular saw or table saw - whatever you feel comfortable with.

Like any wall art that we create, it could be customized to your liking. I used a 1x10” wooden board but you can go smaller or bigger. You could also swap up real wood with plywood if that is the look you are going for. It would be definitely cheaper than using select pine boards.

Select pine boards were pricey but I love the edge on them so it was worth it in my opinion.

Related:

DIY textured abstract art

Minimalist contemporary art

Simple abstract acrylic paintings that anyone can do

Materials

  • (2) 1x10”x6’
  • Acrylic paint (colors of your choice)
  • painter's tape
  • Paint brushes

Tools

  • Straight cuts saw (or ask at Home Depot to cut it for you)
  • Sander or sanding block

How to make an easy wall wooden panels art

Step 1. Prepare wooden panels

Cut 12 square boards

Measure the width of the board. If you are new to woodworking, the measurements for the boards aren’t the same as they mark them in the store.

1x10” actual size is ¾x9 ¼”.

Since I was going for a square look of the boards, I measured the board at 9 ¼” before making a cut. I was debating if I should make 9 panels but decided to cut 12, just in case I’ll decide to make more panels.

You’d want to be very precise with the cuts and try to make it as clean as possible. If you are using a miter saw, secure the board on the miter saw, drive the blade down very slowly. When it reaches the bottom, stop the miter saw but don’t put up the blade yet. Let it stop completely. This way you’ll minimize the amount of chopped wood and would get a perfectly clean cut.

Step 2. Paint a frame

Tape off edges with painter's tape

Tape the edges with painter's tape on the sides and paint the middle white. As I said before, you can use any color you want, I felt that white would be a perfect canvas for my project.

easy wooden panels art
Paint the middle

Step 3. Paint your designs

I started out by sketching a layout of designs that I’d like to make. I researched Pinterest and chose the images that I liked and went well together.

Sketch up designs of the art

After I decided on the images I chose a color palette. I felt that earthy colors would go perfectly in my living room. I chose my favorite shades of terracotta, sage, and pinkish colors.

The next step would be to paint designs on the panels. I used my favorite brushes for acrylic paint.

I'm not that great at painting but I think these pieces turned out lovely! I used different brush strokes.

I even experimented with making stamps from potatoes. That was so much fun! Just cut the shape that you need on the potato, dip it in paint, and press against the canvas. I love how it starts fading after a few pushes and creates these unique shapes. What do you think? Have you tried making shapes with potatoes?

PIN IT TO MAKE LATER

Step 4. Hang it on the wall

My original idea was to use strong tape to attach these wooden panels of art to the wall. I got this tape from Amazon since it had excellent reviews! The only thing I didn't account for was that you can't use it on the painted wall.

Oops!

It ended up a complete fiasco when I texted one panel on the wall. Since we are in a rental and moving out soon, I couldn't make 12 holes on the wall so I decided to show you it as is and will put it up on the wall later.

What do you think about this idea?

easy wooden panels art

It could also be rotated vertically.

easy wooden panels art

Which design is your favorite?

This one is my favorite 🙂
Or maybe this one haha

If you’d like to watch me making it, the video is available on my YouTube channel. It’s quite a therapeutic one so I highly recommend it. I also talk about more details on painting.

I hope it inspired you to make something like this, if you do, tag me on Instagram @ifonlyapril. I’d like to brag about your project!

xoxo,

April

Share this:

  • Tweet
  • Print
« When cement and epoxy collide. How to make a gorgeous DIY trinket tray
12 IKEA Alex drawer hacks that will inspire you (must see) »
FacebookPinPrintEmail

Reader Interactions

Leave a Reply Cancel reply

Your email address will not be published. Required fields are marked *

Primary Sidebar

Hi, I'm April! I love woodworking and making things! I hope you will stay for a while and get inspired to make something!

More about me →

Popular

  • The progress of Sia's bedroom and my favorite finds for her room
  • 10 LEGO table ideas that kids would be excited about
  • Sia's room makeover moodboard
  • Step-by-step tutorial on how to reupholster a chair

ifonlyapril

DIY single mom | 📍CT
Hi 👋🏻 I haven't done this in awhile so thoug Hi 👋🏻
I haven't done this in awhile so thought I'd introduce myself.

Im a DIYer by passion, art business MA by education. 

I came to USA from Russia 13 years ago. I had an itching urge for adventures 😅

I lived in NYC for the most part and worked at the auction house till I had kids and had to move and adjust to suburban life. 

My passion for DIY started when I had my first baby and saw a Montessori baby gym. So I thought.. I probably can make it too! 

And I did 😅 

When we already moved to CT, I saw a Montessori floor house bed that was well over my budget, so I thought I'd try it out too... 

That's when I got my first power tools as an anniversary gift and the rest was history😂

Now I'm a single mom to 2 little girls (Sasha and Sia) and a beautiful long coat German Shepard puppy, named Drogo (after khal Drogo from GOT😁)

We bought our first house in the summer - a 1900s beauty so I had to switch gears from woodworking and start working on room renovations, to make this house our home. 

The progress is very slow, since life always gets on the way🤦🏻‍♀️ but my motto is progress, even slow is better than nothing. 

I can't wait to get a shed so I can pick up my woodworking projects again. Working out of my porch in the winter is not pleasant 🥶

If you'd like to know me more, sign up for my newsletter in link in bio! ☺️

Thank you for following my journey, now tell me something about yourself! 

#introduction #ifonlyapril
I'll get a cookie if I'll finish this bedroom at s I'll get a cookie if I'll finish this bedroom at some point 🤣 it's moving so slow but progress is good😁  @spoonflower 
#kidsbedroom #diykidsroom #homeimprovement  #ryobi #behrpaint #spoonflower
Three evenings well spent. Amazing DIY project, gr Three evenings well spent. Amazing DIY project, great conversations and now I have a beautiful 3-D book nook on my library shelves😍❤️ @byanavrin #diybooknook #ifonlyapril_diy
Yep, another "progress shot"... although I feel th Yep, another "progress shot"... although I feel the end is near 😁 follow @ifonlyapril to see this room transformation for my little bunny🤗☺️ 
#diyroomtransformation #diymakeover #diykidsbedroommakeover #makersgonnamake #kidsroominspiration #kidsroomdesign
I can't express it in any other words then... I ju I can't express it in any other words then... I just hate it🤷🏻‍♀️#roommakeover #kidsroommakeover #ifonlyapril_diy #ihateprimer #paintingdoors
We all love beautiful "before" and "after" room tr We all love beautiful "before" and "after" room transformations. But truth is... there is a lot of "work in progress" in between 😁 #diyroommakeover #diy #roomtransformation
Haha so here is a thing... I'm not sure how often Haha so here is a thing... I'm not sure how often you wash your hair, but I do it every 4-5 days. And my entire schedule depends on a "hair day"🤣

I'd never do a workout or a messy project if I just did my hair that morning😁 

Making videos every day with fresh hair is quite hard lol 

Now I'm trying out a new thing... I make "lifestyle", nice reels on my hair day and leave all messy projects for "not a hair day" 🙈😁

Can you relate? Or am I the only one?😁
Would you ever do a workout or a messy project if you just did your hair in the morning? 😅 
#dayhairdontcare #dontmesswithmyhair
Haha New Yorkers has seen it all 😅 so who cares Haha New Yorkers has seen it all 😅 so who cares🤣 #hairstyles #hairstylegoeswrong #funny #lifemoments
Load More... Follow on Instagram

Footer

↑ back to top

About

  • Disclaimer

Newsletter

  • Sign Up! for emails and updates

Contact

  • Contact
  • Media Kit

As an Amazon Associate, I earn from qualifying purchases.

Copyright © IfOnlyApril 2023

Share this ArticleLike this article? Email it to a friend!

Email sent!