• Skip to primary navigation
  • Skip to main content
  • Skip to primary sidebar
If Only April
  • MEET APRIL
  • DIY PROJECTS
    • Kids projects
    • DIY furniture
    • Design plans
    • DIY holiday projects
    • Macrame
    • Transformations
    • Woodworking
  • VIDEOS
  • CONTACT
  • SHOP
    • Facebook
    • Instagram
    • Pinterest
    • YouTube
menu icon
go to homepage
search icon
Homepage link
  • MEET APRIL
  • DIY PROJECTS
    • Kids projects
    • DIY furniture
    • Design plans
    • DIY holiday projects
    • Macrame
    • Transformations
    • Woodworking
  • VIDEOS
  • CONTACT
  • SHOP
×

2 ways to make a DIY lazy Susan pencil holder

Please note, that some of the links below are affiliate links and I will earn a commission if you purchase through those links (at no additional cost to you). Thanks for your support this way.

FacebookPinPrintEmail
doy lazy suzan pencil holder

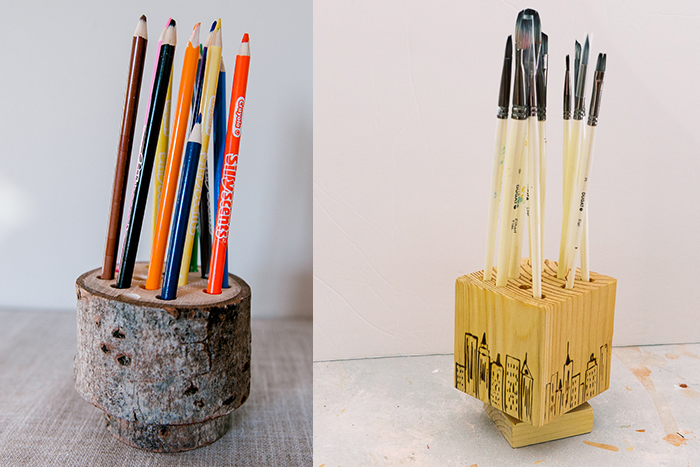
This DIY lazy Susan pencil holder is seriously one of my favorite projects. It's so easy to make, it's practically for free and it's so functional. It's just a perfect DIY gift from wood for anyone who has pencils or pens (hint: everyone). My daughter loves the functionality of it and I'm planning to make another one for her brushes and crayons. 

If you prefer a video version of these tutorials,

you can watch it here

Subscribe to get notifications!

Contents hide
1 DIY lazy Susan pencil holder from a log
1.1 Materials
1.2 Instructions
2 How to make a DIY lazy Susan pencil holder from a 4x4" cube
2.1 Materials
2.2 Instructions
3 How to assemble lazy Susan turntable the easy way
4 Tips on how to use Dremel VersaTip for pyrography.
4.1 Share this:

DIY lazy Susan pencil holder from a log

Materials

  • Wood log
  • Lazy Susan turntable 2"
  • Drill
  • 5/16" drill bit

Instructions

1. Gather your tools and materials, which are a log that could be found in nature, lazy Susan turntable (you can find an old lazy Susan in a thrift store, or buy it from Amazon for $2), drill, and drill bits. Simple as that.

2. Cut your log to size. Sand it lightly to remove all the dirt. (I made it last minute and had to use an old log found in the garage, but the fresher the wood the better)

3. Measure how deep you want your pencils "to sit" inside and mark your drill bit with tape.

4. Drill holes randomly as your soul desires.

5. To attach a lazy Suzan you'll need a base. I used another smaller log for this purpose. You position lazy Suzan on your base and screw it to it. Then you rotate the lazy Susan 90 degrees and drill a bigger hole in the base. Add our pencil holder to it and put screws to it through that big hole in the base.

6. That's it. As simple as that. You just made a great DIY present for the artist in your life.

PIN IT TO MAKE IT LATER>>>>>>>

UPDATE (12/08/20): 

I made another version of this lazy Susan pencil holder and you can watch the video on how to make it on my YouTube channel here.

How to make a DIY lazy Susan pencil holder from a 4x4" cube

Cost: $3

Time: 1 hour

Level: Beginner 

Materials

  • 4x4x4"
  • 1x3x3"
  • lazy Susan turntable 2"
  • Drill
  • 5/16" drill bit
  • Dremel VersaTip
  • Minwax natural stain (optional)

Instructions

  1. Cut 4x4" at the desired length. Mine is about 4" and makes almost a perfect cube. Cut a base from 1x3". Mine is 3" wide and makes a square.
  2. Make holes on the top of the 4x4" cube. Pinch small holes first for the center of a drill bit. Use tape on a drill bit to make sure the holes are the same depth.

How to assemble lazy Susan turntable the easy way

  1. Use small head screws and attach one side of lazy Suzan to the bottom of the pencil holder. 
  2. When one side is attached, move the second half at 90-degree and position it so you could drill a hole through the base of the pencil holder.
  3. Drill the hole all the way through. It should be big enough to fit the drill bit and a screw.
  4. When you have that hole, turn it around and place it on top of a 4x4" cube. 
  5. Take a drill bit and screws and drill them through that hole, attaching the second part of lazy Suzan. It can be a bit tricky but definitely can be done. To make your life easier and the lazy Susan placed correctly, you can pre-drill pilot holes.

PIN IT TO MAKE IT LATER>>>>>>>

So now that the lazy Susan is in place, it's time to decorate this DIY lazy Susan pencil holder

To decorate this one, I chose to try my new Dremel VersaTip and make a city landscape scene. It was so much fun to try myself in pyrography. I'm sure it's not the last project I'm doing it with. It's only a beginning haha

Tips on how to use Dremel VersaTip for pyrography.

  1. Fill the tank with butane gas. The tank should be filed within 10 seconds. When the gas starts spilling out, the tank is full. Very important! Let it sit for 3-5 minutes for gas to settle inside the tank.
  2. Put a special tip on it. I first tried it with a soldering tip but had better results when I switched to a shaping knife.
  3. Light on Dremel VersaTip, slide the Lock-on button to the lock position, and wait for it to get hot!
  4. When it's hot, it's time to work! I drew a landscape with a pencil prior to the process, so I just traced it with a hot tip and it looked amazing! Not perfect, but great for the first try! To make your arm more comfortable, put support under your elbow of the same height as your project. This will help your hand to be more stable and the result to be more precise. 

In the end, I finished my DIY lazy Susan pencil holder with a Minwax natural stain and it was ready!

Which version of the DIY lazy Susan pencil holder do you like better? Comment below! And let me know if you'll be making one! If you do, tag me on Instagram. I'd love to see it!

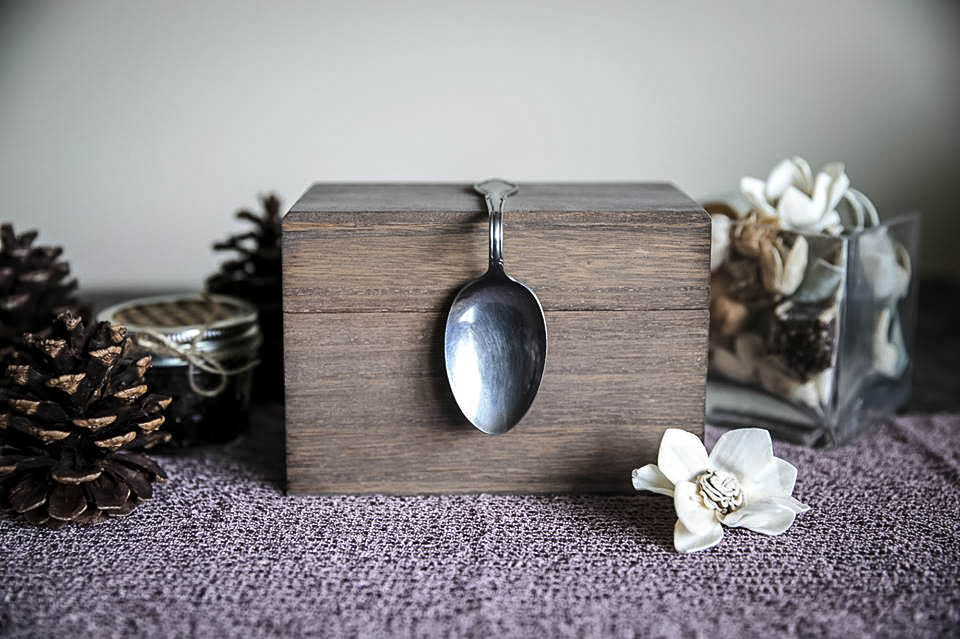
If you like the DIY lazy susan pencil holder project we think you might like to see how we made a recipe box that takes even less time to make but is also a wonderfully thoughtful present.

diy recipe box-

Would you like to know how to make a citronella candle to repel mosquitos? You can download this cute printable there as well! It could be a great gift for someone! You can watch me make it here. 

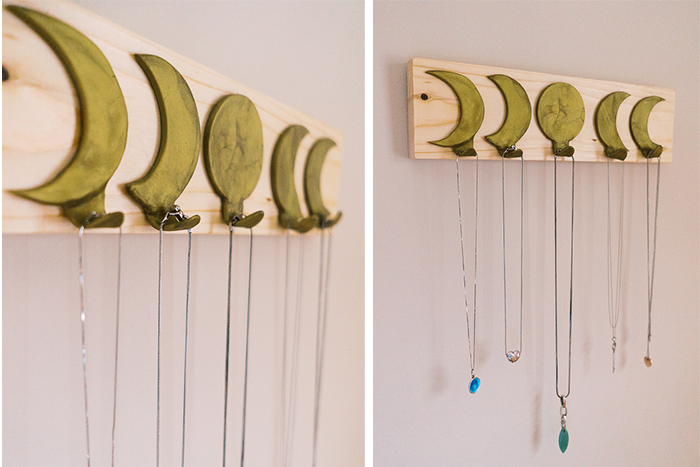
Or how to make this adorable jewelry holder from clay, you can watch me make it here

If you like this DIY, check out my Instagram, where I try to post behind the scenes in my stories. And subscribe to my YouTube channel to get your weekly dose of DIY of all the kind 🙂

Will see you soon!

xoxo,

April

Share this:

  • Tweet
  • Print
« A simple way to save money on a heater this winter {DIY draft catcher}
Ultimate guide to a successful DIY dinosaur birthday party at home for a 3-year-old »
FacebookPinPrintEmail

Reader Interactions

Leave a Reply Cancel reply

Your email address will not be published. Required fields are marked *

Primary Sidebar

Hi, I'm April! I love woodworking and making things! I hope you will stay for a while and get inspired to make something!

More about me →

Popular

  • Things to do with kids in Vermont in the fall
  • Sasha's bedroom makeover progress
  • Speakeasy library room reveal + budget breakdown
  • Little girl bedroom makeover inspired by spring

ifonlyapril

DIY single mom | 📍CT
Painting my heart away 😅 since we moved to this Painting my heart away 😅 since we moved to this house a year ago, it's been a journey, and tons of paint involved.

I wish I could say I love painting walls. I don't. I love a fabulous transformations though. So the pain is validated. 

Considering I'm a single mom of two kids and  a dog (that is heavier than my both kids combined and quite a handful), I'd say I'll need another 2 years to paint all the rooms as I planned. 

What's your estimate?

#diyprojects #diysinglemom #makersgonnamake #diyproject #diyhome #paintingroom #ifonlyapril_oldhouse #behr #swpaint
If anyone needs a reminder - you are still here af If anyone needs a reminder - you are still here after all the sh*t you had to go through, and it's worth celebrating! I'm proud of you! 

So often we look at people through social media, admiring them, admiring their life, without realizing what is actually going on behind the scenes. 

Last few years has been an emotional rollercoaster for me. After being in an abusive relationship for years, being constantly gaslighted  that made me question my sanity, I thought I was going crazy. I've found the truth. Truth can set you free. I wasn't the crazy one after all. I just didn't trust my gut and chose to ignore it while it was screaming at me that I'm being played. 

It taught me a lesson. I didn't know I was going to go through something like this, and oh my, I had very low scary points during all that. But now I have awareness. And the biggest lesson I've learnt is to trust my gut.

You are strong! You can get through whatever life (or some assholes throw at you) 😘 in case you didn't hear it from anyone today 😊

#narcawareness #narcabuse #narcissist #narcissiticabusesurvivor #youvegotthis #narcissisticabuse #narcissisticrelationship
Fall foliage, hayrides, and cozy cocoa sips—Verm Fall foliage, hayrides, and cozy cocoa sips—Vermont is the ultimate playground for autumn-loving kiddos! 🍁🚜🍫 
For more ideas, visit my blog where you can find all the links, locations and more fun activities to do with kids in Vermont in a fall besides hiking and enjoying nature.

https://ifonlyapril.com/things-to-do-with-kids-in-vermont-in-the-fall/

#VermontFamilyEscapades #FallFestivities #KidApproved #alpacaexperience #vermontwithkids #vermontteddybearfactory #applepicking #christmasshop #thingstodoinvermont
YouTube is def a Harvard for self taught individua YouTube is def a Harvard for self taught individuals 🤣 Don't want to pay someone to do the job? Look it up online😁

#makersgonnamake #diyrenovation #diyreno #diyrenovations #ifonlyapril_diy #diyhammerhood #diyprojects
One of my favorite DIY projects for kids! Why? I One of my favorite DIY projects for kids! Why? 
I made the same building blocks pyramid for my kids 4 years ago and they still play with it!!!

It's such a great open ending toy (my favorite kind) that can take kids imagination to the moon!

What are you waiting for? Your kids will thank you later!

Find all the details on the blog: https://ifonlyapril.com/diy-wooden-building-blocks/

#diykidstoys #diywoodentoys #diykids #diybuildingblocks #singlemoms #diysinglemom #kidstoysplay #ifonlyapril_diy
It's definitely has been a journey. Journey of sel It's definitely has been a journey. Journey of self discovery, healing childhood trauma, learning how to let go. 

The hardest part was to live in a fantasy world. Where I felt for years that something was off but my every concern was met with me being called crazy. 

I wasn't crazy after all. And truth can set you free. 
I'm in a happy place now. 

Finally. 

I remember who I am.

#narcawareness #narcabuse #narcissisticabuse #healingjourney
Little bunny's room transformation. Find all the Little bunny's room transformation. 
Find all the details and sources on www.ifonlyapril.com

And I'm working on a YouTube video. Need to push myself to find time to finally finish it 😁 it's been a long journey. I'm glad it's at the finish line🤗

#roomdesign #kidsbedroomdecor #kidsbedroomideas #diybedroommakeover
I made this sound diffuser almost a year ago. I fi I made this sound diffuser almost a year ago. I finally hung it up and added picture light to it. 

I call it "There will be light" as a reflection of a dark times I was going through at the moment.

What do you think guys? 

Watch full video on YouTube and find all the details at 
https://ifonlyapril.com/there-will-be-light-unique-diy-wood-sound-diffuser-wall-art/

#makersgonnamake #diyproject #diysounddiffuser
Load More... Follow on Instagram

Footer

↑ back to top

About

  • Disclaimer

Newsletter

  • Sign Up! for emails and updates

Contact

  • Contact
  • Media Kit

As an Amazon Associate, I earn from qualifying purchases.

Copyright © IfOnlyApril 2023

Share this ArticleLike this article? Email it to a friend!

Email sent!