

Recently I shared my plans for projects that I would like to complete by the end of the year. Well, I was so excited and thought that my first project will be to redo the library, I had something else that required my immediate attention. I had to DIY a brick hearth around our woodstove.
Our home insurance company reached out to us and said that the wood stove wasn't built up to code. By the rules, we had to cover the surface with noncombustible materials 24" all around the stove.
To be fair, the complaint from insurance was quite reasonable. The gray concrete slab that we had wasn't secured properly to the floor, in fact, it was just laying on brick. Any wrong move and you could knock out a brick from underneath and create a dangerous situation.
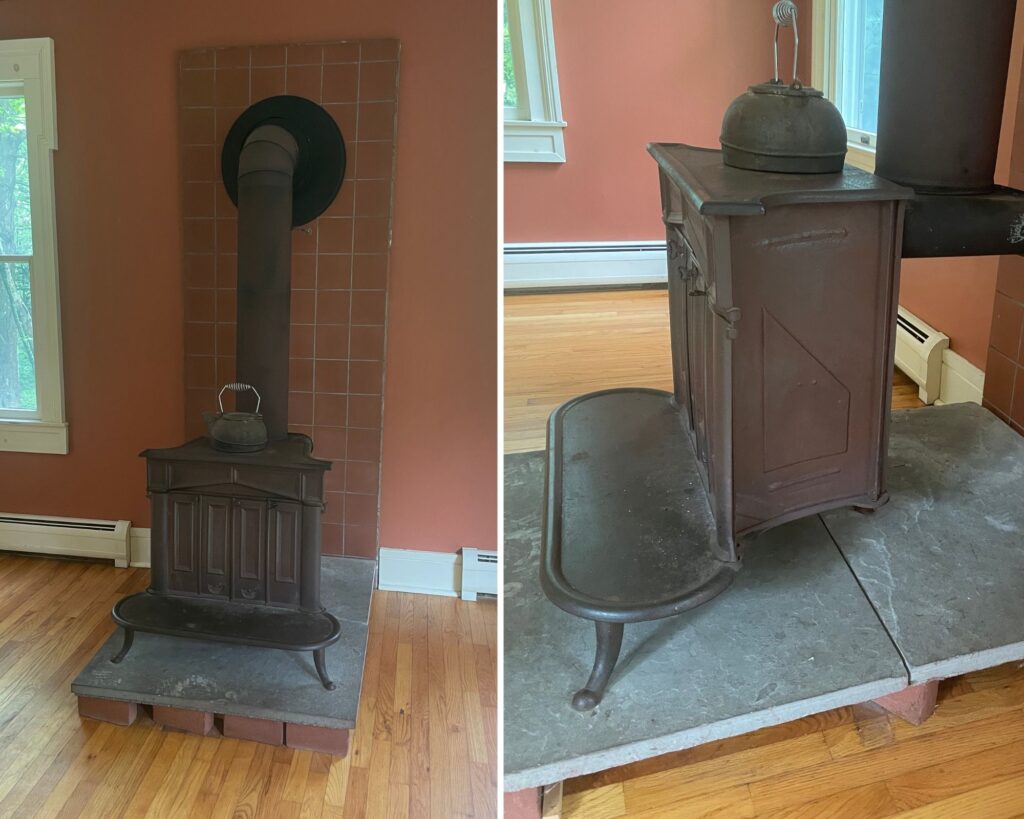
I do not entirely agree with a 24-inch surface coverage, but what we had definitely was hazardous - the distance from the stove and wooden floor was too close. The flakes from the fire could easily reach the ground and start the fire.
Since the required hearth won't be heated up by fire much, it doesn't have to be as fireproof as the wall. It has to be made out of non-combustible material to protect the surface from heating up.
What is a hearth?
A hearth is a place in front of a fireplace or a wood stove that is made from stone, brick, tile, or other noncombustible materials and prevents the surrounding floor area to catch fire from stray embers. They function as a barrier between the floor and fire for fireplaces and wood stoves.

What materials can be used as a heart in a wood stove?
You could use any material that is fire-resistant, durable, and wouldn't crack with time. The most popular options are:
- Brick
- Stone (Slate and granite)
- Concrete
- Marble
- Tile
Sometimes people also choose glass for a hearth, technically it can also withstand the heat without cracking. The hearth will protect the floor from catching fire and heating up.
After I've learned about my options on what can I use for a wood stove hearth, I was debating between tile and brick. The tile was my first choice but with the urgency of the project and long delivery dates, bricks were easier to find. Also, I find bricks very charming and definitely don't regret my choice.
Can I use bricks for a hearth?
Bricks are a traditional material for a hearth and a hearth pad so it's an excellent choice to use to protect your floors from random embers.

How thick does a hearth pad need to be for a wood stove?
Hearth pad thickness should be a minimum of an inch, depending on the noncombustible material that you are using. I'd go even thicker, just in case.
The most important thing is that the hearth pad shouldn't have gaps and has to be a continuous surface. That's for stray embers not being able to go through the crack and set the floor on fire. It's always better to be safe than sorry. So in the case of bricks, make sure to cover all the gaps with mortar so a sneaky ember wouldn't have a chance to get through.
How do you make a brick hearth for a wood stove?

Step 1. Choose your pattern
So you made your choice and decided to go with brick. You can find so many DIY hearth pads ideas on Pinterest. I found a few and got inspired to do a herringbone pattern close to the stove and a row of bricks standing.
That got me into trouble of laying bricks - the herringbone pattern was laying on the front and the outer row on the side. Since they are not the same height I had to lift up the herringbone pattern.

Step 2. Build a platform

I measured how wide the herringbone pattern will be and determined the width of the plywood support.
I used doubled ¾" scrap plywood to build a "bed" for bricks.
I have so much scrap wood that this was an excellent way to get rid of them. It won't be visible on the outside so who cares if it's a full sheet or cut in parts?

Then I cut plywood according to the measurement and used brad nails to secure it to the floor.
Of course, mistakes couldn't be avoided. You can see a gap between the slate stone and some parts of plywood. I thought at the moment that it won't matter when you attach the brick since it will be held on a bigger part of plywood.
Oh, how wrong I was! Remember when we lay a herringbone pattern those small triangles go on the side? Well, they successfully fell down. But I didn't realize it till later.


After I secured doubled ¾" plywood for the inner row to the floor, I measured and cut ¼" plywood for the outer raw.
Technically, since this part won't even heat up, it could go directly to the floor but I thought it will be cleaner to do it with ¼" plywood. It also elevated bricks perfectly to the level of the inner row.
PIN IT FOR LATER

Step 3. Cut bricks

What do you need to cut bricks?
How to cut bricks
Start by drawing lines on both sides where you want to cut. For the herringbone pattern, I had to cut at 45 degrees angle.

I took my speed square and drew a line from one corner creating a 45-degree cut.
Next, you need to clamp the brick to something so it doesn't move.
If you have a big circular saw then you might have to make a second cut from another side. I used Dremel saw since I had a coordinating cement blade for it.

I had to cut from both sides and it wasn't cutting through the middle. So I had an extra step - to hit the triangle with a hammer. After a few tries, you'll get a hang of it. But basically, you need to tap gently but hard. Does it make sense?

I became a pro after a few tries haha
If you want to see a video of how it's done, you can find it on my YouTube.
I'd recommend using a large saw and blade for it to avoid this extra step and get a smoother cut.
And don't forget to wear a mask and eye protection while doing it. Bricks create a lot of harmful dust that you don't want to inhale. And you also don't want to get a piece of brick in your eyes.
Choose a workspace far from objects, like windows and cars. Unless you want to clean it after. And you can use a leaf blower to get rid of dust in the end.
Step 4 - dry fit
Lay down bricks in the pattern and make sure that you have enough, that everything is straight and you have enough gaps between. This is important!

Step 5 - attach bricks

Mix mortar mix in a bucket as per instructions on the package. I had fast curing mortar mix so had to work fast. Use the mixing tool to mix mortar with water or you can do it by hand, but it will take longer.

Tips for Laying a Brick Hearth
Mix mortar in small batches so it doesn't cure too fast. The consistency should be more liquid than sour cream. Just mix the first batch and you'll figure out the right consistency. After my mortar hardened too fast a few times I realized that the more liquid it is at a starting point, the better.
If you see that it starts to harden, spray a bit of water on it.
I've learned that if you spray bricks with water before laying them down, they cure better. Using a trowel for cement, put a bit on the floor and a bit on the brick itself. Set it in position and put some pressure on it. Try to clean mortar right away before it hardens and becomes difficult to clean.

I started with the inner row. When it was finished I ran out of mortar mix and had to wait for the next day to continue.
When you lay the outer row, make sure to wet and apply mortar on the sides as well.

Also, a very important tip - you want your outer layer to be even. To archive the result, use a board that you can put flash next to bricks so when you lay the outer layer it's even.


This DIY brick hearth for a wood stove started coming together.
Step 6 - add mortar between bricks
Let DIY hearth pad dry overnight and finish it off by adding mortar between bricks.
I got premixed mortar in a tube for easier application but at some point realized that it will get very expensive. Instead, I got this grout bag for $6 and mixed the mortar myself.
It worked wonders, especially in the bigger gaps.
What I thought would be a therapeutic experience became a bit of a nightmare. On the positive note, it reminded me a bit of a cake decorating lol
I ran into an issue of mortar drying up too fast in the bag and blocking the pointy side. At some point, it got so frustrating that I cut the tip off and realized I ruined this bag. So I had to go to Home Depot and get another one.
Tips for applying mortar between bricks
- Work fast
- Mix mortar more liquid than you think
- Wipe off access right away
- Use premixed tube for the small areas
- Mix your mortar for larger gaps and use the bag for it
When you finish, let it cure. It will change color once it dries to white.


And this finished Phase 1 of this project. I'm planning to paint it with whitewash since I messed with mortar and didn't clean it too well. But I think it already looks fabulous.
Building a DIY brick raised hearth pad for a wood stove is not for the faint-hearted but it's totally doable and if I did it, you definitely can do it too!
The insurance company approved and we can move on to the next exciting project! Stay tuned!
Watch the full video on the YouTube channel

Follow the process of renovating this house on my Instagram @ifonlyapril and on my YouTube channel.
xoxo,
April


Leave a Reply