
If you've been following my DIY adventures, you've probably seen the dining table that I made a few months ago. I had to find fun chairs on the budget and one day I was in luck when I thrifted these old cane chairs. They had a perfect base but were a bit outdated. So I decided to repaint them and since I don't like sanding, I had to find a way to do it this way. Today I'd like to show you how to refinish old furniture without sanding.
It was one of the projects I've been most proud of in 2020. The result exceeded my all expectations and it literally was a dream come true dining table! If you want to watch how I made it and all the obstacles I went through, you can watch it here.

Finding a piece of furniture to refinish.
I was on the lookout for perfect dining chairs for quite some time. The only condition I had - it had to be budget-friendly.
Once in September, I stumbled upon these dining chairs in Goodwill for a whopping $40 for 7 chairs!! The deal was so good, I couldn't just pass on it.
I'm not a HUGE fan of these chairs, but they had a few very appealing features.
- The price was too good to say no
- Chairs had so much potential
- The cane was intact
- I didn't care about quantity and loved to have that extra chair since I knew my kids would probably break them.
Basically, these chairs were perfect for my experiment.
The main thing I looked at while deciding to take the chairs for refreshment was how stable they were... they were quite stable for old chairs that you get for $40. Another thing I looked at was the overall condition of the wood and cane.
The cane was intact in all places and the wood had a few scratches and holes that I thought could be easily patched with wood filler.
I feel that if the cane was damaged, I wouldn't take it home since fixing the cane is way more trouble than patching holes in wood.
2 ways to refinish old furniture without sanding.
If you look closer at the chairs, you'll see that they have turned legs, which would make the sanding job so much more complicated. I mean, it's still possible, just would require way more time and dedication that I was willing to invest into these chairs at this point. So here are a few options that I came up with. There are plenty more, but I'll speak about my experience with these few.
My first choice would be to stain it, but it requires sanding old varnish down which was not possible in my case, since the legs were curvy and with. A lot of details. Let me rephrase it, it's possible, but I didn't want to spend that much time on it.

Using Watco refinisher.
My friend Michele (@pieceofmeesh) recommended using a WATCO refinisher to dissolve a top layer. The idea sounds quite intriguing since it could reveal the real color of the furniture and if that would work, I'd be super delighted with that natural wood finish.
When I applied WATCO refinisher, I was quite disappointed since the original color was nothing exciting but rather dull. It works wonders on other woods but didn't work in my case.
So if you'd like to get back an original wood grain of the furniture piece, I'd start with this refinisher.
If it doesn't work, and by that I mean if you find out that the wood underneath doesn't deserve all the effort, you can move to the next option. At least you'd know that you've tried😁
Painting it
It's probably the easiest way and the process is quite straightforward. You just need to know a couple of details to make it as smooth as possible.

Can you repaint old furniture without sanding?
Yes, you can definitely paint furniture over the varnish. But you'd need to prep the surface properly first.
I tried to paint it over the varnish without any prep and the paint didn't stick, it simply scratched off with a touch of my nail.
Materials
- Zinsser oil-based primer
- Behr latex paint ( I used Canyon Dusk color)
- Spray painter
- Frog masking tape
- Drop cloth
PIN IT TO DO LATER>>>>

How to refinish old furniture over varnish without sanding?
Step 1. Clean it up
Wash your chairs very well. I usually use a mixture of 50:50 vinegar and water. It's cheap, environmentally friendly, and works really well. Spray the mixture or wet the rag and wipe off the dust and dirt, paying special attention to the areas where dust collected over time, like turned legs in my case.
Step 2. Fill in the cracks.
Since chairs are quite old, there were a few bitten up spots that had to be taken care of. I used wood filler to fill up all the cracks that could be shown after the layer of paint. As I always say - "wood filler will save us all" hahah It's such a powerful little thing! Make sure to cover the dents in the wood as well, to get a complete finished look. Remember, that in this case prep is everything.
Step 3. Tape off the part you don't want to paint.
Since I wanted to keep an original color of the beautiful cane, I taped it off with masking Frog tape and covered it with paper to prevent it from getting paint splatter. When applying masking tape, make sure to use your nail to seal the edge to prevent bleeding through.
Step 4. Use a stain-blocking oil-based primer.
Here is the thing. Oil-based primers are ideal for varnished wood since they enabling the coat of paint to better cover the surface and stick to varnish. Water-based paint doesn’t bond well with the glossy surface of oil-based paint. If you'll be using latex paint on top, make sure you choose a primer that goes on top of all surfaces but under latex paint. Not all primers are made equally. The one I used is perfect for latex paint.
I've tried to use my spray-painter for oil-based paint but didn't have much luck. The spray painter got clogged up and stopped working. I cleaned it up and tried it again but the same thing happened after I finished one chair, so I just used a brush to finish off.

Let it dry completely, it shouldn't take to long. By the time I finished all the chairs, the first one was dry.
Step 5. Sand between layers.
Fine, I said, "without sanding". ;D But I meant the heavy sanding when you take the whole layer off to original wood. Use a 220 or higher sandpaper and lightly sand off the primer. You don't' want to sand it all down but smooth the surface from brush strokes.
Step 6. Use a few coats of latex paint.
I prefer water-based latex paint since it's easier to apply using a spray painter. But it's totally up to you if you prefer using oil-based paint. I usually do at least 2-3 coats, to make sure it's perfectly covered.
 Step 7. Take off the tape

When you take off the tape you can hope that you did a fine job and the paint didn't bleed through. Most likely it won't be the case so be prepared to fix it. You can use a knife and scrape the paint off the cane. Or you can just take a small brush and paint the outer cane weaving. I actually did both, but mainly I scraped it off. I had to paint a small line only on one chair since there was a lot of paint and it would be a real pain to scrape it all off.
Step 8. Apply a topcoat
You can leave it as it is or apply a coat of Polyurethane. I left it as it is but probably will apply a water-based polyurethane soon for more durability. But as I mentioned before, kids probably will destroy these chairs before I get my hands on them to finish it.

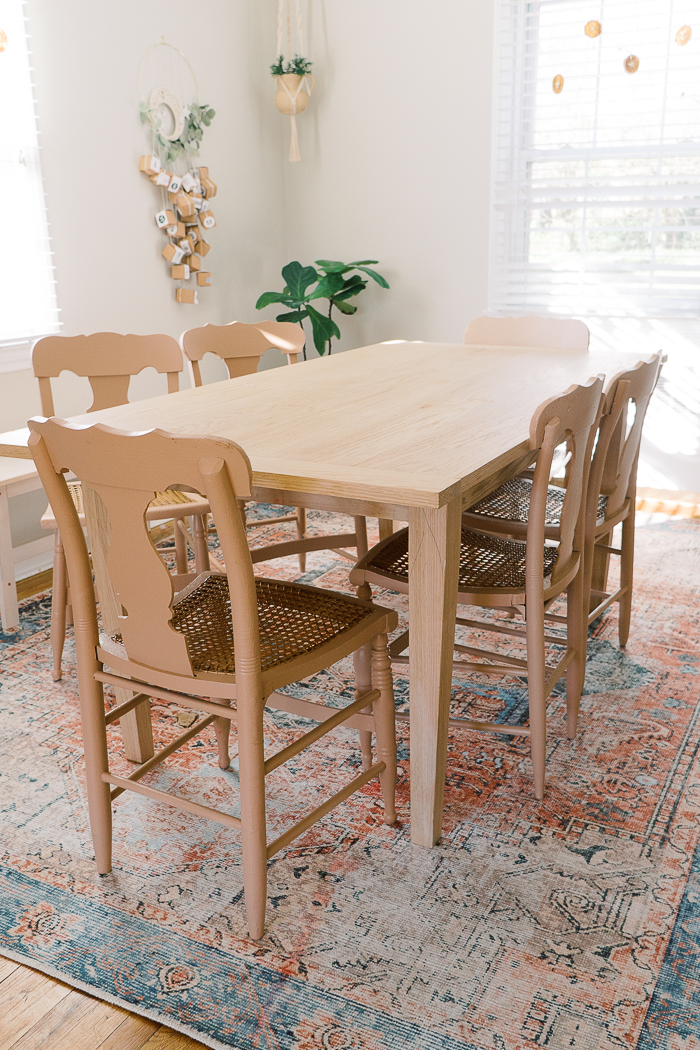
And that's it! I love the overall look of these chairs. I'm not 100% love the color that I chose and feel that it could've been better with a darker color. But oh well, maybe I'll repaint at some point. So this is how you refinish old furniture without sanding.
Have you ever repainted old furniture? What are your tips and tricks?
Watch a video tutorial on YouTube
xoxo,
April


If you like this tutorial, we thought you might also like
Tips on how to paint on fabric. DIY painted throw pillows

DIY LEGO table {IKEA hack} or you can watch me make it here


Nathalia Basso says
Interesting idea. I don't do much restoring of furniture, but I do like taking the time to sand down first. These are great options in a pinch.
Nathalia | NathaliaFit - Fitness & Wellness Blog
April says
I’m so not into sanding 😆 but I see why it is useful. It’s great to have options ☺️