This project was in the brewing for so long, I'm so glad that I finally got to it. I wanted to finish this easy DIY modern dining table before it gets cold outside, while I can still work in the garage.

And oh my, how glad I am that I'm done and have this absolutely gorgeous dining table in our house, right on time for the upcoming holidays.
It was a bit challenging to come up with the design of the base and make it sturdy but I was so not disappointed today will show you how to make an easy DIY modern dining table in no time!
You see, I don't know any kind of fancy joinery, like dowels or groves, but I know how to use a Kreg jig. I was staying up at night trying to figure out the fancy joints but then decided that it's better to go with something familiar that I know for a fact will be sturdy enough and not going to collapse. I already made a similar tabletop for my office desk last summer and can vouch for this method.
If you want the whole story, I was planning to repurpose the old tabletop and add another plank to it, to make it wider. I was so into dark wood last summer, I stained it in dark walnut 🙄This is not the look I was going for with my dining table so when I started sanding it, I realized there is no way I could match the old tabletop with new boards. So I had to do it from scratch.
It was such an important build for me and I'm very proud of it. I think it turned out divine!
But let me take you on this journey if you want to make something similar. It is actually way easier than it seems and I'm here to guide you along the way.
Overall it took me about 7 hours to make this table, which was surprisingly fast.
Few words about lumber
For this project, I used red oak for this project and the overall cost of lumber was $300. I bought premade legs from Table legs to save time and make sure that my dining table has a perfect base. To be honest, I was intimidated and afraid to make four legs and end up with an uneven product. I chose the easy way out and have no regrets because this table looks stunning this way.
But let's get to a step-by-step tutorial on how to make this easy DIY modern dining table.
If you want to see a video version of this tutorial, you can find it HERE
Subscribe to get notifications!
Cost: $320
Time: 8 hours
Level: intermediate
Lumber
- (4) 29" legs, I got mine from TableLegs.com (Country Hepplewhite Dining Table Leg 2.75" x 29")
- (5) 5/4x8x72"
- (2) 5/4x4x96"
- (1) 5/4x4x72"
Cuts
2 - 5/4x4@36" (sides of the tabletop)
5 - 5/4x8@65" (tabletop)
2 - 5/4x4@26" (short aprons)
2 - 5/4x4@50" (long aprons)
4 - 1x4@12" (connecting brackets)
Tools
- circular saw
- miter saw
- drill
- sander
- Kreg jig
- speed square
- clamps, especially this right angle clamp
Materials
Instructions

Making the tabletop for our easy DIY dining table
1. Measure 5 boards at 65". Use a speed square to make sure it's a perfect 90-degree angle.
To make sure that wood won't split, you can take a sacrificial plywood board, clamp it on top of your wood and cut through it. This was the wood will cut without splinters and you will get a perfect cut.
2. Use a miter saw or a circular saw. When I started my project I've noticed that the blade on my miter saw is worn out. I didn't want to risk it to cut my beautiful oak, so I opted out for a circular saw.
When using a circular saw, put a speed square down and use it as a guide so the saw doesn't wander off.
3. Lay down your boards on an even ground. I used a ¾" plywood sheet that I put on the ground since I was worried that my workbench is small and won't fit all the pieces.
4. Play with the boards and align them at the best layout, so there are no gaps in between. At this point also flip the boards to choose a better side for the tabletop of your DIY easy dining table.
When you are done arranging and satisfied with the look of your tabletop, Carefully flip all the board to the inside and Mark where pocket holes will go. I made 6 pocket holes for each board, but I think I could get away with 5.
It's important to Mark the positioning of the pocket holes so you won't get confused when using the Kreg jig.
5. Set up Kreg jig for the right settings and make pocket holes throughout your boards.
6. When all wood is cut, it's time to assemble it. The best way I know how to do it, and don't laugh at me, is to put it on the ground and attach it while standing on it. So the weight of your body would align wooden planks.
You could also clamp it but my 36" clamp didn't work since it was literally ¼" too short.
7. Add wood glue on one board and attach it to another one with pocket holes. Move forward one by one. Let it dry.
When it dried, I've noticed that it was not perfectly aligned. I decided to attach the sides of this DIY dining table and find a solution later.
8. You need to make the sides even before attaching the sideboards. Take a speed square and draw a line on the edge of your boards. Then carefully use a circular saw to cut the edge.
9. Cut two 5/4x4" boards at 36" to create sides for the tabletop. I think it's better to make cuts as you go since you can adjust the length of the sides. My tabletop wasn't exactly 36" after boards were attached, but a bit wider. It could be an issue if you precut all the wood.
PIN IT FOR LATER>>>>>>>>
10. Mark pocket holes positions and predrill pocket holes.
11. Attach sideboards to the tabletop using wood glue and pocket holes screws. Let it dry.
12. When you flip your tabletop to see a beautiful alignment, don't be too disappointed to see some imperfections. At first, I was so upset but then decided that I need to fix it, so I took 60 grit paper and started sanding it down.
It took me a while to sand it all down, but in the end, the result exceeded my expectations! The imperfections were gone and I had a beautiful tabletop for my easy dining table.
I filled some of the small holes with wood filler and I promise you, you can't even see it's there! But of course, try to make it as precise as possible.
13. Then take 220 grit sandpaper and sand it till it's as smooth as a baby's butt.
It took me about 5 hours total to make this tabletop.
Making the aprons for our Easy DIY dining table
As I mentioned before, I had different plans for the base but decided to go the easy route to save time and my sanity. And I'm so happy with the result 🙂
1. Take your legs and place them on the tabletop to determine the positioning of your legs and aprons.
2. Cut 5/4x4" to length (in my case it's 26" and 50").
3. Make pocket holes on all sides of the boards.
4. I wanted to have a gap from the legs to make it look more professional. To archive that, simply put ½" plywood under your apron when attaching it to the legs.
5. Use Kreg jig clamp to secure tight positioning and attach aprons to legs with pocket holes. Always refer to a speed square to make sure it's at a perfect 90-degree angle.
6. When aprons are attached, flip the base and it's time to add some security.
I didn't have enough oak boards left so I used 1x4" pine wood. I made four 12" planks and cut a 45-degree angle on both sides using my miter saw.
7. Make pocket holes on both sides of the boards and attach them to the aprons. This will add strength to this easy DIY dining table.
8. Are you still with me? We are almost done!
Attach Izzy skirt washers to the base.
Flip tabletop on the floor face down and put the base on top. Measure even distance from all the edges and screw the tabletop to the base through skirt washers.
9. The color of this red oak looks so lovely, I didn't want to change the color at all but I had to add a finish to protect the wood.
Always test the stain and finish in one place! I tried oil-based poly but it gave my dining table such an orange hue that I didn't like. Especially since it blends in with the floors of our rental.
After some research, I decided to give a try to water-based clear matte poly. And oh boy, I was not disappointed.
To finish this easy dining table, I used water-based poly. I applied 3 coats and lightly sanded it in between.
Ugh! And that's it!

This absolutely gorgeous and easy-to-make dining table will brighten up your dining room and completely transform your dining experience!!
I love it so much, I don't want my little kids to eat on it😄 Well, as my aunt said, if I made the table, I surely could fix it if my kids make it dirty, but the memories are priceless!
I think it's my favorite built today, but oh well, I say it EVERY single time haha the only regret I have is that I procrastinated for so long and haven't made it months ago.
So what are you waiting for? Make a dining table of your dreams this weekend! And don't hesitate to reach out if you have any questions!
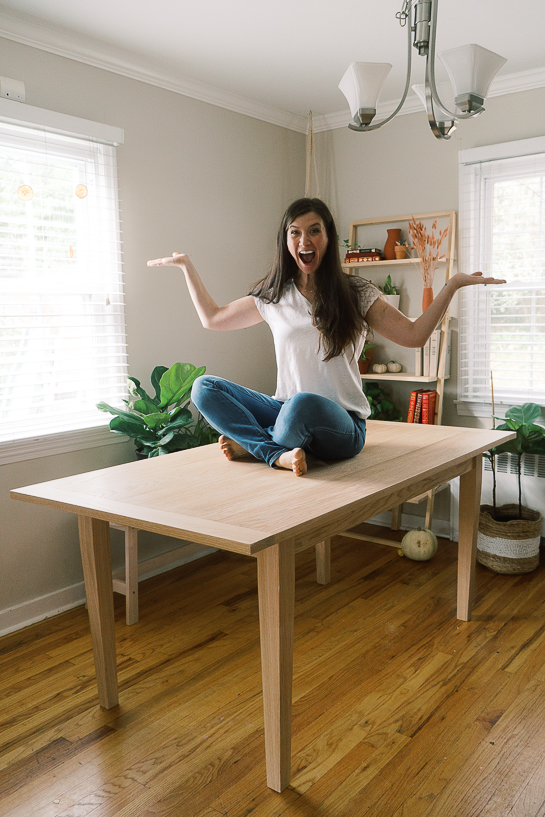
What is your dream dining table look like?
WE THOUGHT YOU MIGHT ALSO LIKE:

How to make full over full bunk beds

DIY fantastic playground with a slide (free plans)
Sandbox picnic table (free plans)
Follow me on Instagram @ifonlyapril. I post in stories my progress and behind the scenes for all my projects.
xoxo,
April


Leave a Reply