• Skip to primary navigation
  • Skip to main content
  • Skip to primary sidebar
If Only April
  • MEET APRIL
  • DIY PROJECTS
    • Kids projects
    • DIY furniture
    • Design plans
    • DIY holiday projects
    • Macrame
    • Transformations
    • Woodworking
  • VIDEOS
  • CONTACT
  • SHOP
    • Facebook
    • Instagram
    • Pinterest
    • YouTube
menu icon
go to homepage
search icon
Homepage link
  • MEET APRIL
  • DIY PROJECTS
    • Kids projects
    • DIY furniture
    • Design plans
    • DIY holiday projects
    • Macrame
    • Transformations
    • Woodworking
  • VIDEOS
  • CONTACT
  • SHOP
Γ—

Adding trim and challenges | One Room Challenge. Week 3

Please note, that some of the links below are affiliate links and I will earn a commission if you purchase through those links (at no additional cost to you). Thanks for your support this way.

FacebookPinPrintEmail

Week 3 of the One Room Challenge went faster than I thought. Now I wonder if eight weeks is really enough time to finish one project.

If you are new here, welcome to my little corner of the internet.

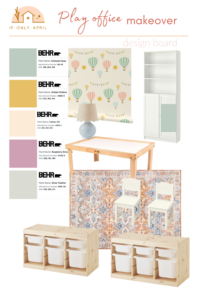
I'm April and I'm a guest participant in the Spring 2021 One Room Challenge. If you are not familiar with a One Room Challenge, you can read more about it here. 

If you are catching up on these projects, here is what we've done so far

Week 1. The before photos and design plans

Week 2. Demo and installing siding panels.

I've been thrown off track in the last week since I got sick and couldn't continue working on the project for most of the week. But thankfully I recovered and was able to add trim to the screened-in-porch.

This is how we left screened-in-porch last week

Challenges of the week

Besides me being sick most of the time, I've had a few issues with the renovation. One of them was the disposal of garbage. After our last week of the demo, we've had a lot of remains of the walls (the old beadboard). I left a few boards next to our garbage bin last week and it was taken with the rest of the garbage.

I got so excited but clearly, it was too early to do a happy dance. When I tried to get rid of the rest of the walls this week, it was left behind by people who do garbage. Clearly, now I need to either dispose of it in small batches or drive it somewhere. Any suggestions?

Added trim and shoe trim on the bottom

Progress check

Clear the space

Demo the walls

Put side paneling

Add trim

Power wash the floors

Paint screened-in porch

Change screens

Add a new door

Install new fan light

Source credenza from Facebook marketplace

Build outdoor chairs

Make tile coffee table

Get accessories 

Decorate the space

Add lights

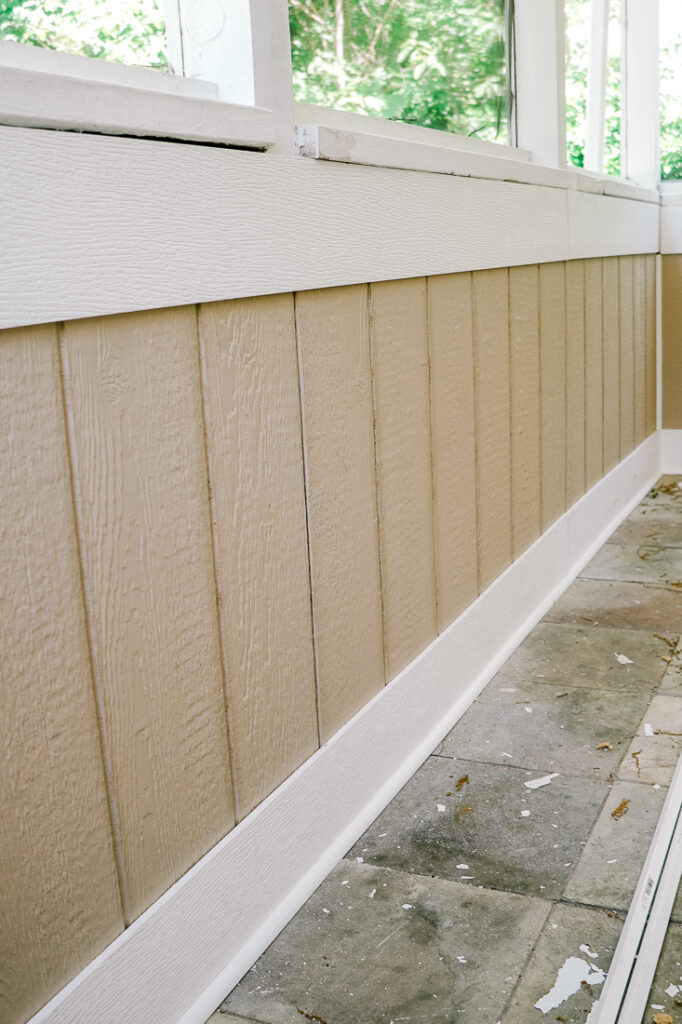
How to add trim to siding panels

For our trim, I chose the PVC Royal molding trim. It's square and neat and when added to siding panels it elevates the walls. I think it made a huge difference in the overall look of the screened-in-porch.

To attach the trim to siding panels I used liquid nails and 2" galvanized brad nails. It's super important to use galvanized brad nails outdoors! Galvanized brad nails won't rust if exposed to wet elements.

To add trim to siding panels was a fairly quick process. The only challenge that occurred was the amount of custom-beveled cuts that had to be made. Literally, every cut had to be taken one by one. It slowed down the process a bit but resulted in very accurate and seamless connections. Especially in the corners!
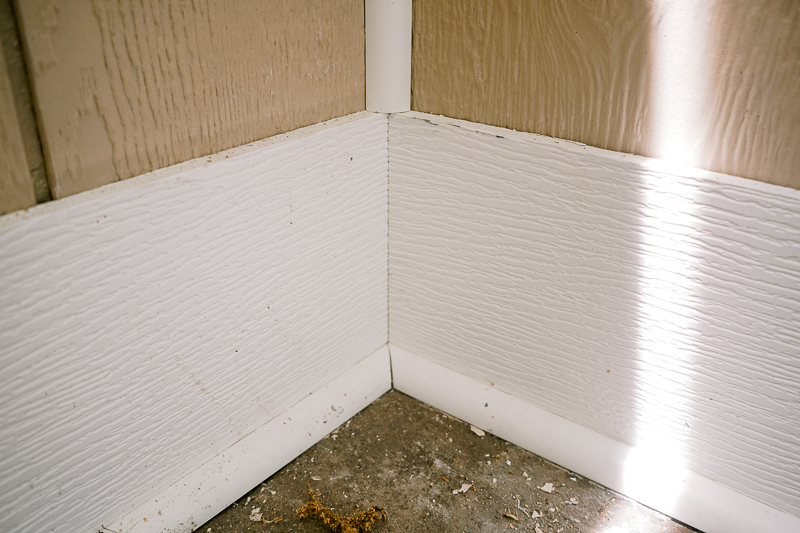
Each cut had to be made and measured individually

Adding shoe trim

Flat PVC trim on the top and the bottom looks very impressive but adding shoe trim in the bottom and in the corners made all the difference, in my humble opinion.

It's amazing what a little trim can do to your space! To attach it I also used liquid nails and brad nails. Now it's not going anywhere but looks absolutely fabulous!
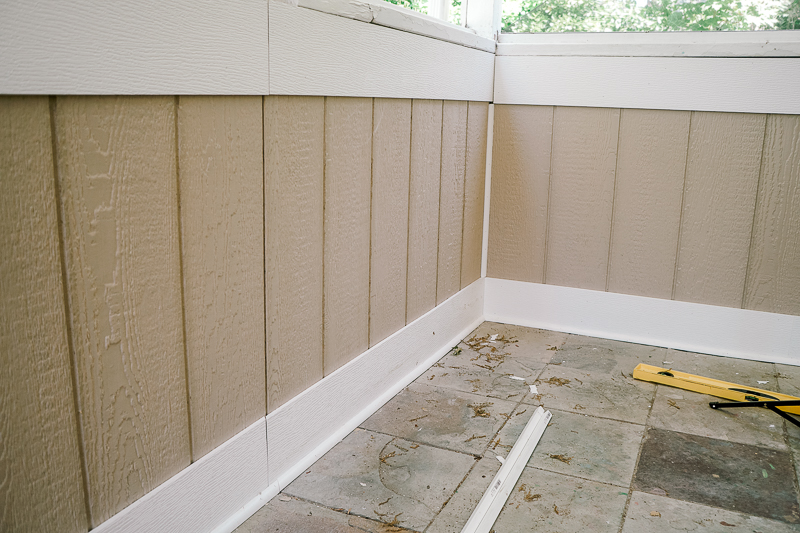
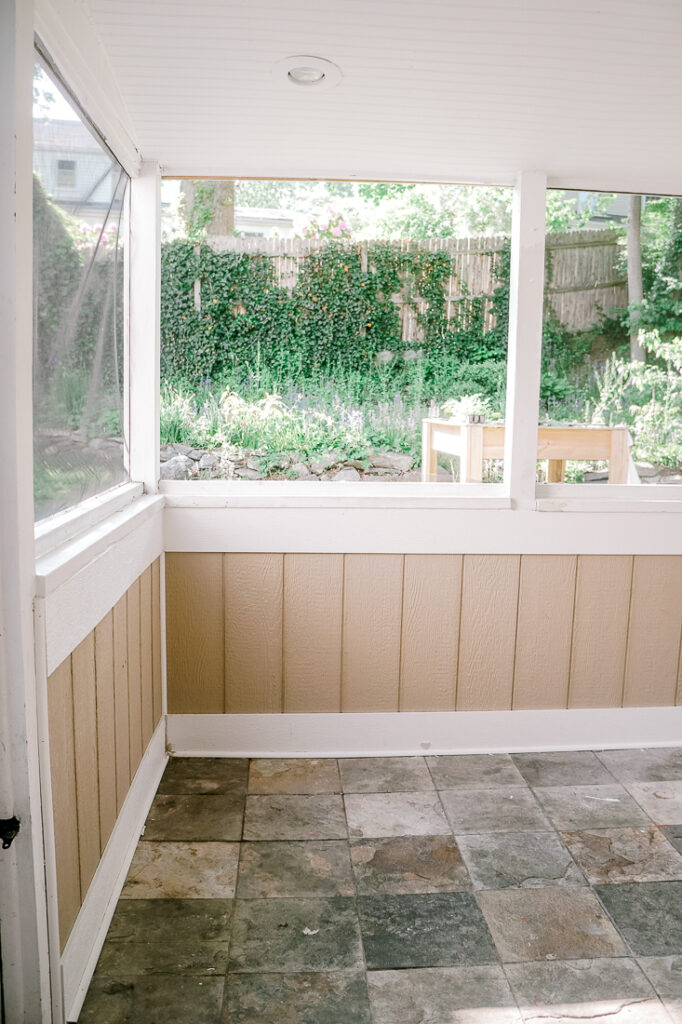
Shoe trim made all the difference

Finishing touches

When all the trim was up I used fast cure adhesive sealant that meant to be outdoors. This not only made the walls look nice but also added protection from the natural conditions. It sealed all the cracks and holes and the water won't get inside the walls when it rains.

It was so satisfying to patch all the cracks! The only thing I wish I did differently is to wait for the sealant to cure before sweeping the dust from the floor. Well, I'm not too stressed since I'll be painting it all over but it would be nice to have it clean and intact.

Sealing the cracks between windows and walls protects walls from water damage

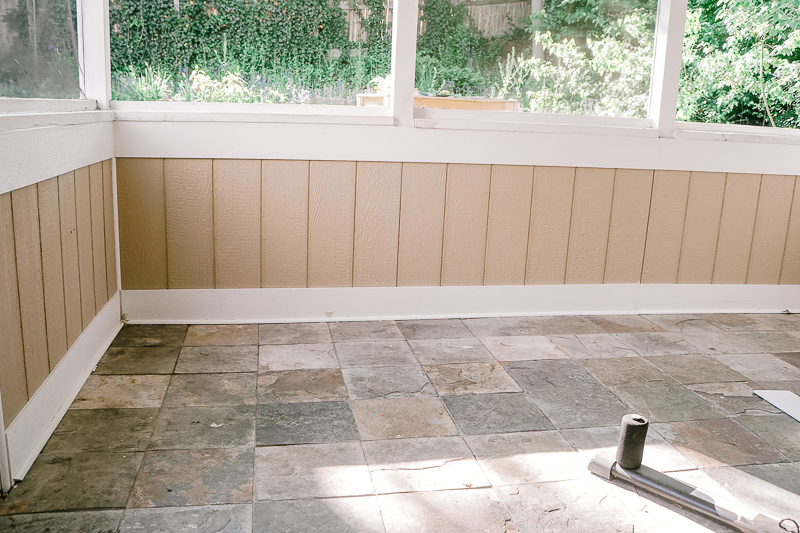
To change the walls from a bead board that we previously had was such a great decision. These walls can stay intact for many years to come!

Here is how the porch looks as of this moment. I still have a lot of work to do. The next step is to use a power washer and paint the walls. My neighbor said he will land me a power washer, so I'll have to wait for that, or I might rent it. But this will happen next week. As of now, I'll go and enjoy the beautiful new walls of our screened-in-porch!

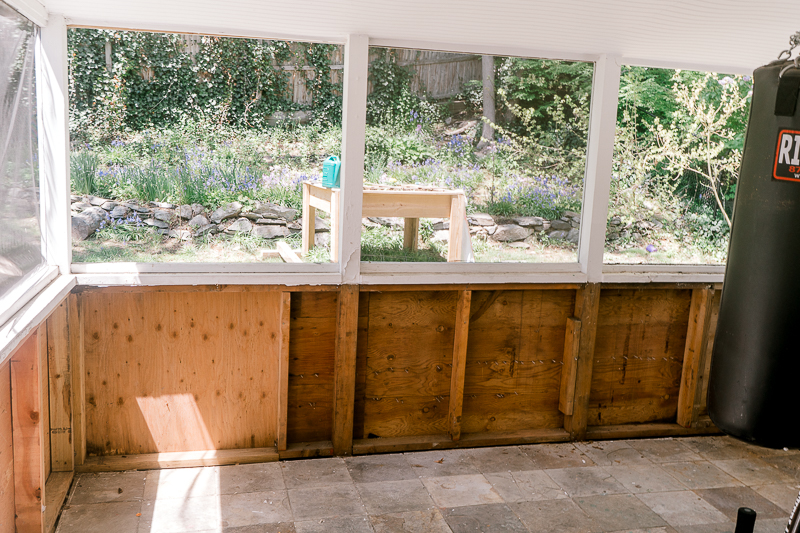
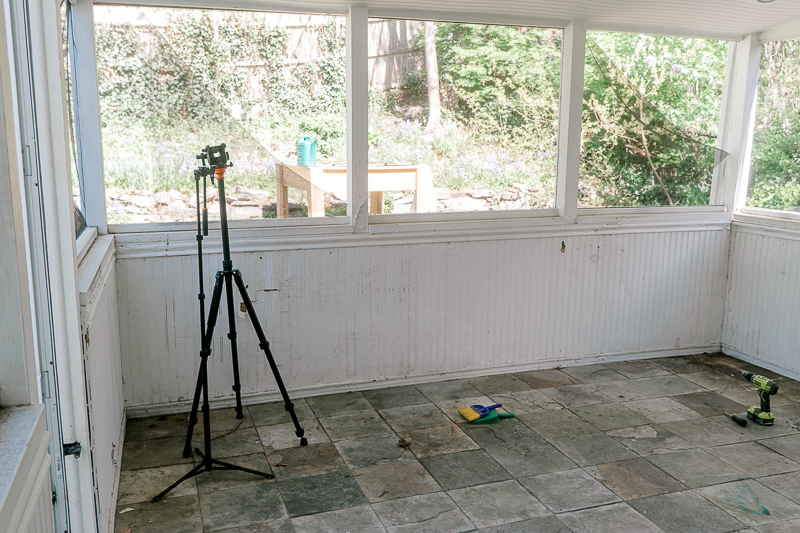
In case you forgot where we started, here is a before photo.

Huge difference, right?

The before of screened-in-porch

I still haven't decided on the furniture but I still have time, right? Haha or maybe in a couple of weeks, I'll be running like a headless chicken in search of suitable furniture for this screened-in-porch. Will see!

I'm posting sneak peeks of the progress to Instagram, so make sure you're following along. You can also sign up for email updates below so that you don't miss any of the action!

xoxo,

April

Share this:

  • Tweet
  • Print
« Demo and installing side paneling in the screened-in porch | One Room Challenge. Week 2
Pressure washing tips for a porch | One Room Challenge. Week 4 »
FacebookPinPrintEmail

Primary Sidebar

Hi, I'm April! I love woodworking and making things! I hope you will stay for a while and get inspired to make something!

More about me β†’

Popular

  • Speakeasy library room reveal + budget breakdown
  • Little girl bedroom makeover inspired by spring
  • The progress of Sia's bedroom and my favorite finds for her room
  • 10 LEGO table ideas that kids would be excited about

ifonlyapril

DIY single mom | πŸ“CT
I made this sound diffuser almost a year ago. I fi I made this sound diffuser almost a year ago. I finally hung it up and added picture light to it. 

I call it "There will be light" as a reflection of a dark times I was going through at the moment.

What do you think guys? 

Watch full video on YouTube and find all the details at 
https://ifonlyapril.com/there-will-be-light-unique-diy-wood-sound-diffuser-wall-art/

#makersgonnamake #diyproject #diysounddiffuser
I hosted my first party for @newcanaannewcomers In I hosted my first party for @newcanaannewcomers International club last night and it was such a success🀩✨ 
Thank you all for coming! 

If you want to recreate the magic, all you need is PVC pipes, some cement, few buckets and string lights. 
Easy peasy πŸ˜„

Would you try it at home?

#easydiy #diyoutdoors #diystringlightpoles #ifonlyapril_diy #newcanaannewcomers
Nothing can beat a $1 find that looks so good 🀩 Nothing can beat a $1 find that looks so good 🀩 what do you think?

#rubnbuff #diy #diyonthebudget #simplediy #letsmakeitfabulous
I think this little bunny bedroom makeover deserve I think this little bunny bedroom makeover deserves a permanent place on my feed☺️ scroll to the end to see "the before"πŸ₯Ί 

#littlegirlmakeover #bunnyroom #littlebunnyroom #moodypinkroom #crateandbarrel #potterybarnkids #smallable #diyroommakeover #spoonflower
Do you see a resemblance?πŸ˜… #dogsofinstagram #dr Do you see a resemblance?πŸ˜…
#dogsofinstagram #drogodog #germansheppard #germansheppardpuppy #germanshepherdsofinstagram #longcoatgermanshepherd
I made this reel last week and intended to post it I made this reel last week and intended to post it for the last day of school. I feel before 9.20am I did already so much lol
What was I complaining about? πŸ€¦πŸ»β€β™€οΈπŸ˜†

Now, on day 6 of summer break, I reminiscent on good all chaotic mornings when I had to drive kids around and get them ready for school. At least I had time for cold green tea in peace! πŸ˜†
We miss you, school! 

I can't wait for September when both of my kids will be on the same bus. 

Till then, we need to survive the summer and get the best out of it! 
Send me chocolate and wineπŸ€—πŸ˜…

#morningroutine #singlemom #singlemomlife #summerbreak #singlemomproblems #morningroutines #diysinglemom
I always called my youngest daughter a little bunn I always called my youngest daughter a little bunny. Partially since she is so adorable, but also because she is obsessed with bunnies . And she finally got a room makeover. Now she has a ton of bunnies to look at πŸ₯³ 

I make her count bunnies on the walls before going to bed (my little trick to get her to sleep πŸ˜…)

Watch the shocking before and a gorgeous after and let me know your thoughts in commentsπŸ˜πŸ°πŸ‡

#girlroommakeover #diymakeover #roomrenovation #littlegirlsroom #pinkbedroom #pinkbedroominspo #pinkbedroomideas #bunnythemedroom #ifonlyapril_makeover #diyprojects
It's a strange feeling to feel alone in a relation It's a strange feeling to feel alone in a relationship, to walk on egg shells every day and to hear that everything is always your fault. 

It took me years to get to this point, but slowly I got to realization that the only person I lost in this, was me. 

And I'm on the way to get that person back. 

Healing is not a journey, it's a crazy ride! Damn, buckle up your seats😁

#narcabuse #narcissisticabuse #singlemoms #singlemomlife #therapyiscool #healingjourney #narcsurvivor #narcissisticabusesurvivor
Load More... Follow on Instagram

Footer

↑ back to top

About

  • Disclaimer

Newsletter

  • Sign Up! for emails and updates

Contact

  • Contact
  • Media Kit

As an Amazon Associate, I earn from qualifying purchases.

Copyright Β© IfOnlyApril 2023

Share this ArticleLike this article? Email it to a friend!

Email sent!