
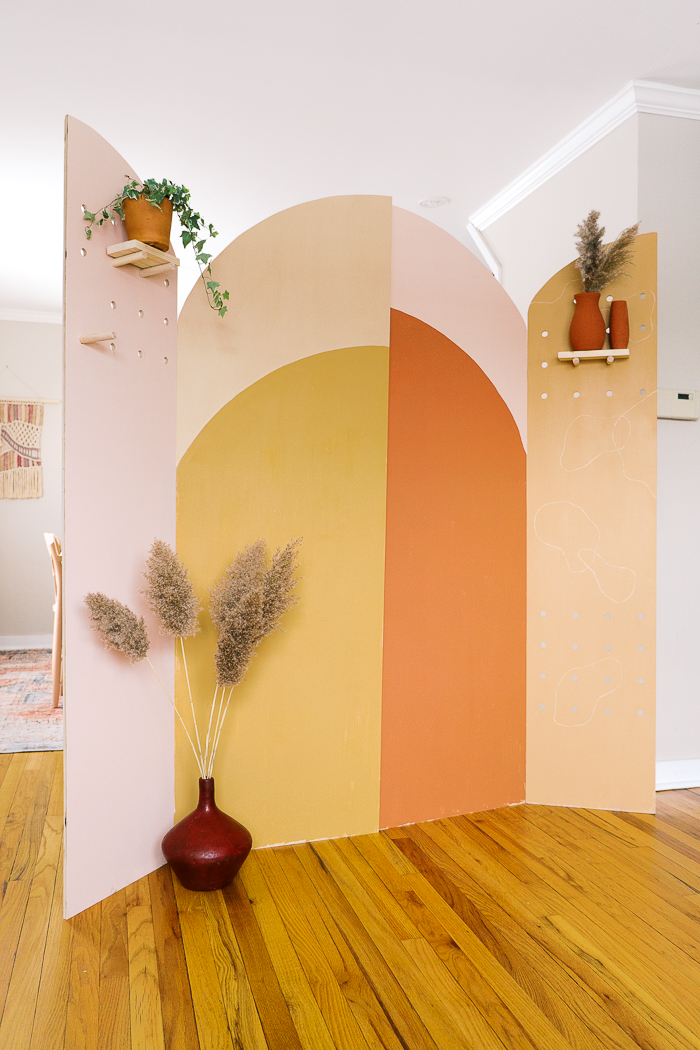
Making videos for YouTube is so much fun, but when you have kids can be quite challenging. When I record an intro video, I need an excellent clean background. With kids, the word "clean house" takes a different meaning 😄 To make my life easier and always have a place that I could use as my shooting location, I came up with the idea of DIY wooden pegboard room divider with arches that also serves me as a backdrop.
It's simply genius! It could be moved where I need it; it could be decorated by seasons, I can even repaint it to get a completely different look. The versatility and convenience are quite evident!
You don't even need to add pegs, but I felt it could be useful if I want to add a shelf to hold some cute little things.
Watch me make it here
If you aren't subscribed to my DIY YouTube channel, don't miss out and subscribe now😁
Watch how to make this DIY bohemian room divider from scratch here.

Ways to use this DIY wooden pegboard room divider
This pegboard divider can have so many purposes and could be a great addition at the wedding, for example. Probably minus pegs since they are more for functionality. But the arches are gorgeous. You could add flowers or some other cute elements and make it one of a kind backdrop for your event.
Or you can use it for your Zoom meeting; if you are an artistic type, 😁 you can add your brand logo to it and have a killer backdrop for your zoom meeting. The jaw-dropping effect from your colleagues is guaranteed.
To start this project, I turned to Pinterest for inspiration. I found a few cool ones and added them to the board "office makeover inspo" in case you want to check it out.
Materials

The best part about this project is that it requires minimal tools, and you can ask people at the home-improvement stores to cut plywood sheets. Most likely, 4x8' wouldn't fit in your car anyway.
At first, I thought I can get away with just one 4x8" plywood sheet cut in 3 even parts. But when I put it together, I realized that it is too narrow for my needs. So I had to get another 4x8' plywood and cut it in half. So I could get 4 panels in the end. Two wider in the middle and two narrows on the sides. And oh well, it worked like a charm! This DIY wooden room divider turned out gorgeous!
Tools
- jigsaw
- drill
- ¾" drill bit. I like spade bits since they make a clean hole
- orbital sander
- Dremel drum sander for spots. I also like their Dremel Lite version, which is especially good for beginner DIYers
Materials
- (2) ½"x4x8' plywood sheet
- ¾ dowels
- paint (optional)
- pegboard (optional)
- 6 hinges
Instructions
STEP 1
Set on design. How many arches do you want? How wide do you want them to be? It's so customizable. You should see what would look good in your space.
STEP 2
Determine the height of your panels. Mine is 6' tall.
If you want to make the same one like mine, ask to cut one plywood sheet @6' first and then divide it into 3 even parts at your home improvement store (You'll need two pieces for this DIY wooden pegboard room divider).
The second panel should be cut at 6' first too and then divided into 2 parts.
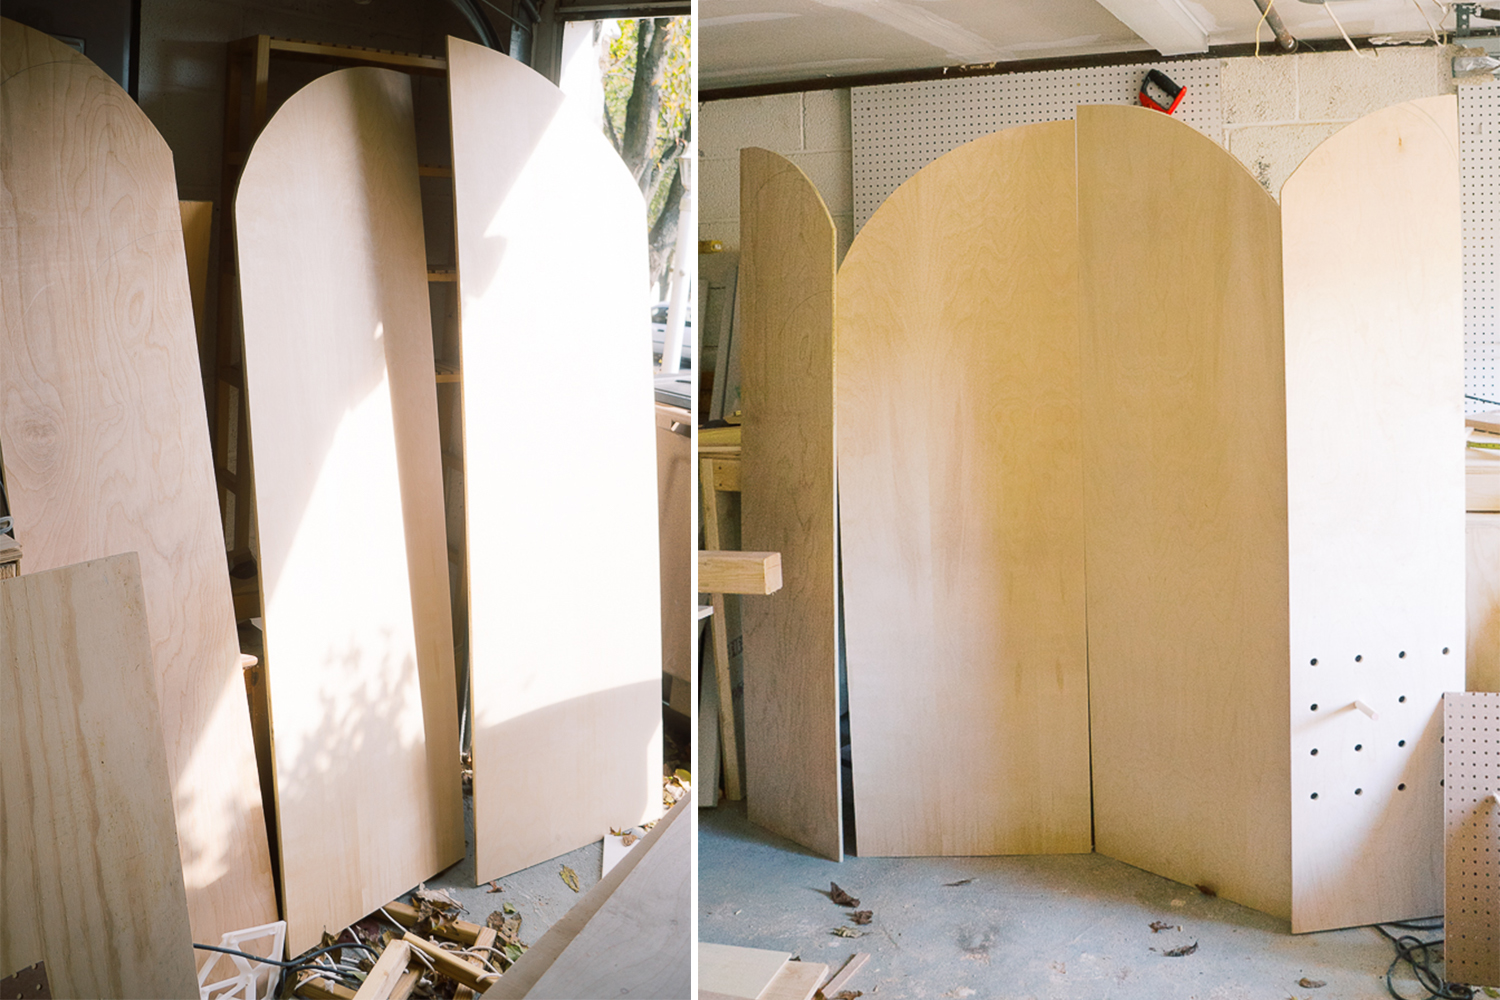
Suggested plywood cuts diagram
I drew for you a plywood cuts diagram so you can show it to your home improvement staff and ask them to cut it for you.
STEP 3
Draw your arches on plywood. Use a piece of rope to make a half-circle. I already had an experience with it when I painted a mural in my previous office. You can find it here.
To make an arch a bit less rounded, make a wider circle, even if it means not getting to 90-degree on the other side.
I pretty much eyeballed it.
STEP 4
Using a jigsaw, carefully cut the arches. It might splinter. To avoid it, use a sacrificial board on top. I didn't care about the back of my backdrop, so I just flipped it to the right side. Talking about perfectionism here, haha
STEP 5
When arches are ready, lay them next to each other to get the overall feel. And then decide where you want the holes to go.
Initially, I planned to make it all with holes, but I realized I'm not fond of that look very much when I started drilling holes. So I left 4 rows in the bottom and decided to skip some rows and continue on the top. I also decided to leave the middle ones blank for now, and if I want to add holes later, I can always go back to it.

How to make pegboard holes
If you have a regular pegboard, it will make your life so much easier! You wouldn't have to measure every side to get to the perfect positioning of the holes. Just put a pegboard on top of the arch and trace where you want holes to be. I'm sure there are other ways to trace the holes' perfect placement, but this worked for me.
I skipped 3 holes both horizontally and vertically for my spacing. It would be best if you also accounted that pegboard holes are smaller in diameter than your dowels.
Go ahead and draw the placement of holes on your arches.
When you are done, take something sharp and poke a center, so when you start drilling, the drill bit doesn't wander off.
Place a sacrificial board underneath before you start drilling. It will save your table and prevent splintering on the other side.
When you decide exactly where holes will be, go for it! Try to go as straight as possible under a 90-degree angle. The drill press will be perfect for the job if you have one.
At first, I was planning to make holes throughout all the panels. But during the process, I realized that I like fewer holes and decided to leave the middle empty.
STEP 7
When holes are ready, give it nice sand to your DIY wooden pegboard room divider. Use Dremel to sand inside the holes, even though mine were in a decent shape.
PIN IT TO MAKE FOR YOUR HOME LATER>>>

Tips on how to attach panels
Time to attach it. I wanted to add cute little detail and make leather attachments instead of the standard hinges. I found a leather belt at a thrift store, cut it to pieces, and used screws to attach it to the backdrop. In the end, the backdrop was flimsy and didn't want to stand on its own.
I also decided to leave middle arches not connected to be standing next to each other and add some depth to the DIY wooden pegboard room divider. Remember, I'm planning to use it as a backdrop for my videos 🙂
All that being said, if I attached all 4 panels, I wouldn't face the problem of them being unstable. But here we were, and to fix the problem, I used regular hinges to attach these arches.
How to make shelves for a pegboard
To make shelves, you'll need ¾" dowels and a 1x4" board.
Cut the dowels @ 4.5" so they are about an inch longer than a shelf.
Put dowels into the holes and add a board on the top. Use a brad nailer and wood glue to attach dowels to the board.
If you make it on the board, it will save you time and ensure the right measurements.

Painting - the fun part!
I used 5 color samples from Behr, and the names of the colors are:
- Radiance
- Cream de caramel
- Fresh croissant
- Cockleshell
- A mix of "Kalahari sunset" and "creme de caramel."
While drawing the arches, I wanted to make them the same as I cut them, but it didn't work since I eyeballed it when I made the cuts. It's ok, though. I think it still looks super cool ;D
Use a high-quality brush. I used a cheap brush at first and then switched to Purdy. I could totally see the difference between the two.
Enjoy your beautiful room divider/ backdrop for Zoom/ art installation for a wedding ahha, One thing and so many purposes!
Ways to make it free standing
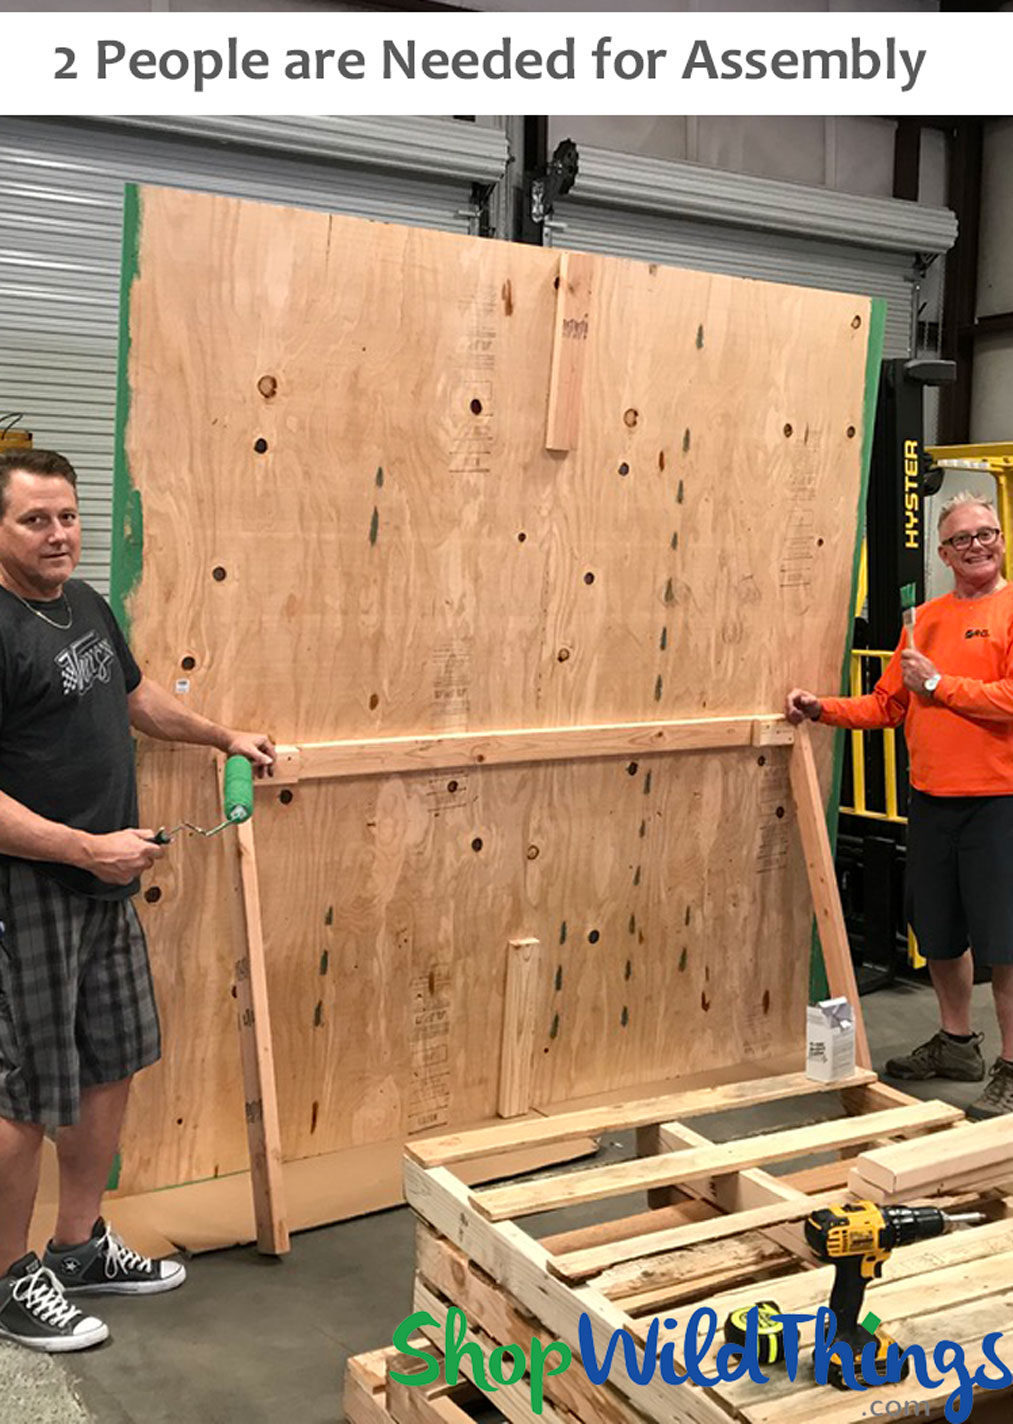
Since I have two sides attached to each other when they fold they can stand by themselves on the floor. If you decide to modify it and use it as a set of a few straight panels, you might need support. So let me show you how to make this room divider into a free-standing Chiara backdrop.
Shop wild things have very clear instructions on how to create a standing backdrop.

If you like this backdrop, we thought you might also like
How I made full over full bunk beds, you can also watch me here making it

How to upgrade your IKEA Alex drawer
How to make a ladder shelf for $25, or you can watch me making it
xoxo,
April


Ocie Ryen says
Heya! I understand this is sort of off-topic but I had to ask. Does running a well-established website such as yours require a large amount of work? I am completely new to blogging however I do write in my diary on a daily basis. I'd like to start a blog so I will be able to share my own experience and views online. Please let me know if you have any suggestions or tips for new aspiring bloggers. Thankyou!
April says
hi Ocie! First, thank you so much for visiting my blog. I’m not going to lie, it requires a lot of consistency. But it also depends on the niche. With DIY blog I have to actuallly make something before making a post so it takes more effort. If you write in your diary every day and going to speak about topics that don’t require the product to be made then I think it won’t take for you as much effort. Good luck and wish you all the best. You can always email me if you have more questions