
Since my kids were little they never really had a playroom. When we lived in a New York apartment our living room was my daughter's playroom. Even when we moved to Connecticut, she still had a play area in the living room. It wasn't ideal, but we made it work. This kid's playroom makeover is so long overdue.
Recently I built my kids a bunk bed, which made it possible for us to move things around and as a result, I've got an office/studio space and kids got a playroom. The playroom was so disorganized and disinviting for so long that I decided to do some changes and do a kid's playroom makeover.
The only condition I have for this room is to be budget-friendly. Basically, I want to spend as little as possible on this makeover. This means I'll thrift some furniture, make decor myself and will get creative. I'll give you a breakdown of all the costs when I'm done.
RELATED POSTS:
How to make an arched bookshelf
Before

We used to have a Montessori-inspired toy shelf before. This is in fact my first built ever, you can read about it here. I love the Montessori approach and find it extremely beneficial for kids, but it also requires a lot of time from a parent to be involved. Toy rotation is beautiful and the concept of having toys on trays is also inspiring. We tried it, it worked for us for a while till it didn't anymore. Some changes clearly had to be made.
Our books used to be in the kid's bedroom on the ledger wall-mounted shelves, which I also made a few years back 😀
I stored most of the toys that are not in use in plastic containers in the closet, but with this room makeover I want to make space for all the toys, all the book,s etc so it's contained in one room.
That being said, let's talk about must-haves for this room.
Must-haves for my kid's playroom makeover
- a lot of storage
- bright happy colors
- a nook for reading
- Art display
Inspiration for a design
I saw this image online and thought that it would be fun to incorporate that 70s-80s retro vibe into the kid's playroom space. Not sure they'll appreciate it as much as I do, but hey, I'm enjoying the process of it coming together!
I like the "Good vibes only" vibe and planning to incorporate it into the playroom.
It's been so long in the brewing that I really felt I'll be done with it super quickly. Well, not so fast! Since I decided to make most of the furniture myself, thrift some of the pieces, and repurpose what we already had, the process of this makeover taking longer than I expected. Ugh! It's ok though! It's about the journey, not the destination, right?
Plans
One of the biggest decisions I need to make is whether I want to make a mural or not. This room was previously my office and there is a mural on the wall that I'll have to cover up! That's exciting! This room will be like a blank canvas for me.
I'll leave it open till I gather all the furniture and see how I feel about the mural then!
When I asked the kids what they want in the room, the only request from my 4-year-old was to have "a bed" haha (I showed her the nugget play couch before and she clearly remembered). She also asked for a pink table! Well, I'll do my best but can't promise anything, kid!
I want this room to look like a furnished room, not like a kid's playroom. Does it make sense? But at the same time to be playful and transmit a retro vibe!
Haha, maybe I'm asking for too much! Let's see!
Color palette
I want this room to feel happy and bright but retro at the same time. It took me a while to decide on a perfect paint color for walls but I found it! It's a "Whisper white" by Behr.
I also absolutely love the combination of Dandelion wish, Vanilla paste, Rasberry smoothie, and monologue. It gives me a happy vibe while still staying girly and retro. I chose to have yellow Dandelion wish as the first main color and Rasberry smoothie for small accents. I might actually paint the tabletop trim for the play table with it as well! I recently thrifted a Nilo lego tabletop from the Facebook marketplace for free! And so excited to bring it back to life!
Mood board for our kid's playroom
I created an inspirational mood board for the kid's playroom in retro style.
I'll be honest with you, I made it mid-progress when I already built a bookshelf and made an IKEA toy storage hack.
I think the posters will really make this place feel retro. See for yourself!
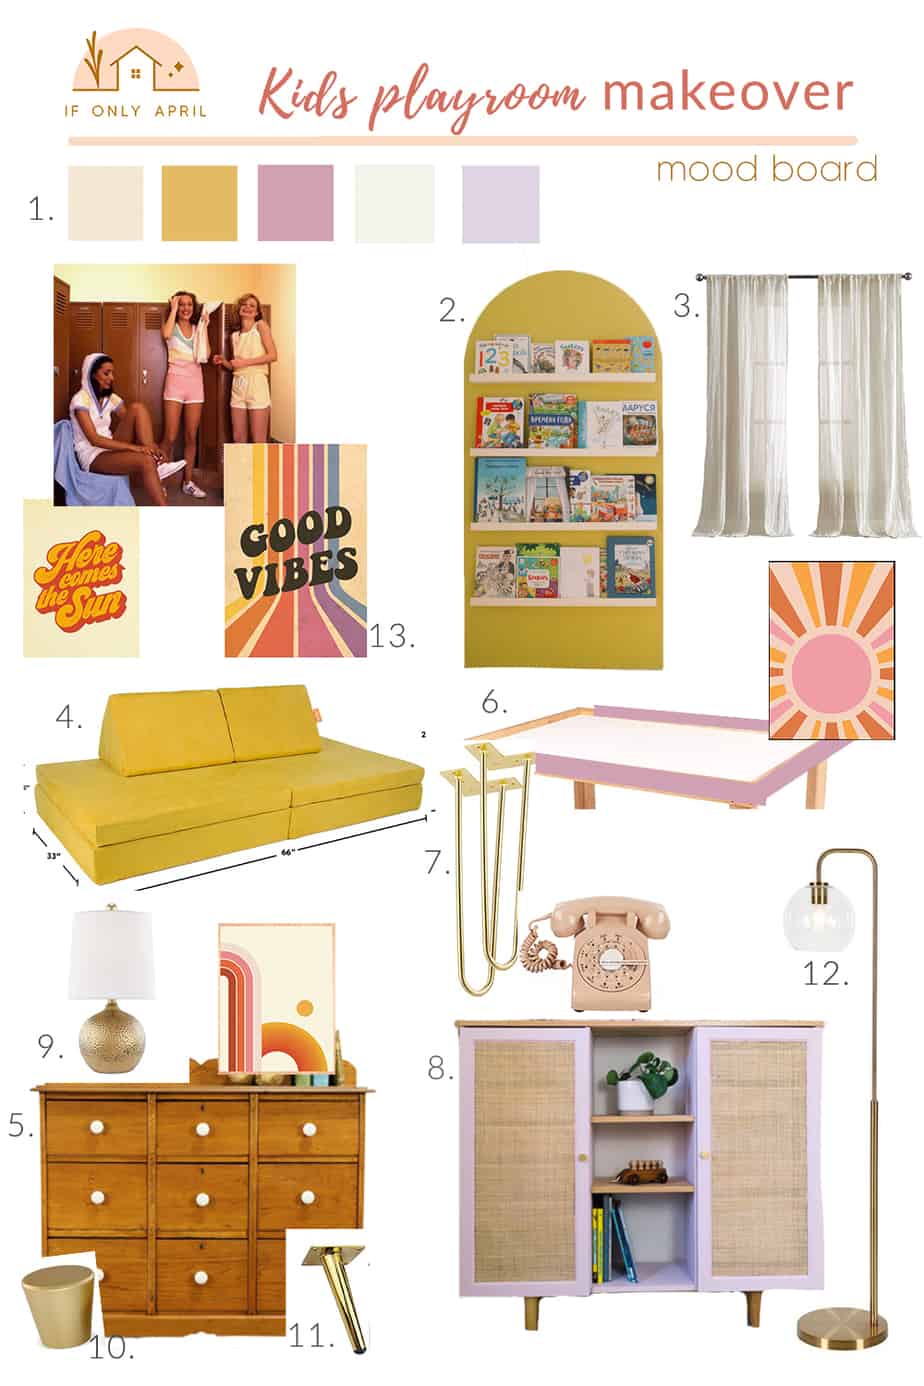
Sources:
- Behr paint colors. Read about the exact color above.
- Arched bookshelf. I haven't seen anything like this on the market, but you can make it yourself 🙂
- Solid Semi-Sheer Curtain Panels. I love the color. It seems like a perfect fit.
- The Nugget play couch. I ordered it a few weeks ago so I guess it will take a while till we get it.
- 9-drawer dresser. Since I thrifted mine and gave it a makeover I found a similar one for you.
- Nilo Lego table. I have only a tabletop and planning to add Harpin legs to it.
- Harpin legs. They elevate any piece of furniture and add a modern feel.
- IKEA toy storage hack. Read all the details on how to make the same one here.
- Heather table lamp. Absolutely love bronze textured base.
- Brass cabinet door knobs. I added those for a dresser makeover.
- Mid-century tapered legs. I also added them to a dresser to make it look more modern.
- Harrison Arc Bronze floor lamp. Absolutely love the look of this lamp, especially the arch.
- Good vibes only print. Retro prints will be a final touch to add a retro vibe.
What do you think about this mood board for a kid's playroom makeover? I've been thinking about it for so long that would definitely appreciate your comments and your ideas 😉
xoxo,
April

Leave a Reply