

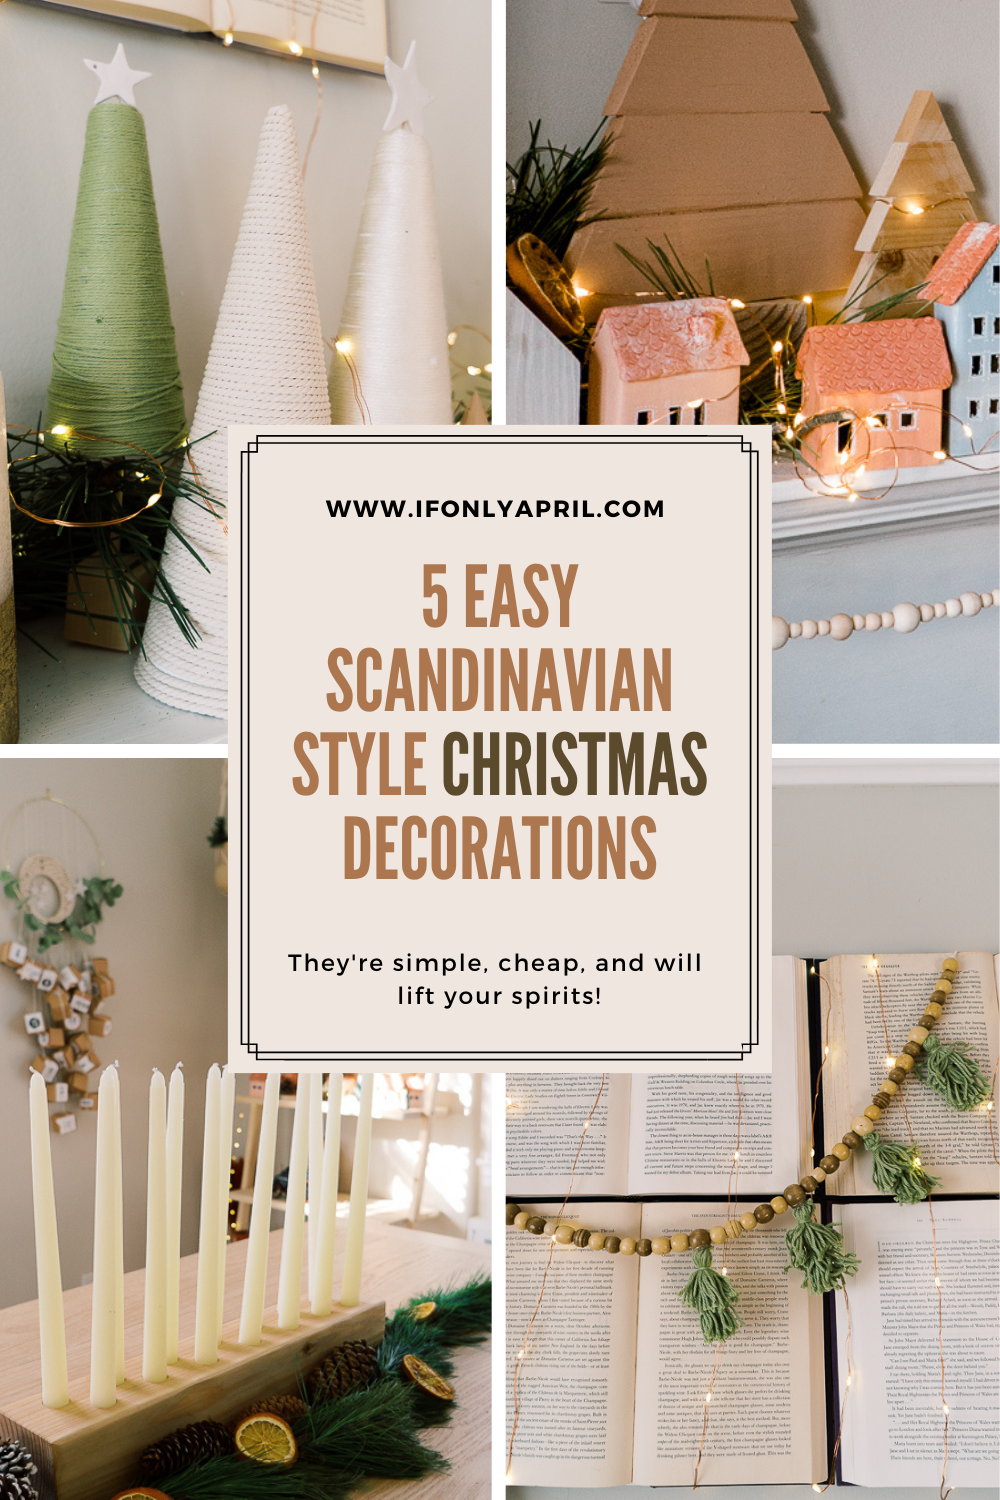
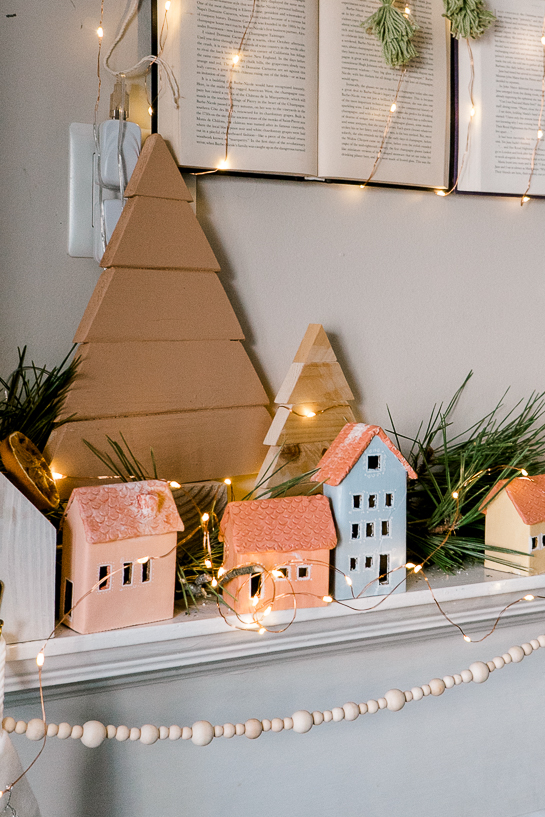
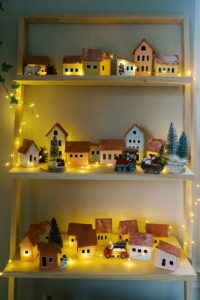
In Christmas decor style, I tend to turn to simplicity and nature. Recently I found out that it's a definition of Scandinavian decor. This is probably a very Americanized version of Scandinavian decor, so let's call it kind of Scandinavian style Christmas decorations, but I really enjoyed making these decorations and would like to show you how easy it is to make Christmas decorations instead of buying tons of decor every year. I decorated my mantel in a bit of color this year and still obsessed with this cardboard Christmas village that I made as an advent calendar for my kids. You can find a tutorial on my blog here or watch me make it here.
If you prefer a video version of these tutorials, you can watch it here
Subscribe to get notifications!

Beads garland

The bead garlands are quite trendy now, but I can't justify the price tag for it. A simple 4 ft garland can easily go for $20. Say what? And what's the point to pay so much money if you can easily make one for yourself in a matter of 15 minutes? So here are few tips on how to make this process painless and efficient. I got my beads last minute from Amazon, but if you plan ahead, you can easily find the same product cheaper on AliExpress. The delivery time might take a while, but it is the same as sold on Amazon, just costs way less.
Cost: $5 for 6ft
Time: 20 mins
Level: Beginner
Materials:
- Beads
- Cotton rope
- Yarn for Christmas trees (optional)
Instructions:
- Make a loop on a thread and start putting beads on it. Pro tip: to make it easier to put beads on a thread, take a small piece of floral wire, fold it in half and use it as a "needle" to get the thread through the bead. It's quite a simple process. Try to keep the pattern the same. I made mine with 4 different sizes of beads. They come in a box of 6 sizes. I thought that 6,8 and 10 mm were the perfect ones for it.
- You can add tassel Christmas trees to it. I've already shown how to make a perfect tassel when I had to make a hundred of them for the FELA-inspired chandelier. You can read the tutorial here or watch it here. I made mine about 2" long and used a chip from Sherwin-Williams paint. When tassels are ready, attach two to them together. I used a hot glue gun for it. When you get your tassel to resemble a Christmas tree, glue the top to the bead.
If you'd prefer to buy:
You can find a lot of them on Etsy, all very beautiful! I like this one!!
PIN IT TO MAKE LATER
Scandinavian style Christmas decorations >>>>>>>
Wooden Christmas trees from scrap wood
Choose the width of your scrap wood. I made two of these wooden Christmas trees. One with 1x2"s that I had left from the old baby gym and another one with 1x3" that I had leftover from my disassembled Montessori floor bed that I replaced with bunk beds for my girls. Talking about zero wood going to waste 😀 Especially, with the outrageous prices for wood these days.
Cost: $1
Time: 1 hour
Level: beginner
Materials:
- 1x2" or any other scrap wood you have
- wood glue
Instructions:
- Cut the wood at a 30-degree angle. I suggest going one by one, starting from the top. In this scenario, the tree will look perfectly even and you'll save yourself a headache of calculating each piece. That being said, I didn't bother to measure the exact length of each plank. When you cut the top triangle, place the next board below, and measure where you'd like to cut. I wanted to have some sort of shape, not just straight trees, so I measured ¼" to come out from each side.
- Go ahead and make the tree as tall as you like. I used 5 lines.
- When all of the wood is cut, you'd need to glue pieces together. Add some glue to both sides. Clamps would be perfect for it, but I couldn't place mine so I Just put a heavy board over it and topped it up with the 20lb dumbbell 😉
- I wanted to add a "leg' to my smaller one but then felt that it's cute on its own.
- Go ahead and finish as you like. I used stain on one and paint on another.
If you prefer to buy:
I like these Christmas trees. This Christmas season, if you are planning to buy decorations, I encourage you to buy them from small shops to help small businesses. So Etsy is a perfect place to shop for your favorite Christmas decorations.
Christmas trees from yarn or macrame rope

These little cute Christmas trees from yarn or cotton rope are all over the place. They can go easily for $20 a piece in store and my DIY soul just can't buy it, knowing how easy they are to make! So here is a quick tutorial on how to make cute Christmas trees from yarn yourself!
Cost: $2 each
Time: 15 mins
Level: beginner
Materials:
- Yarn or macrame cotton rope
- Foam cone or poster board (or get it in the Dollar store)
- 8" craft dowels (I got mine from the dollar store)
- 1x1" wooden block or just cut a piece from any wood as I did.
- Hot glue gun
Instructions:
You can take a foam cone or make your own from the poster board. I made two versions and here to show you how.
- Take a foam cone and your yarn. With a hot glue gun, glue the thread on the top. Start wrapping your thread from the top to the bottom around the cone and secure the end on the bottom with a hot glue gun.
- You can add a stick to it and a wooden cube to make a base.
- Take a piece of poster board. Draw a half-circle and cut it out. Fold it together to let the sides meet and attach with a hot glue gun. Repeat the same process of wrapping the thread around.
If you prefer to buy:
I adore these cute little trees and there are plenty of other options on Etsy!
Taper Candle centerpiece
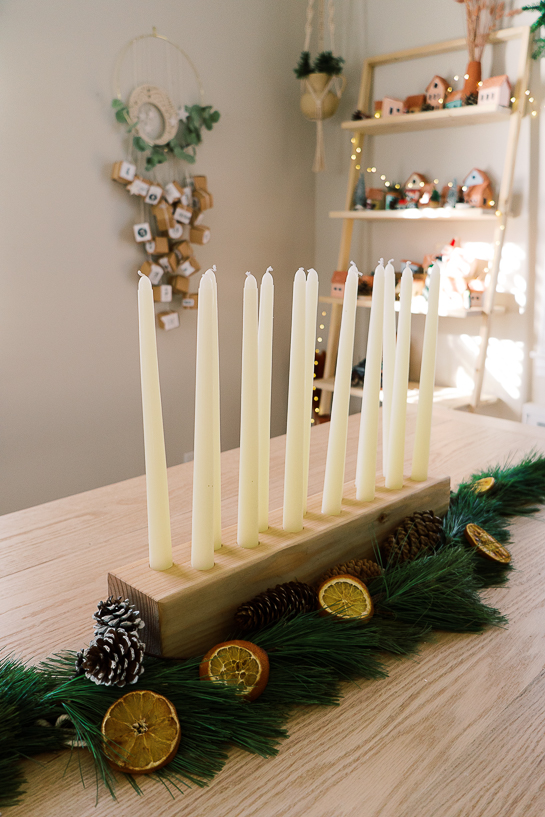
I've seen these around, but as usual, couldn't justify the price. So I went ahead and made my own and I absolutely love it! The only thing I would've changed is to make it a bit longer. But oh well, it's such an easy project, I'll probably make another one when I get my drill press 😉 A drill press would make the job waaay easier and more precise.
Cost: $2 + cost of candles
Time: 2-3 hours
Level: beginner
Materials:
- 4x4"x20"
- Taper candles
- ⅞" drill bit (or the size of your candles)
- Stain (optional)
- Dremel Lite
Instructions:

- Cut 4x4 to length. I measured how many candles I have (14) and where I'd like to place them.
- Sand it smoothly. It might take some time since 4x4" usually don't come in a nice shape.
- Measure the diameter of taper candles on the bottom. Mine was ⅞". Place taper candles once again and see what is the perfect place for each. Mark their location.
- Take the drill bit and put a tape on it to stop at the depth you'd want to go.
- Carefully, start drilling at a perfect 90-degree angle, make sure that the bit doesn't wander off the course. That's where the drill press could come in handy if you have it. Ptsss... I'm getting mine for Christmas 😄
- When the holes are ready, sand them down. I used Dremel lite to smooth the holes inside.
- That's it, it's super simple yet beautiful. Finish it as you like. I used the Weathered oak stain but thinking to stain in a bit darker since it blends in with the dining table a bit.
If you prefer to buy:
Here is a version that you can buy. It's so cute! I love it!
Natural garland from evergreen

I can't say that I'm strictly against faux garlands, but the fact that you need to store all these decorations all year long kind of makes me slow down when I'm purchasing a new addition. That's why I think it's so much better to make a natural garland from a fallen evergreen branch, use it and recycle after, instead of hold on to a faux one. My opinion might change in the future, but this year I decided to give it a go. My friend got me this evergreen branch that she found on the farm laying right next to their car. Well, challenge excepted! And it was so easy to make this natural garland, I don't see any reason to go back! So let me show you how to make a natural garland! It is a perfect addition to Scandinavian style Christmas decorations.
Cost: free
Time: 30 mins
Level: beginner
Materials:
- evergreen (it's better if you have different kinds)
- floral wire
- floral wire cutters
- rope
Instructions:
- Cut small branches and put them together in a "bouquet"
- Tightly wrap it with floral wire.
- When you have a bunch of them, take a piece of rope (the length of how long you want your garland to be). Using floral wire, start attaching "bouquets" to the rope. Flip the rope after every "bouquet" so it's even from both sides.
- Make it as long as you need.
If you prefer to buy:
This garland is so gorgeous and that's what I had in mind when I started making my own. I love how they mixed a different kind of evergreen.
As you can see, I love Scandinavian style Christmas decorations, what's your favorite style for Christmas? Leave me a comment below, I'd love to know!
xoxo,
April
WE THOUGHT YOU MIGHT ALSO LIKE:
Advent calendar with macrame crescent moon

Wine glass Christmas candle holders


An advent calendar for adults ideas


Leave a Reply